Hi there, fellow quilters!
SEE A NEW PATTERN HERE
I’m Julie, and I’m absolutely thrilled to take you on a creative journey today as we dive into the vibrant world of quilting with the stunning Dresden Dreaming pattern.
This quilt holds a nostalgic place in my heart, not just for its captivating design but for the stories and experiences it unfolds.
Let me transport you back a few years when I found myself enchanted by the rich artistry of Dresden plates during a trip to Europe.
As I wandered through charming shops, I discovered not just beautiful porcelain but inspiration for my quilting passion.
As someone who finds joy in fabric, colors, and the transformative power of crafting, creating something like Dresden Dreaming fills me with excitement.
This quilt is an homage to my travels and all the whimsical designs I saw along the way.
Plus, there’s something so satisfying about piecing together the circular blocks, reminiscent of the picturesque landscapes I encountered.
Are you ready to unleash your creativity with the Dresden Dreaming pattern?
Let’s jump in and stitch together beautiful memories that will last a lifetime!
Exploring the Rich History of Dresden Plates
The Dresden Dreaming quilt pattern draws from a beautiful tradition, steeped in history.
Originally inspired by the exquisite china from Dresden and Meissen, these designs were popularized during the 1920s and 30s.
The intricate curvature of the plates reflects an era of elegance and craftsmanship that resonates with those who appreciate the finer things in life, much like we do in our quilting adventures!
Honoring these roots, I wanted to put a modern spin on Dresden Dreaming.
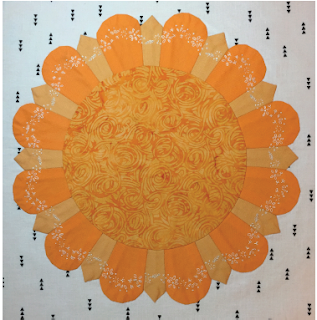
With a vibrant palette of oranges reminiscent of the stunning sunsets I watched during my travels, I’ve integrated varied wedge shapes into the design.
This blend of traditional vibes with contemporary flair truly embodies the essence of this quilt – a lovely mix of nostalgia and fresh perspectives!
The Significance of Fabrics and Colors
When you set out to create your own Dresden Dreaming quilt, the fabric you choose can speak volumes about your personal style.
I recommend incorporating a delightful mix of light and medium oranges, a striking black and white print for contrast, and a playful touch of textures.
These selections will bring the design to life while allowing for endless creative possibilities!
The best part of working with fabric is how it enables us to express our individual stories.
Each piece you select contributes to the overall narrative of your quilt, transforming mere textiles into cherished keepsakes.
As you stitch, remember that every fabric holds its own story, and together they create something extraordinary!
Materials You’ll Need
- 1 Fat Quarter of a black and white print for the background
- 1/8 yard medium orange solid fabric for A (the round-topped Dresden wedges)
- 1/8 yard light orange solid fabric for B (the point-topped Dresden wedges)
- 10” square medium orange print fabric for C (the block center)
- Coverstock Paper (between letter paper and cardstock)
- Fons & Porter Refillable Fabric Glue Stick
- Aurifil Mako 50wt 100% cotton thread in coordinating colors
- Aurifil 100% cotton white embroidery floss
- Clover Black Gold Appliqué needles in size 10
- Mary Ellen’s Best Press
- Water Soluble Stitch Stabilizer
Prepping for Success
Before we dive into stitching, here are some essential tips to set you up for success.
First, ensure your workspace is clean and organized.
A welcoming environment fosters creativity!
Plus, keep your tools handy, including scissors, a rotary cutter, and a good mat.
Next, take the time to pre-wash your fabrics.
This step prevents any surprises down the line – like fabric shrinkage!
By prepping your materials, you’re establishing a solid foundation for the journey with your Dresden Dreaming quilt.
It’s about setting yourself up to have fun!
Step-by-Step Instructions:
Now, here comes the exciting part – the step-by-step instructions to create your very own Dresden Dreaming quilt!
Make sure to grab your pattern linked below; you’ll find all the details you need.
Follow the image guide below as we piece together this beautiful quilt block!
Full Pattern: Click Here
Pro Tips for Finishing Touches
Once you’ve stitched your blocks together, you might find yourself mesmerized by the wonderful curves and vibrant colors of your Dresden Dreaming quilt.
Make sure to take your time while pressing the seams to ensure everything lays flat.
A well-pressed seam makes for better results when you join the blocks.
Also, don’t forget to trim any excess fabric after each step!
It’s the little details that count and help create sharp corners and perfect edges.
Celebrate your progress – each step is a visualization of your journey through the quilting world!
Mastering Advanced Techniques with the Dresden Dreaming Quilt
If you’re feeling adventurous, adding detailed embroidery onto your Dresden blocks can elevate your quilt to a whole new level!
Exploring French knots, lazy daisies, and stunning stitch details allows you to personalize your quilt.
Just be sure to have a good embroidery floss on hand for added texture.
You can also play with different quilting techniques!
Experimentation in quilting often leads to discovering new patterns and methods.
Whether you quilt in the ditch or opt for free motion quilting, these techniques will highlight the beauty of your finished Dresden Dreaming quilt!
Time to Celebrate!
As you lay the finishing touches on your Dresden Dreaming quilt, take a moment to reflect on all the dedication, creativity, and love that went into crafting your unique piece.
Every stitch tells a story, and your quilt will become a cherished part of your home for years to come!
I invite you to explore more articles on my blog packed with tips, tricks, and exciting adventures in sewing.
There’s a treasure trove of inspiration waiting for you!
Dive into your next quilting endeavor by exploring this link.
Happy quilting, friends!
Let the echoes of our creativity inspire each of you as you unfold the beauty of fabric artistry with your own Dresden Dreaming quilts!
I hope you enjoyed this journey, and I can’t wait to see the masterpieces you create.
Until next time, happy stitching!


