Welcome, quilting enthusiasts!
Today, we’re diving into a delightful project that will challenge your skills and result in a beautiful quilt.
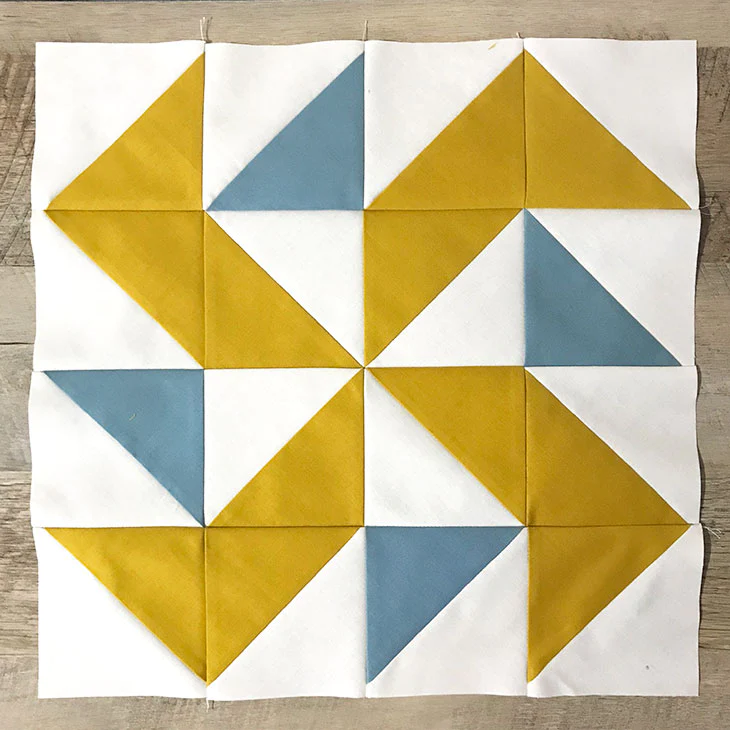
We’re creating the Yankee Puzzle Block, part of the Farmhouse Sampler quilt.
This tutorial will guide you through each step, ensuring you have a clear understanding of the process.
Let’s get started!
What is the Yankee Puzzle Block?
The Yankee Puzzle Block is the first block in our Farmhouse Sampler quilt-along. It’s a classic quilt block that offers a great opportunity to play with color and pattern.
The block is made up of half-square triangles arranged in a specific pattern to create a dynamic and visually appealing design.
Materials Needed
For this project, you’ll need:
- Four (4) 7″ squares from your background fabric (Fabric A)
- Three (3) 7″ squares from Fabric B
- One (1) 7″ square from Fabric C
- A hot iron (no steam)
- A rotary cutter
- A square ruler
Step-by-Step Instructions
Step 1: Prepare Your Fabric
Press your blocks with a hot iron to get rid of creases and wrinkles. Remember, you’re pressing your blocks, not dragging the iron back and forth like you do when you iron clothes.
Dragging causes distortion, while pressing keeps your blocks straight and wave-free.
Step 2: Pair and Stitch
Place your 4 “A” blocks right sides together (RST) with your 3 “B” and 1 “C” block, lining up your outer edges. Sew a 1/4″ seam around the perimeter of each block.
For greater accuracy, draw the lines with a pencil on the wrong side of your block before taking it to the sewing machine and simply stitch over those lines.
Step 3: Cut and Press
With your rotary cutter, cut diagonally through the corners of your blocks. Each square will yield 4 half-square triangles (HSTs).
Be careful not to move your square between cuts. Press your blocks while still closed and then again after opening them, pressing seams to the dark side.
Step 4: Trim HSTs
With a square ruler, trim blocks down to 4-1/4″. Align the diagonal (45°) line on your ruler with the diagonal line created by your 2 triangles. Trim the top and right sides with your rotary cutter. Repeat this for all 16 HSTs.
Step 5: Layout and Chain Piece
With your 16 HSTs, lay out your quilt block. Following your layout, chain-piece blocks together in pairs, using a 1/4″ seam allowance. Snip threads between your blocks.
Step 6: Press and Layout Again
Press your blocks, with seams to one side. Alternate pressing your seams to the right and left on your rows. Lay out your blocks again and piece the block pairs RST to make rows.
Step 7: Sew Rows Together
Sew the first and second rows RST, followed by the third and fourth. With RST, piece the top and bottom halves together using a 1/4″ seam allowance.
Step 8: Final Press
Press your seams to one side and give your final block a good press from the front. Your final, unfinished block should measure about 15-1/2″ square. Once you piece your entire quilt top, each block will measure 15″ finished.
Full Pattern: Click Here
Congratulations! You’ve just completed the Yankee Puzzle Block. Remember, the beauty of quilting lies in the journey, not just the destination. Each stitch you make is a testament to your creativity and dedication. Keep going, and don’t forget to share your progress with us on Instagram by tagging your blocks with #FarmhouseSamplerQuilt. Happy quilting!


