Hey there, friends!
I’m Julie, and today I’m bursting with excitement to share my latest adventure in the quilting world—the Personalize It!
Quilt.
Last week, while sifting through my fabric stash, I stumbled upon some beautiful solid blues and whites that just begged to be stitched together.
I knew then that it was time to create a quilt that could not only add charm to my space but also let me express my personality through colors and designs.
What I love most about quilting is the journey of turning simple fabrics into something meaningful, and the Personalize It!
Quilt is no exception!
As I started cutting away my fabric, I couldn’t help but think about the versatility of the Personalize It!
Quilt.
Each section of this project allows for personalization, whether through unique colors or meaningful shapes, making it a fantastic way to connect with my creativity.
There’s something thrilling about crafting a quilt that feels uniquely mine.
So let’s dive into the world of stitches, fabrics, and endless creativity with the Personalize It!
Quilt!
Exploration Through Sewn Patterns
The Personalize It!
Quilt isn’t just any standard quilt.
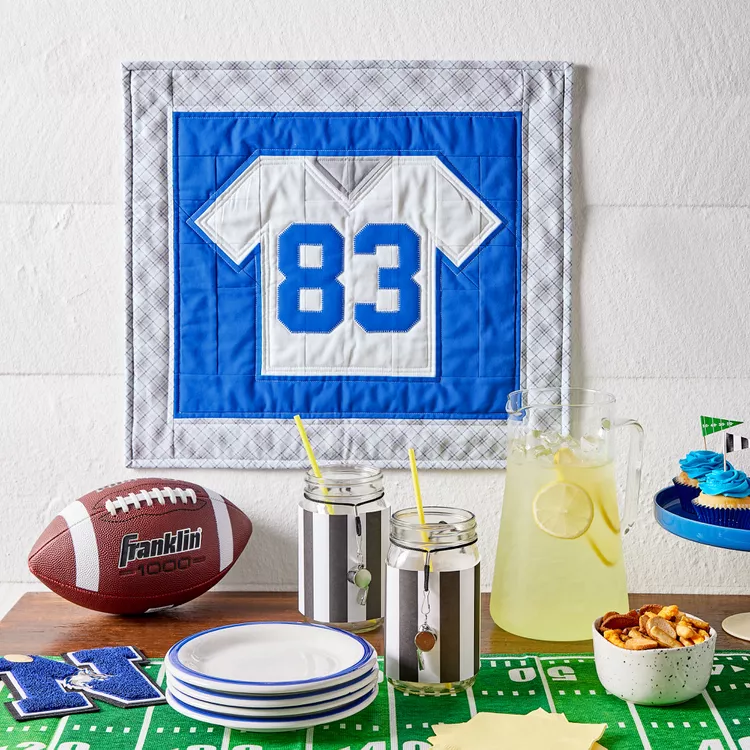
Inspired by scrubs—an unexpected muse for a quilt!—this project showcases how we can blend practicality with artistic flair.
The pattern allows for incorporating playful appliqués that let your personality shine through or the flexibility to just keep it classic.
Remember, whether you want a vibrant finish or a more subdued look, the quilt will adapt to your vision.
While working on the Personalize It!
Quilt, I found myself continually discovering the relevance of choosing the right elements, like colors and textures.
This exploration becomes a form of creative expression where each piece tells a story, making it a joy to quilt it all together.
Now, let’s talk about the specifics that can take your quilt game to the next level!
Techniques & Inspirations
When creating the Personalize It!
Quilt, it’s essential to utilize layering techniques effectively.
You’ll want to ensure that your appliqués are secure and look professional.
I recommend fusing them to your quilt top following manufacturer’s guidelines, which achieve a crisp, clean finish.
Trust me, taking this extra time will make all the difference!
Additionally, be bold with your choices!
The numeric appliqués on the Personalize It!
Quilt offer a fantastic opportunity for customization.
Whether you want to commemorate a special date or just add a fun twist with playful numbers, it’s entirely up to you.
Embrace that artistic freedom!
Materials
- 33/88 yard solid white fabric (block)
- 33/88 yard solid blue fabric (block and appliqués)
- Scrap of solid gray fabric (block)
- 11/22 yard gray plaid fabric (border, binding)
- 33/44 yard backing fabric
- 25×27” batting
Prep Work That Pays Off
Before diving into the sewing spree, make sure to cut your fabrics in the right order.
I can’t stress enough how this prep work saves time and helps you align your vision for the Personalize It!
Quilt.
Furthermore, it diminishes the possibility of errors later on that may need time-consuming fixes!
Consider laying out your pieces and sketching a quick diagram if that helps visualize the layout.
Using fusible web is also a game-changer when it comes to applying those cute numbers or shapes onto the quilt.
It gives more structure and a neat finish, which makes my heart sing each time I add a piece to my quilt top!
Step-by-Step Instructions:
Following these steps will help you create your masterpiece!
Below, you’ll find comprehensive instructions to guide you through the process, along with a complete pattern link at the end for the Personalize It!
Quilt.
Remember, as you sew, take your time, and enjoy the process!
Full Pattern: Click Here
Additional Tips for Success
As you work through the Personalize It!
Quilt, one tip I swear by is to keep your work area organized.
Loose fabric pieces can hinder your creativity and progress.
Also, don’t rush through sewing your seams!
Taking your time will ensure that everything lines up beautifully, creating that polished look we all aim for.
An additional little trick I’ve learned is to press your seams open as you work.
This prevents bulk and creates a flatter quilt, which makes for easier quilting and better results!
Advanced Techniques to Elevate Your Quilt
If you’re looking to take the Personalize It!
Quilt to the next level, consider adding some free-motion quilting on top of your design!
This technique really allows you to showcase your personality, and there’s immense satisfaction in seeing those little quirks enhance your quilt.
I began incorporating free-motion elements into my quilts, and it was thrilling to watch each thread create a new layer of space and texture!
Another area to explore is patchwork borders; they can add a splash of fun!
Experimenting with various patterns can make the Personalize It!
Quilt even more striking.
Celebrate Your Quilting Journey
As you wrap up your Personalize It!
Quilt, take a moment to step back and admire your handiwork!
Every stitch represents your creativity, time, and passion.
Don’t forget to share your quilt with friends and family.
Let them witness this unique piece of art that reflects who you are!
And hey, if you’re hungry for more inspirations, you’re in luck!
There’s a treasure trove of other articles on this blog waiting to ignite your creativity—like the fabulous one I’ve prepared, which you can check out through this magical link!
So go ahead, explore, and let your creative juices flow.
Remember, it’s all about having fun along the way!
In conclusion, I hope you enjoyed following along on my journey with the Personalize It!
Quilt.
It’s incredible to see how we can transform fabric into something cherished, and the joy that comes with it is priceless.
Happy quilting!


