I found this quilt idea tucked into a photo from my grandmother’s holiday table, right beside a picture of her glass candy dish and the soft glow of string lights.
When I sat down at my sewing table, I kept thinking about those striped ribbon-candy loops, and how they looked like little ribbons just before they settle.
That’s how this quilt began: with one curved strip and a wish to turn nostalgia into something you can wrap around and keep.
I stitched the arcs until they started to swirl into disc-like candy bursts, and the whole design suddenly felt like winter cheer you can touch.
By the time I layered the simple grid of solid blocks, the candy motion had a calm place to rest.
And when the final striped binding landed like a candy-cane edge, I knew I’d make a pattern you’d want to save for December quilts.
SEE A NEW PATTERN HEREA nostalgic look that feels like candy-table magic
Ribbon Candy Christmas has that vintage holiday charm where everything looks slightly sweet, slightly playful, and a little bit sentimental.
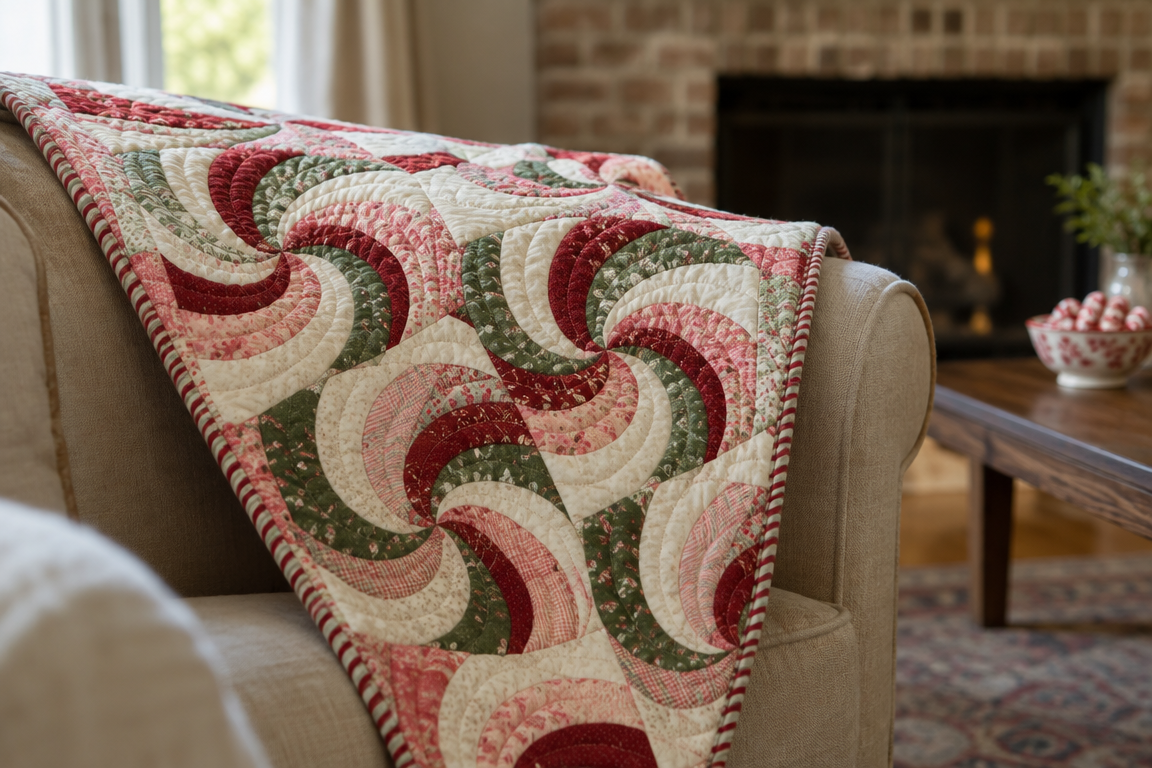
The curved strip-pieced arcs form ribbon-candy discs that echo the striped loop candy from a grandmother’s glass dish.
Surrounding them, a simple alternating grid of solid blocks keeps the eye moving without overwhelming the swirl.
I love how the quilt reads differently depending on the light—sometimes the discs look like stitched ornaments, and other times they feel like little bursts of ribbon candy.
How the curved arcs turn into swirly candy discs
The magic is in piecing accurate curves from strip segments, then arranging them so the arcs build a disc that looks like candy wrapped in motion.
I use a gentle approach to curve control—pressing with patience, easing the seam to match marks, and checking alignment before stitching the next section.
For the striped effect, I keep the fabric direction in mind so the color rhythm stays lively across each disc.
When your arcs start to click into place, you’ll see the ribbon-candy illusion form faster than you expect.
Vintage-leaning fabric play and the candy palette
This quilt shines because the prints are small-scale and classic, so the curves feel crisp instead of busy.
I mix cranberry red, wintergreen green, buttery cream, dusty rose, and soft peppermint pink, letting the solids give the pattern breathing room.
Even the binding feels like a finishing wink, using a striped look that frames the quilt like a candy-cane edge.
Materials you’ll need for Ribbon Candy Christmas
- Fat quarters or small cuts of vintage-style cotton prints: about 8–12 fat quarters (depending on layout and how many disc variations you want)
- Solid background fabric (buttery cream or similar): about 3 yards
- Cranberry red solid accents: about 1 yard (plus extra for optional backing piecing)
- Wintergreen solid accents: about 1/2 to 3/4 yard
- Dusty rose or peppermint pink solid accents: about 1/2 yard
- Backing fabric: about 5 1/2 yards
- Batting (queen-size or crib-size depending on your chosen pattern option): about 90 x 110 inches for a lap/throw, or per the pattern PDF
- Binding (striped bias binding): about 1 1/4 yards of fabric total, cut into bias strips for the finished binding width
In the downloadable pattern PDF, I include a fabric guide for the specific quilt size you choose, so you can shop confidently without guessing too much.
If you love scrappy variety, this design is forgiving—just keep a similar value range so the candy discs pop clearly against the background.
Prep your workspace before the first seam
Before I sew, I set up my cutting area with a clear ruler zone and a small stack of labeled cups for curve pieces so nothing gets mixed.
I also pre-wash if my fabrics need it, then press them smooth so curved seams behave beautifully.
For assembly, I keep my iron nearby and press seams in a consistent direction where the pattern tells you, flipping between curves to maintain alignment.
Most importantly, I take a quick breath and test one small section first, because that’s where you confirm your curve ease and seam allowance feel right.
Grab the Ribbon Candy Christmas downloadable pattern
The complete set of instructions for this quilt lives below the photo, including step-by-step construction for the curved arcs, disc assembly, and the alternating grid layout.
You can follow along while you look at the quilt image, and the pattern link includes the exact order of operations so the finished swirl stays crisp.
Tips for a cleaner finish (the little things matter)
To keep the curved pieces looking smooth, I clip carefully where the pattern seam lines are gentle, then press with steam and a light hand.
Before joining each disc to the grid, I do a quick dry fit on the design wall or tabletop so the edges land evenly.
When quilting the sandwich, I favor a design that lets the discs be the star—simple stipple or gentle curved quilting echoes without competing.
For binding, I take extra time to miter cleanly at corners and align the striped bias look so it feels like a candy ribbon frame.
Optional: an extra-advanced candy sparkle idea
If you want to stretch your skills, try adding free-motion quilting details that trace the swirl around each disc, echoing the ribbon-candy loops.
You can also add a thin border in a solid that matches your background, then let the binding stripes frame everything like a final candy-cane ribbon.
And if you’re a scrap mixer, choose two or three print families and keep the values consistent so the discs still read as crisp candy bursts.
Celebrate your finished Ribbon Candy Christmas
When I photographed this quilt folded over the arm of a vintage linen settee beside the fireplace, it felt like the whole room warmed up with it.
The chipped enamel bowl of ribbon candy and the blurred string lights in the background made the nostalgic story complete.
Now it’s your turn to bring that same cozy sweetness to your own home, and I can’t wait to see what fabric choices you make.
If you’re ready for another seasonal project, take a stroll through the Quilt Dreams blog for more holiday quilt patterns with heart and a little homemade magic.