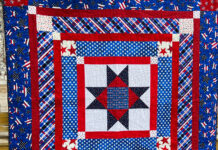
Growing up, quilting was always a part of my life. My grandmother, a master quilter, taught me the basics when I was just a child.
We’d spend hours together, sorting through colorful fabric scraps, choosing patterns, and slowly piecing together creations that were much more than just blankets—they were stories, woven from the fabric of our lives.
One project always stood out to me, a quilt we began one summer but never finished. Years later, as I embark on the Summer Solstice Quilt-A-Long, I’m reminded of those sunny days, the patience in my grandmother’s hands, and the unfinished stories waiting to be told.
A Patchwork of Memories
The Summer Solstice Quilt-A-Long is more than just a sewing project; it’s a journey through the past, present, and future. Each stitch connects me to memories of my grandmother, to the community of quilters participating in this event, and to the future generations who will cherish these quilts.
The “Building Blocks” stage is particularly special, as it represents the coming together of all our efforts over the past weeks, transforming individual pieces into a coherent, beautiful whole.
The Heart of the Summer Solstice
Embarking on the “Building Blocks” phase of the Summer Solstice Quilt-A-Long feels like piecing together a puzzle where each component holds a unique place. This stage is where the magic happens, where the individual elements we’ve been crafting—Flying Geese, Drunkard Path, and Half Square Triangles—come together to form something truly spectacular.

Full Pattern: Click Here
Materials Needed for Your Quilt Block
To start, ensure you have all the necessary materials gathered. For one block, you will need:
- 4 Flying Geese Units
- 4 Print Crust Drunkard Path Units
- 4 Background Squares for the Star
- 8 Half Square Triangle Units and 8 Background Squares for the Corners
- 8 Print Pie Drunkard Path Units, 8 additional Half Square Triangle Units for the Sides, and 4 additional Flying Geese Units
Preparing Your Pieces with Precision in Solstice Quilt
Before diving into the assembly, it’s crucial to organize your pieces into three piles: Star, Corner, and Sides. This pre-step is vital for ensuring that each part of the block is ready for assembly. Visualizing the final block can help in understanding how the fabrics and colors will interact, adding depth and beauty to your quilt.
Step-by-Step Instructions
-
- Building the Corners in Solstice Quilt:
- Lay out 2 Half Square Triangles (HSTs) and 2 Background Squares as illustrated in your guide.
- Stack 4 sets of these, preparing for chain stitching. Sew a 1/4″ seam along the edge of each set.
- After sewing, press the seam allowances towards the Background Squares to reduce bulk.
- Place the top row onto the bottom row with right sides facing each other, ensuring the center seams are perfectly aligned and pinned. Stitch along the pinned edge.
- Once stitched, clip your threads and press the seam allowances open.
- Building the Sides in Solstice Quilt:
- Arrange your pieces as follows: 4 HSTs (in 2 different fabrics), 2 Drunkard Path units, and 1 Flying Geese Unit.
- Begin by sewing the curves of your Drunkard Path units together. Pay careful attention to aligning and pinning the curves precisely.
- Chain stitch a 1/4″ seam along the edge of each set, clip threads, and press seams open.
- Proceed to attach the bottom row of pieces to the top row, focusing on aligning the center seam of the Flying Geese unit perfectly. Chain stitch a 1/4″ seam along the edges of all 12 pairings.
- Press all seams open, completing the side units.
- Building the Star:
- With the remaining pieces designated for the Star, lay them out to form the center of your block.
- Start by connecting the Drunkard Path blocks, ensuring curves are matched and pinned accurately.
- Sew a 1/4″ seam along the pinned edges, press the seams open, and then join the top and bottom rows with the center, using the same method.
- Once the center of the Star is assembled, attach the side units, using the pin trick to align points accurately.
- Assembling the Block in Solstice Quilt:
- Layout the 4 Corners, 4 Sides, and the Star unit according to the pattern.
- Begin by attaching the Side units to the Star center, using the pin trick to ensure all points align perfectly.
- Sew the Top and Bottom Rows to the Center Row, carefully aligning each seam and point for a crisp, clean finish.
- Press all seams open, completing your Summer Solstice Block.
Additional Tips:
- Precision is Key: When piecing your block, taking the time to align each component precisely will result in a more polished and professional-looking quilt block.
- Chain Stitching: Utilize chain stitching to save time and thread. This technique also helps keep pieces organized.
- The Pin Trick: Mastering the pin trick can significantly improve the alignment of points in your quilt blocks. This technique is especially useful when aligning multiple layers of fabric.
- Pressing vs. Ironing: Remember to press your seams rather than ironing them. Pressing helps to prevent distortion and keeps your quilt blocks flat and even.
- Enjoy the Process: While precision and technique are important, remember to enjoy the process of creating. Each block you complete is a step closer to a beautiful finished quilt.
Completing the “Building Blocks” phase of the Summer Solstice Quilt-A-Long is a significant milestone. As you press the last seam and step back to admire your work, take a moment to reflect on the journey thus far. Each block represents a combination of skill, patience, and creativity. The beauty of quilting is not just in the final product but in the stories each stitch tells. As we move forward, let’s continue to share our progress, support each other, and, most importantly, enjoy every stitch of this creative journey.

