Hey everyone!
It’s your girl, Julie, back again to share another delightful quilting adventure.
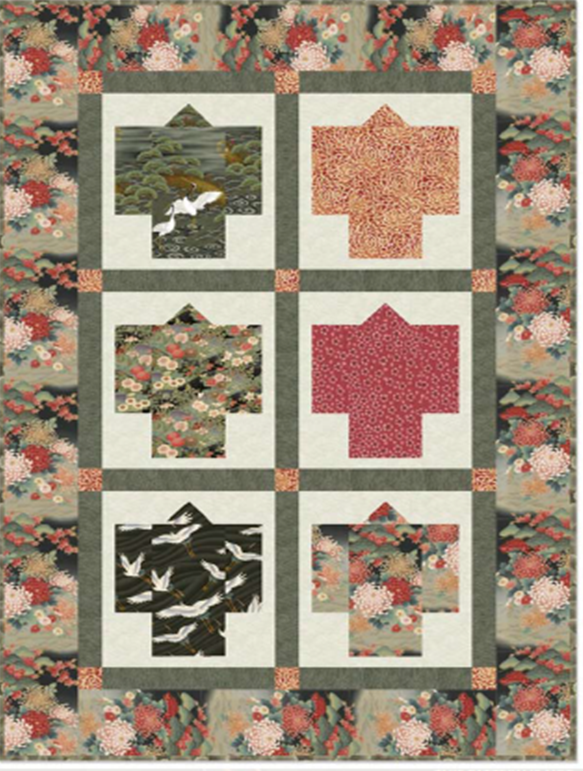
Recently, I decided to challenge myself and dive into the wonderful world of the Tranquility Quilt.
Just so you know, I’m no stranger to quilting, but this stunning design by Jason Yenter made me feel like a newbie all over again!
Filled with vibrant colors and intriguing patterns, I was completely hooked from the first moment I laid eyes on it.
As I started working on the Tranquility Quilt, I realized how much it reminded me of my journey through crafting.
Each piece, like a thought, shapes the narrative of the quilt.
There’s just something magical about watching those fussy cuts come together into a beautiful design!
Trust me, by the end of this blog post, you’ll be just as excited to start your own Tranquility Quilt.
Understanding the Beauty of Fussy Cutting
The beauty of the Tranquility Quilt lies not only in its colors but also in the technique used to execute it.
Many of you might have heard of fussy cutting; it’s when you cut your fabric pieces in a way that highlights specific motifs, ensuring they’re perfect for the design.
This method of crafting can truly elevate your quilt, making it uniquely yours.
Fussy cutting brings a sense of intimacy and attention to detail that really resonates with the spirit of the Tranquility Quilt.
I always recommend taking your time selecting which elements to highlight.
The end result will be worth the extra effort and will infuse your future quilt with love and personality.
Materials to Gather for Your Tranquility Quilt
- Fabric A (TRAN-05 Cream Background) – about 1 yard
- Fabric B (TRAN-02 Taupe Kimono) – 1-2 yards, depending on your fabric repeat
- Fabric C (TRAN-06 Red Kimono & Cornerstone) – 1-2 yards, depending on your fabric repeat
- Fabric D (TRAN-04 Taupe Kimono) – 1-2 yards, depending on your fabric repeat
- Fabric E (TRAN-07 Red Kimono) – 1-2 yards, depending on your fabric repeat
- Fabric F (TRAN-03 Taupe Kimono) – 1-2 yards, depending on your fabric repeat
- Fabric G (TRAN-01 Red Kimono & Outside Border) – varies depending on fabric repeat
- Fabric H (TRAN-05 Taupe Sashing) – 1 yard
- Fabric I (EMPR-17 Taupe Binding) – ¼ yard
- Backing Fabric – varies based on your quilt size
- Batting – at least 47″ x 69″ (or larger if you want a larger quilt)
Get Ready: Preparing for Your Tranquility Quilt Adventure
Before jumping into creating the Tranquility Quilt, I like to prep my workspace.
Ensure that all your materials are on-hand, not just what I listed above, including pins, scissors, and a rotary cutter.
A tidy workspace is known to fuel creativity and helps keep distractions at bay.
Additionally, I suggest giving your fabric a good press before beginning.
It makes a world of difference for cutting and sewing!
And guess what?
The smoother your fabric, the smoother the stitches.
So, let’s get everything ready for a beautiful quilting experience!
Step-by-Step Instructions:
Now the fun part begins!
Below you’ll find the detailed instructions for making the Tranquility Quilt.
Remember, patience is key, so take your time to follow along.
The full pattern can be accessed via the link provided after the image.
Let’s do this!
Full Pattern: Click Here
Additional Tips for Success
As you embark on your Tranquility Quilt journey, keep these tips in mind.
First, always use an accurate ¼-inch seam allowance.
It may seem trivial, but it can make or break the final look of your quilt.
Trust me; precision is your best friend!
Next, don’t forget to press your seams as directed in the instructions.
It truly helps to create a polished finish, and it makes the sewing process much smoother.
You’ll end up with an aligned quilt that you’ll want to show off to all your friends!
Exploring Advanced Techniques
If you’re feeling adventurous, consider adding your unique touch to the Tranquility Quilt.
You can incorporate additional quilting techniques like applique or embroidery to some sections.
This way, you can explore your artistic side while still following the original pattern at its core.
Perhaps, before you begin, you can sketch out how you’d like to combine techniques.
It makes planning so much easier, and you’ll see your vision come to life in no time!
Celebrate Your Creative Journey!
As we wrap up our quilting adventure with the Tranquility Quilt, take a moment to reflect on your journey.
Remember, this process is about enjoying every stitch and celebrating each mini-milestone along the way.
No one quilt is perfect, but each one tells a beautiful story crafted by you.
If you’re hungry for more creative inspiration, I invite you to explore the amazing content we have on the blog.
You’re bound to find something that sparks your creativity!
Dive into another fantastic article when you click here.
Trust me, you don’t want to miss out on these crafty treasures!


