Have you ever felt inspired by the shimmering colors of the ocean and decided to bring that beauty into your home?
That’s exactly what happened to me when I stumbled across the Beach Haven quilt pattern.
I remember sitting on my porch, a gentle breeze ruffling the pages of my quilting book, when the vibrant colors of turquoise and sandy beige called my name.
I knew I had to create this masterpiece that would echo the beauty of the beach in every stitch.
As I gathered my materials, I felt the excitement bubble up inside me.
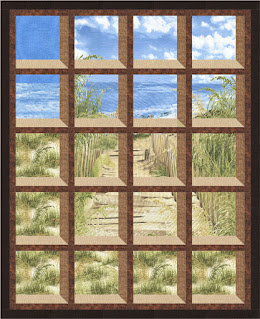
The Beach Haven quilt pattern captures the essence of a coastal getaway, complete with playful waves and soft sand.
I could already envision how this quilt would transform my living space, bringing warmth and joy.
In this blog post, I’m thrilled to share how to bring this stunning design to life, step by step.
Let’s Talk Fabric Choices
The Beach Haven quilt pattern invites you to dive into a palette that reflects the colors of nature.
Opting for fabrics like Fun-C8224 Chambray and Beach-C5354 Grass can truly make a difference in how lively your quilt turns out.
These fabrics don’t just complement each other; they tell a story, creating a visual feast that will transport you to the seaside every time you wrap yourself in it.
I love how the Beach Haven quilt pattern encourages us to play with textures and colors.
The combination of the cool shades of blue from Beach-C5430 Water and the earthy tones of Fun-C8224 Bark creates a soothing, coastal vibe.
Don’t forget to consider your backing fabric—it can open up a whole new dimension to your quilt’s design!
Gathering Your Supplies
- 1/3 yard Fun-C8224 Chambray
- 1/3 yard Fun-C8224 Linen
- 1/3 yard Beach-C5430 Water
- 2/3 yard Beach-C5354 Grass
- 1/3 yard Fun-C8224 Latte
- 2/3 yard Studio-C3096 Brown
- 2/3 yard Beach-C5351 Beach panel
- 2/3 yard Fun-C8224 Bark (for binding)
- 3 yards Beach Haven backing fabric
- 50″ x 60″ batting
Before diving into this project, I recommend laying all your materials out neatly.
It not only helps keep track of everything but also gives you a chance to mix and match fabrics visually.
This step brings excitement as you see how each piece contributes to the overall look of the Beach Haven quilt pattern.
Remember, having your cutting tools, ruler, and mat easily accessible will streamline the process.
When you have everything organized, creativity flows more naturally.
You can sit down and let your imagination guide you through the design without the stress of hunting for supplies!
Before You Start Sewing
Preparation is key!
As you prepare to embrace the Beach Haven quilt pattern, take a moment to thoroughly read through the pattern instructions.
Familiarizing yourself with each step can save you time and help you avoid any frustrating hiccups later on.
If you’re new to quilting, don’t hesitate to practice some of the techniques recommended in the Beach Haven pattern on scrap fabric first.
For example, creating half-square triangles is a critical component of this pattern, so getting comfortable with that technique can really boost your confidence before you tackle the real deal.
Time to Sew!
Ready to kick things off?
Below, you’ll find the detailed instructions to guide you through every step of the process.
Make sure to refer to the image above to visualize how everything comes together, and remember that you can access the full pattern via the provided link.
Full Pattern: Click Here
Finishing Touches
As you approach the final stages of creating your Beach Haven quilt, take time to appreciate the journey you’ve undertaken.
Layering your quilt top, batting, and backing fabric is a significant moment—it’s when your artistic vision truly comes to life.
Choose a quilting method that complements the design, whether it be stippling or channel stitching.
And don’t rush the binding!
Attaching it with care ensures a clean finish and durability.
After all the hard work you’ve put into the Beach Haven quilt pattern, you deserve a professional-looking result!
Advanced Techniques
If you’re feeling adventurous, consider adding some embroidery elements to your Beach Haven quilt.
A few simple beach-themed stitches can elevate the quilt into something truly personal and unique to you.
The pattern allows room for creative expression, so don’t shy away from making it your own!
Incorporating advanced techniques can be a fun and rewarding challenge.
Experiment with different stitches and threads—perhaps even try out some decorative fabrics within the quilt itself.
Who knows?
You might just invent a new technique along the way!
Celebrate Your Work!
Congratulations on completing your Beach Haven quilt!
As you lay it out in your living space or gift it to someone special, think about the countless moments you will share wrapped in its warmth.
Quilting is not just about the final product; it’s about the creative process and the joy that comes with it.
Feeling inspired?
There’s always more to explore!
Our blog is brimming with delightful content that can spark your creativity, too.
I’ve prepared an incredible piece you won’t want to miss right here.
Dive back in and let’s keep the creativity flowing!


