dear friends, oh my goodness!
Get ready to dive into the deliciously creative world of quilting!
I can still remember my first sewing session when ideas bubbled up inside me like hot cocoa on a winter’s day.
I sat there, surrounded by a myriad of colorful fabrics, envisioning all sorts of patterns dancing before my eyes.
As I gazed at those delightful prints, I realized that each piece was like a beautiful little story waiting to unfold.
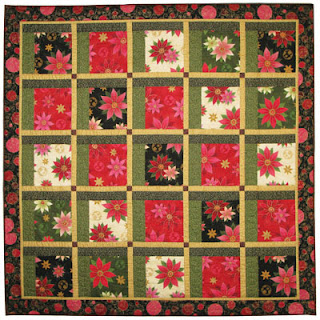
That’s when I first laid my hands on the sumptuous Christmas Windows quilt pattern, and it was love at first stitch!
As the colder months come creeping in, nothing brings more joy than wrapping myself in a cozy quilt crafted with love.
The Christmas Windows quilt pattern adds a festive flair to any space, transforming your home into a winter wonderland filled with vibrant poinsettias.
This stunning wall hanging is not only a visual treat; it’s also a heartfelt way to celebrate the holiday season with family and friends.
So grab your fabric and let’s get quilting!
Colors That Speak the Joy of the Season
One of the best aspects of the Christmas Windows quilt pattern is its captivating use of color!
The vibrant reds and greens remind us of just how cheerful the holiday season can be.
It utilizes beautifully designed prints such as traditional cream and modern red poinsettias, which really make this quilt pop.
Don’t you just want to dive into those colors and soak everything in?
When working with the Christmas Windows quilt, consider how to position your prints in a way that resonates with you.
Mixing and matching fabrics can create a unique flair, personalizing the project to fit your vibe.
So let those creative juices flow like freshly made apple cider as you explore different combinations of fabrics!
Gather Your Supplies!
- Fabric: Choose vibrant prints and solids for a stunning effect, including:
- – Stitch with Beads 2564-33 Gold
- – Stitch with Beads 2564-12 Black
- – Stitch with Beads 2564-44 Dark Green
- – Various Poinsettia fabrics in Red, Cream, Green, and Black
- – Binding fabric (about 7 strips of 2-1/2” wide fabric)
- 1/2 Zip Daisies quilt batting (enough to cover 61” square)
- Thread that complements your fabric choice
- Rotary cutter, cutting mat, and ruler
- Sewing machine and basic sewing tools
It’s essential to check your fabric quantities against the Christmas Windows pattern to ensure you’re not left in a scramble halfway through the project.
And you know, nothing makes your heart race quite like piecing together those beautiful fabrics into a stunning quilt!
Preparing for a Seamless Start
Starting a project like the Christmas Windows quilt can feel daunting, but with a little preparation, you’ll be knitting away before you know it.
Start by pre-washing your fabrics to prevent any shrinkage; nobody wants a quilt that’s a bit shy when wrapped around a cozy couch!
After washing, iron your fabrics to eliminate any creases and make cutting a breeze.
Next up, cutting!
Follow the Christmas Windows pattern closely.
Lay out your fabric and cut out the required shapes according to the instructions—trust me, this will save you a world of hassle later on.
Being organized is key, and keep your pieces labeled, so you’re never left wondering about each shape’s purpose!
Step-by-Step Instructions:
Now the best part—let’s get sewing!
Below, I’ll lay out the step-by-step journey, but keep in mind that the full Christmas Windows pattern can be accessed through the link provided.
Buckle up, because you’re about to create some quilt magic!
Full Pattern: Click Here
Tips for a Flawless Finish
As you work through the Christmas Windows quilt pattern, remember that patience is your best friend.
Take your time with each step, ensuring your seams are accurate and crisp.
Consider chain piecing to speed things up, which is a great way to save time and thread.
It creates a flow that helps focus on the project as a whole rather than individual steps!
If you come across any tricky corners, don’t stress!
A little snag in your journey is part of the process.
Just remember to take a deep breath, reassess, and keep moving forward—treat each stitch as an opportunity to learn and grow, spreading that holiday cheer with every inch!
Advanced Techniques to Elevate Your Quilt
Once you feel more comfortable with the basic assembly of the Christmas Windows quilt, why not challenge yourself with some advanced techniques?
Perhaps consider incorporating some embroidery on the borders or even some fancy quilting stitches to give it that WOW factor!
Twinkling beads could even be a fantastic addition to replicate Christmas lights on the quilt.
Engaging in these advanced techniques not only enhances your quilting skills, but it also personalizes the Christmas Windows to make it uniquely yours.
Let your creativity soar, and don’t shy away from experimenting with different methods!
Celebrate Your Hard Work!
A huge round of applause to you for embarking on this quilting adventure!
You’ve tackled the Christmas Windows quilt with grace, creativity, and determination.
The joy of creating something with your own hands is simply unbeatable, and you’ve succeeded in blending artistry with warmth that the holiday season brings.
If you found this guide helpful, don’t stop here!
Our blog is packed with amazing content just waiting for you to explore.
I’ve prepped a delightful piece that you can uncover by dancing your cursor over this link.
Until next time, keep stitching away and spreading that joyous holiday spirit!


