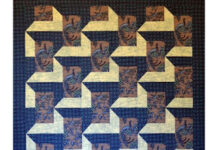
Every once in a while, a project captures your heart and feels like a burst of sunshine in your creativity.
The Flourish Quilt is precisely that for me!
As I pieced together squares inspired by lively floral patterns and playful butterflies, I felt every stitch transport me to a wild garden full of color and life.
This quilt, designed by the talented Patty Sloniger, is not just a craft; it’s a journey through creativity and imagination.
My love for quilting blossomed unexpectedly, fueled by the desire to create something unique and comforting.
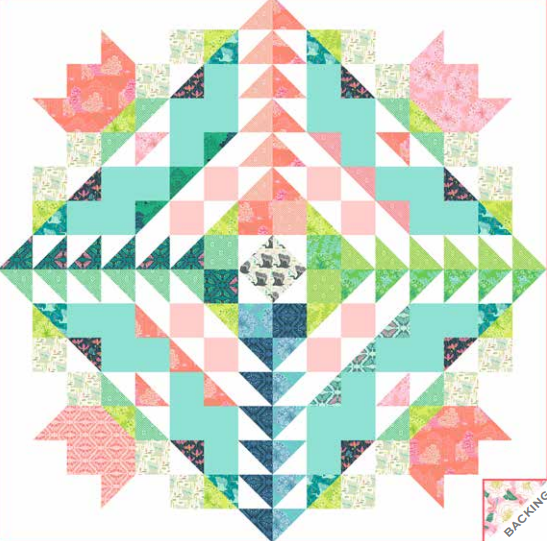
When I first stumbled upon the Flourish Quilt, I could hardly resist its medallion-style design adorned with cheerful motifs!
Armed with a cup of coffee and my sewing machine, I was ready to dive into this beautiful world of fabrics and patterns.
Bringing Nature Inside Through Quilting
The Flourish Quilt is a beautiful representation of how nature can inspire art and creativity.
The unique blend of floral designs and vibrant colors is sure to bring life to any space.
Utilizing half-square triangles (HST) adds an interesting technical aspect to this quilt.
The soul of this quilt lies in the combination of colors and patterns, crafting an inviting atmosphere.
What excites me is how each section of the Flourish Quilt showcases various fabrics, creating delightful surprises as you look closer.
It’s a fantastic opportunity to experiment with fabric combinations that capture the essence of the natural world.
The juxtaposition of colors reminds me of blooming flowers and fluttering butterflies, which brings joy to the whole crafting process.
A Symphony of Techniques
Working on the Flourish Quilt, the ease of assembly is truly remarkable.
The general technique involves using half-square triangles (HST), which offer a multitude of design possibilities.
I love that you can use your favorite methods to make HST or follow the directions provided.
For those who enjoy precise cuts, cutting squares and trimming is essential for a polished look!
With this quilt, it’s important to remember that the cutting directions often guide the overall layout.
Each piece is a significant component in creating that eye-catching aesthetic that is so characteristic of the Flourish Quilt.
So, gather your fabric and let’s get started on this incredible piece!
Materials You’ll Need:
- Fabric A: 2 squares (5”)
- Fabric B: 2 squares (82”), 8 squares (5”)
- Fabric C: 3 squares (5”), 1 square (42”)
- Fabric D: 2 squares (5”), 1 square (82”)
- Fabric E: 3 squares (5”), 1 square (42”)
- Fabric F: 6 squares (5”), 4 squares (42”)
- Fabric G: 4 squares (5”)
- Fabric H: 1 square (82”)
- Binding: 7 strips (22” x WOF)
- Backing: 2 panels (35” x 70”) pieced to fit quilt
Preparing to Create Your Quilt
Before you dive headfirst into creating the Flourish Quilt, having a well-organized workspace can make a big difference!
Making sure your cutting area is clear and that you have your fabrics prepped will streamline the process.
I often lay out my fabric before cutting to ensure that I have the right portions and combinations!
Additionally, it helps to read through the instructions thoroughly before starting.
Understanding how each section connects will guide your choices in color and fabric placement.
Mapping out your design can also help you visualize the final product more clearly!
Step-by-Step Instructions:
Below, I’ll provide the essential steps that will walk you through crafting the lovely Flourish Quilt.
Make sure you check out the full pattern via the link following the image below!
Full Pattern: Click Here
Additional Tips for Success
One of my biggest tips for creating the Flourish Quilt is to take your time!
Each block brings its own personality and joy.
Snipping perfect corners and pressing neatly allows the quilt to shine.
Also, ensure your HST is trimmed to the correct size; this can impact the appearance and fit of the finished quilt.
Don’t shy away from experimenting with fabric placements as you build the quilt top.
Sometimes moving a square or two can make all the difference in how the design flows.
And remember, if something doesn’t feel right, it’s never too late to make adjustments!
Elevating Your Craft with Advanced Techniques
If you’re looking to further enhance your skills while creating the Flourish Quilt, consider trying different techniques such as using a design wall.
It allows you to see how the pieces come together before making any permanent stitches.
This adds an extra layer of creativity and organization to your crafting!
Another fun technique to try is playing with color gradients or mixing patterns.
The Flourish Quilt is perfect for that as it allows for excitement in every square you create.
Who knows, your creativity might lead to something entirely new!
Celebrate Your Craft: Reflect and Inspire
As you wrap up your beautiful Flourish Quilt, it’s a moment to reflect on your journey and the creativity that transformed simple fabrics into an inspiring masterpiece.
Quilting is more than just sewing; it’s about expressing oneself and sharing those pieces with the world.
I encourage you to continue exploring other articles here filled with tons of delightful insights and techniques.
You might stumble upon your next favorite project.
Dive into my curated collection of content and discover an incredible piece you can check out by clicking here.
Your next adventure in quilting awaits!

