There’s something truly magical about transforming a stack of fabric into a beautiful Scrappy Star Table Topper.
I remember the first time I decided to take on a quilting project that intrigued me.
The excitement was palpable, and I couldn’t wait to see the final creation!
Diving into the quilt-making world has been one of my favorite pastimes, especially when I get to make something that brings warmth and joy to my home.
While working with the Scrappy Star Table Topper pattern, I felt like a kid in a candy store.
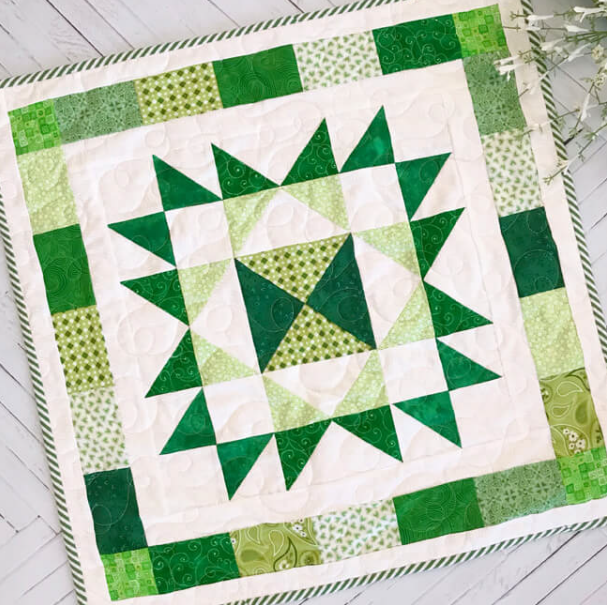
The mix of greens with assorted fabrics opened up a rainbow of possibilities for creativity.
As each piece fell into place, I realized how satisfying it is to see a project come together stitch by stitch.
It’s almost like piecing together a puzzle, but way more colorful and cozy!
Let’s dive into how you can create your very own Scrappy Star Table Topper.
Understanding the Charm of the Scrappy Star Table Topper
The Scrappy Star Table Topper is an incredible way to infuse your space with a touch of cheer while practicing essential quilting techniques.
It embodies versatility; depending on your fabric choices, it can be whimsical, sophisticated, or even quaint.
Each topper tells a story, showcasing the various fabrics you have collected on your quilting journey.
This pattern is fantastic for both beginners and advanced quilters.
The construction of the star pattern is straightforward enough for newbies yet allows for complexity via color choices and fabric prints.
So, regardless of your skill level, you’ll find the Scrappy Star Table Topper both enjoyable and fulfilling!
Diving into the Details of the Pattern
The construction of the Scrappy Star Table Topper may appear daunting at first, but fear not!
The beauty of this project lies in the step-by-step instructions that guide you along the way.
From design layout to sewing techniques, every step is crafted to ensure success.
It’s the little details, like fabric placement, that will make your project shine.
Moreover, the quilt is an ideal canvas to explore different patterns and blocks.
Each unit, like the Flying Geese and Hourglass units, strengthens your quilting skills and builds confidence for larger projects.
You’ll find yourself wanting to try new fabric combinations and techniques after completing the Scrappy Star Table Topper!
Materials You’ll Need
- 10 Fat Eighth’s of assorted green fabrics
- 3/4 yard of background fabric
- 1/4 yard for binding
- 30” of backing fabric
Before you start, ensure that you have a cutting mat, rotary cutter, and a sewing machine ready to go!
Trust me, having all your materials handy makes the whole process smoother and more enjoyable.
Preparing for Quilting Success
Before diving into quilting the Scrappy Star Table Topper, there are a few tips I’d like to share.
First, read through the entire pattern before starting.
Familiarizing yourself with what comes next will ease your workflow and eliminate any surprises.
Next, cut all your fabric pieces accurately.
Precision is key in quilting, as it affects how well the pieces will fit together.
Take your time, measure twice, and cut once.
Having neatly cut pieces will save you additional time when it comes to assembly!
Step-by-Step Instructions:
Now, the exciting part!
Below, you’ll find the step-by-step instructions for constructing the Scrappy Star Table Topper.
Each image will guide you along with the full pattern available through the link at the end.
Let’s get stitching!
Full Pattern: Click Here
Additional Tips for Success
Don’t hesitate to have a seam ripper handy.
Mistakes happen, and it’s best to fix them right away rather than trying to sew around an error.
Take it from me; that’s just a recipe for frustration!
Also, ensure you press your seams as you go; this will help maintain the shape of your units.
Lastly, enjoy the process!
Quilting is therapeutic and should be fun!
Don’t rush through it; admire your progress.
With each stitch, you’re creating something beautiful that you can cherish or share with loved ones.
The Artistic Touch of the Scrappy Star Table Topper
As you bring your Scrappy Star Table Topper to life, think about the color story and fabric textures you’re using.
The combination of lights and darks will attract the eye, creating a vibrant tableau on your table.
Play with the placement of fabrics to ensure your design pops!
Also, consider experimenting with quilting techniques on the sandwich once you’ve finished piecing.
You can try out free-motion quilting or straight-line quilting—it’s a fantastic way to add personal flair, elevating your Scrappy Star Table Topper into a true work of art!
Celebrate Your Quilting Journey!
Congratulations on creating your very own Scrappy Star Table Topper!
Each time you lay it on your table, it’s a reminder of your creativity and dedication.
Remember to not only appreciate the finished product but also the joy and relaxation quilting brings.
If you’re hungry for more creative inspiration, my blog is bursting with a treasure trove of articles that explore all things quilting, crochet, and crafting.
Don’t miss out!
Check out this amazing piece designed just for you by clicking here.
You won’t regret it!
Now, as you wrap up this project and bask in the glory of your accomplishments, think about the next adventure in your quilting journey.
There are endless possibilities awaiting you, and I can’t wait to see what you create next!


