As I sit in my cozy little craft room, surrounded by colorful fabrics, I can’t help but smile thinking about the day I discovered the joys of quilting.
It was a rainy afternoon, perfect for indoor activities—so I decided to dive into my very first quilt project: the Walnut Avenue quilt.
With its intricate blocks and beautiful patterns, I knew this was a challenge worth taking on.
Walnut Avenue isn’t just any quilt—it’s a stunning display of creativity that brings warmth to any home.
I remember the moment I finished my first block, feeling exhilarated as I pieced together the swatches of fabric.
It was then I realized quilting isn’t just a craft; it’s a journey of self-expression and an avenue of relaxation.
Finding the Right Fabric and Colors
When embarking on the Walnut Avenue quilt journey, one of the first things you need to consider is fabric selection.
The beauty of this quilt lies in the variety of colors and patterns you can incorporate, allowing you to create a design that truly reflects your personality.
I recommend visiting your local fabric store to explore different cotton options and coordinating prints that capture your vision.
By mixing and matching different fabrics, I found a combination that really spoke to me: warm earth tones with striking accents of teal and mustard.
This unique blend not only made the quilt visually appealing but also incredibly cozy.
The right fabric will make your Walnut Avenue quilt not just a project, but a cherished piece to showcase.
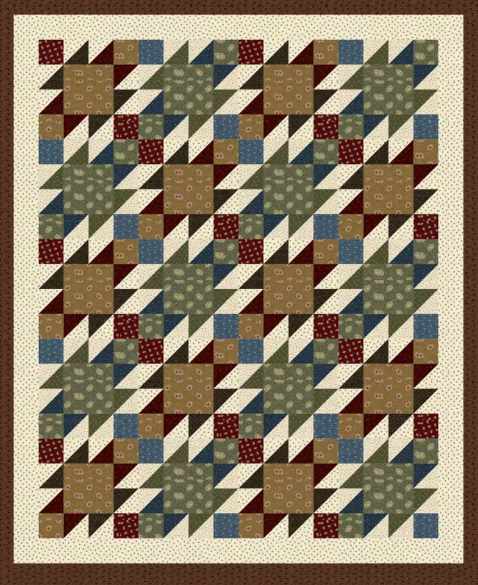
Understanding the Blocks
The magic of the Walnut Avenue quilt becomes evident when you dive into its blocks.
This quilt features two main blocks—Block 1 and Block 2—which you’ll make multiple times (10 of each).
Each block has its own unique arrangement and adds to the overall rhythm of the quilt.
Understanding how these blocks relate to each other is crucial for a harmonious finished product.
As you assemble your blocks, take the time to really appreciate how they come together.
I found that counting out my pieces beforehand kept me organized and passionate about the creation process.
Keep in mind that they may look complicated, but once you break them down, the unique structures behind the Walnut Avenue quilt will reveal themselves.
Materials Needed for the Walnut Avenue Quilt
- Assorted cotton fabric (for blocks and background)
- Rotary cutter and mat
- Quilt ruler
- Thread (coordinating colors)
- Iron and ironing board
- Batting
- Backing fabric
- Quilting pins
Preparation Tips Before Diving In
Before you start stitching away on your Walnut Avenue quilt, it’s advisable to prepare your workspace.
Make sure your sewing machine is in tip-top condition—clean it, adjust the tension, and check your needle.
Having everything laid out neatly will not only keep the stress levels low, but it will also give you more time to focus on your creativity.
Another lovely tip is to pre-wash your fabrics to avoid any shrinking issues after your quilt is complete.
I also like to iron my pieces as they are frequently smooth and easier to work with—plus, they always look nicer!
By setting this foundation before starting, you’re ensuring a smoother process throughout the quilt-making journey.
Step-by-Step Instructions for the Walnut Avenue Quilt
Now that you are fully prepared, let’s get to the exciting part—creating the Walnut Avenue quilt!
Below, I will walk you through the step-by-step instructions, and remember, you can access the full pattern via the link provided!
Full Pattern: Click Here
Additional Tips for Success
As you work on the Walnut Avenue quilt, don’t hesitate to take breaks and step back to assess your progress.
In the early days of quilting, I found myself becoming overly critical of my work, but with time I learned that creativity flows best when it’s coupled with patience and self-compassion.
Trust the process and allow the quilt to unfold as it may.
Using a design wall can also be an excellent way to visualize how your blocks will come together without sewing them first.
It allowed me to move pieces around and discover new combinations.
It’s like having a mini quilt exhibition in your own home!
Playing with Design Considerations
Once you’ve got the basics down with your Walnut Avenue quilt, it’s time to explore design considerations further.
While the traditional patterns are stunning, consider adding some unique flair!
You could experiment with varying block sizes or even include a border of your favorite fabric to frame it all together beautifully.
Your Walnut Avenue quilt can also tell a story through fabric choices—whether you opt for bright and cheerful patterns or muted tones that evoke nostalgia, make it uniquely yours.
Don’t hesitate to let your personality shine in every stitch.
Celebrate Your Creation!
Lastly, I encourage you to take a moment to celebrate your creation!
There’s something magical in piecing together a quilt that spans not just fabrics but memories, time, and energy.
Each stitch carries a part of you, and when you finally hold that Walnut Avenue quilt in your hands, you’ll feel a mixture of pride and joy.
I invite you to explore more of my fun projects on the blog!
There’s an abundance of creative content just waiting for you to dive in.
You can experience something truly special by exploring what’s next right here.
I promise it’ll be just as exciting!


