As the first leaves begin to change color, I feel an irresistible pull to celebrate the beauty of fall through my favorite craft: quilting!
SEE A NEW PATTERN HERE
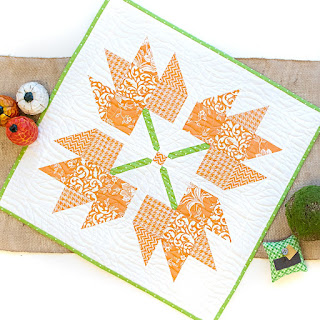
This year, I decided to elevate my autumn decorations with the Maple Leaf Mini Quilt.
It’s a quick project that allows me to play with beautiful fall fabrics while creating a lovely piece of decor for my home.
Let me tell you, there’s something magical about stitching together a quilt that reflects the changing season.
Each piece of fabric I chose for the Maple Leaf Mini Quilt has a story, from the warm oranges and deep reds that remind me of vibrant leaves to the rustic browns that ground my design.
I can’t wait to share the fun of making this delightful quilt with you!
Crafting Traditions: The Maple Leaf Design
The Maple Leaf Mini Quilt is steeped in history and tradition.
The quilt block design is one that has been cherished for generations, conjuring up memories of crisp fall days and the beauty of nature at its best.
This pattern serves not only as a striking visual but also symbolizes the warmth of home and the strength of family ties.
What I love about this design is how adaptable it is!
Whether you stick to traditional colors or go rogue with modern prints, the Maple Leaf Mini Quilt can fit any décor style.
Plus, it’s a fantastic way to use up scraps from other projects you’ve worked on!
The Heart of the Project
Before diving into crafting, let’s chat about which techniques and materials will shine in your Maple Leaf Mini Quilt.
Getting the right fabric is vital!
I recommend using a mix of 100% cotton prints for durability and ease in sewing.
You can explore options from collections like All Hallow’s Eve or Christmas Figs II, which are perfect for this seasonal quilt.
Additionally, picking contrasting backgrounds can really bring the leaves to life!
For my quilt, I opted for Bella Solids Off White as it offered a fresh backdrop against the busy prints.
You can choose whatever makes your heart sing—after all, this quilt is all about personal expression!
Gathering Supplies: What You Need
- 5 Fat Quarter Assorted Fabrics for the leaves (preferably autumn-themed)
- Bella Solids Off White 9900-200 for the background
- Rotary cutter and mat
- Quilting ruler
- Sewing machine and thread
- Iron and ironing board
- Scissors
- Batting for the quilt sandwich
As you can see, gathering your supplies is half the battle!
I love to lay everything out and ensure I have all my materials before starting.
It saves me the headache of running around mid-project—trust me, I’ve learned that the hard way!
Don’t be shy about mixing different fabric collections!
The beauty of the Maple Leaf Mini Quilt lies in its versatility.
Use your creativity to craft something truly unique!
Prepping to Sew: Get Ready!
Prep work is key to a smooth sewing experience!
Start by washing and pressing your fabrics to avoid any surprises later on.
Nothing disrupts the flow like unexpected shrinkage!
I also like to pre-cut all my pieces before I dive into assembly—it helps keep my workspace tidy and allows me to see the design come to life faster.
Another tip: consider laying out your quilt blocks on a design wall or on the floor before sewing.
This way, you can play around with the arrangement of the Maple Leaf Mini Quilt until everything feels right.
Have fun with this stage; it’s where the magic begins!
Mastering the Quilt: Step-by-Step Instructions
Alright, my crafty friends, get your sewing machines ready!
Below, you will find the detailed instructions to guide you through each step of creating the Maple Leaf Mini Quilt.
Don’t forget, you can access the full pattern using the link below the image.
Full Pattern: Click Here
Additional Tips for Success
As you embark on your quilting journey, keep in mind that patience is essential.
If something doesn’t line up perfectly, it’s okay!
The quilt is a reflection of your creativity, and not everything needs to be perfect.
Also, consider using a walking foot for more precise stitches as you work through the layers of fabric.
If you’re new to quilting, practice makes progress!
Don’t rush through your Maple Leaf Mini Quilt.
Take your time with each leaf as you create, and you’ll find it to be a relaxing activity.
Soon, you’ll see your hard work come together in the most beautiful way!
Embracing Creativity: Design Considerations
When working on your Maple Leaf Mini Quilt, think about how you want to display it once it’s finished.
You could add a border to frame your quilt blocks, or even opt for an intricate quilting design that adds texture.
It’s all about your personal touch and what resonates with you!
Try experimenting with different quilting patterns on the leaves themselves.
From spirals to straight lines, these choices can elevate your quilt and give it that professional flair.
So, unleash your creativity and let each stitch tell a story!
Celebrate Your Craft: The Joy of Completion
As you wrap up your Maple Leaf Mini Quilt, take a moment to appreciate your hard work!
You’ve crafted something beautiful that showcases the splendor of autumn.
Display it proudly on your table or hang it on the wall—whatever makes you happiest!
Completing a project brings such joy, and I’m thrilled to see how you interpret this pattern.
And before you go rushing off, take a moment to explore more amazing content on my blog!
There are tons of articles that will inspire your next project.
If you’re looking for more ideas, I’ve prepared an incredible piece just for you to check out by clicking here.
Happy quilting, friends!


