It was a sunny Saturday morning when I stumbled upon a stack of old jeans at my local thrift store.
Little did I know, this moment would inspire me to create a unique piece of art known as the frayed edges picnic quilt.
As I gazed at the vibrant patches reminding me of simpler times, I felt an urge to transform them into something useful and beautiful.
Nothing brings people together like a cozy quilt, and with summer picnics on the horizon, it felt like the perfect idea.
The frayed edges picnic quilt isn’t just a display of fabric – it’s a celebration of creativity and sustainability.
By recycling denim and using colorful fabric insets, I decided to breathe new life into these materials.
It represented a fusion of comfort and charm; it felt like a project that was just waiting to unfold.
In this article, I’ll share my experience in crafting the frayed edges picnic quilt, along with tips and tricks that made the journey so fulfilling.
A Timeless Tradition with a Twist
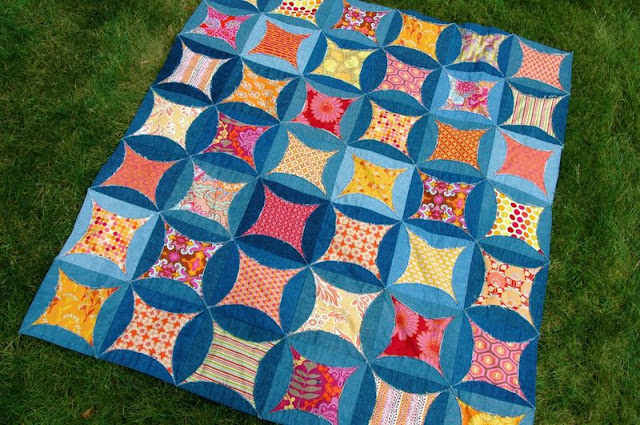
The frayed edges picnic quilt is an excellent way to blend the charm of traditional quilting with a contemporary twist by using recycled materials.
The idea of combining denim with other fabrics brings an extra layer of texture and functionality.
Each piece of denim, with its unique history, forms a tactile connection to the materials we often discard without second thought.
This quilt is more than just a craft project; it offers a way to embrace sustainable practices while having fun.
Picture yourself lounging on a warm summer day, surrounded by friends, with this unique quilt spread out underneath you.
It serves as a reminder that every piece of fabric has its story and can be repurposed into something new—such is the beauty of the frayed edges picnic quilt!
Bringing the Right Tools to the Table
Before we dive into creating the frayed edges picnic quilt, it’s essential to gather your materials.
Trust me, having everything ready will make your crafting process smoother and more enjoyable.
Here’s what you’ll need:
- Old denim (recycled jeans work best!)
- Fabric insets (your choice of color and pattern)
- Heavy-duty sewing machine
- Thread (matching the denim color)
- Scissors or rotary cutter
- Cutting mat
- Measuring tape
- Iron
- Optional: decorative stitches for finishing touches
Having all the materials will not only help you stay organized but also add to the excitement of watching your frayed edges picnic quilt take shape.
And remember, you can customize this with your favorite colors and styles!
A Little Preparation Goes a Long Way
Preparation is key when creating any quilt, especially the frayed edges picnic quilt.
Before you start cutting, I recommend washing and drying your denim to prevent any potential shrinkage later on.
This extra step will also help you achieve that authentic frayed effect.
Next, set aside some time to plan your quilt design.
Sketch out your ideas or lay out the fabrics in different combinations to see what feels right.
This is where creativity blossoms, and your unique touch will shine through!
Making these decisions early on ensures that you won’t face any last-minute surprises.
Step-by-Step Instructions for the Frayed Edges Picnic Quilt
Now let’s roll up our sleeves!
Below, I’ll provide step-by-step instructions for crafting your very own frayed edges picnic quilt.
You can find the complete pattern linked just below.
Full Pattern: Click Here
Additional Tips for Crafting Success
When working on your frayed edges picnic quilt, here are a few tips to keep in mind.
First, don’t be afraid of imperfections!
The beauty of this quilt lies in its handmade quality, and a little fraying only adds to its charm.
Embrace that rough-around-the-edges look—you’ve earned it!
Additionally, ensure you take a break every now and then.
Crafting should be enjoyable, not stressful.
So, if you feel overwhelmed, step back and enjoy a cup of tea while admiring your progress.
Trust me; it does wonders for the creative spirit!
Future-Proofing Your Quilt with Advanced Techniques
If you’re feeling adventurous, consider incorporating advanced sewing techniques into your frayed edges picnic quilt.
For instance, you can add decorative stitches around the edges or create unique patterns by piecing fabrics together in clever ways.
Don’t hesitate to explore your sewing machine’s functions and discover exciting ways to enhance your creation!
Furthermore, think about the quilt backing!
A fun, bright fabric can add a surprising element when the quilt is turned over.
This also allows your quilt to serve multiple purposes—everything from a picnic blanket to a unique home decor piece.
Celebrate Your Crafting Journey!
Upon completing your frayed edges picnic quilt, take a moment to admire your handiwork.
No two quilts are the same, and this one tells the unique story of your creativity and hard work.
Whether it sits in the sun during lazy days or gets spread out for gatherings, your quilt is bound to be a versatile companion!
If you’re eager to explore even more craft projects, my blog has a treasure trove of creative content waiting for you.
You’ve got so many options to choose from, and I’ve prepared an incredible piece you won’t want to miss by clicking right here.
Let the inspiration continue to flow!
In the grand tapestry of crafting, each stitch you take reminds you of the joy of creation.
Embrace the journey, celebrate your achievements, and keep your passion alive.
Your frayed edges picnic quilt is just the beginning of countless joys waiting to unfold!


