Have you ever felt a surge of excitement when you see a quilt pattern that speaks to your heart?
I remember the first time I stumbled upon the Silhoucat Quilt pattern; it was like finding a treasure chest!
I could almost envision the finished quilt draped over my couch, bringing a splash of personality and warmth to my home.
The idea of combining piecing and appliqué thrilled me and got my creative juices flowing.
I knew I had to embark on this journey.
As I gathered my materials, I felt an exhilarating mix of anticipation and a tinge of nervous energy.
I wondered if I could truly create something as beautiful as what I envisioned.
But oh boy, the excitement that followed was contagious!
Working on the Silhoucat Quilt made me realize that it was not just about stitching; it was about the whole experience of bringing a part of myself into my creation.
Let me take you through my adventure step by step, creating something fabulous with the Silhoucat Quilt!
Adding Texture with Technique
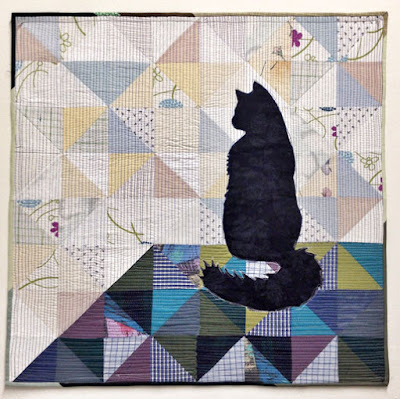
The beauty of the Silhoucat Quilt lies in its innovative fusion of piecing and appliqué techniques.
Using simple half-square triangles as a base for your design can evoke a stunning visual impact.
This technique allows your creativity to truly shine, as there is exhilarating freedom in combining colors and fabrics.
Each triangle, when pieced together, forms the foundation of your masterpiece, with the cat silhouette becoming a show-stopping element!
When I first started with this pattern, I couldn’t believe how seamless it felt to blend these techniques.
The Silhoucat Quilt taught me not only about quilting but also about expressing myself in a vibrant way.
By playing with fabric combinations, I was able to incorporate textures that resonated with my personality.
The process of designing gave me a sense of empowerment, knowing I had total control over how my piece would turn out!
Get Ready with Your Supplies
- Fabrics: A variety of dark and light patterned fabrics for your triangles
- Cutting tools: Rotary cutter, ruler, and self-healing cutting mat
- Sewing machine: A reliable machine to handle both piecing and appliqué
- Thread: Choose color-matched threads for piecing and contrasting for appliqué
- Iron: A good quality iron to press your seams
- Scissors: For trimming your appliqué edges
- Batting: For added warmth and comfort
- Backing fabric: A fun or themed piece to finish your quilt!
Now that we have our supplies at hand, let’s talk about some exciting prep work!
An important part of creating a quilt like the Silhoucat Quilt involves planning the layout and workflows.
I like to sketch my design out or use a color palette that speaks to me to visualize my quilt.
Doing this step really boosts my confidence as I know exactly what I need to do next.
In this exciting preparation stage, I also organize my fabric pieces.
That means cutting them into the necessary triangles and sorting them by color.
Getting organized ahead of time helps keep the momentum going once I start sewing, so I’m not digging through piles of fabric to find what I need.
Let’s dive into creating your quilt!
Ready, Set, Sew!
Alright, everyone!
We are about to embark on the step-by-step fun of bringing the Silhoucat Quilt to life.
The complete pattern can be accessed by clicking the link below, but don’t worry!
I’ll be guiding you through the key steps so you’ll feel right at home.
Let’s get that sewing machine humming!
Full Pattern: Click Here
Don’t Forget the Details!
As you work through the beautiful Silhoucat Quilt, don’t forget to pay attention to the little details.
These might seem minor, but they make a significant impact on the final product.
I recommend measuring your seams regularly and ensuring that your triangles are sewn accurately.
Precision is key, and it helps ensure that the quilt lays flat and looks polished!
Also, take your time pressing each seam open.
Use your iron carefully, and let the fabric cool a bit after pressing.
This technique helps give that crisp, professional look that we all desire when completing a quilt.
Trust me; small details make all the difference!
Exploring Advanced Techniques
If you want to elevate your Silhoucat Quilt even further, consider experimenting with other quilting techniques like free-motion quilting or adding embellishments.
It’s your quilt—so why not make it uniquely yours!
Free-motion quilting can add a textured layer to your work, giving it even more character than what the basic pattern provides.
As I added embellishments to my Silhoucat Quilt, I felt an extra glow of joy.
Using buttons or sewn-on patches of fun fabrics can make your quilt feel like a piece of art.
Just remember to consider how these elements will complement the overall design and balance out your quilt!
Celebrate Your Masterpiece!
Congratulations, my fellow quilters!
You’ve dedicated your time, energy, and creativity to craft your very own Silhoucat Quilt.
Take a moment to appreciate every stitch, every triangle, and the cat silhouette that symbolizes your hard work.
Celebrate your journey of exploration and creativity as all of this unfolds beautifully in your home.
And hey, if you’re ready to dive into more amazing quilt patterns, you’re in luck!
My blog is full of wonderful tips and fun projects geared for artisans like you.
Keep that creativity flowing and let’s keep sewing together!
Check out another fantastic article by clicking here to fuel your passion!


