Have you ever embarked on a creative journey that has not only allowed you to express yourself but also served as a time capsule of memories?
That’s exactly how I felt when I decided to take on the Just Kisses quilt!
This vibrant and charming quilt pattern not only brightens up my sewing space but also fills my heart with joy every time I see it.
Each patchwork piece connects me to the moments leading up to its completion, making it much more than just a quilt—it’s a labor of love.
When I first laid out my squares for the Just Kisses quilt, I wasn’t sure how to arrange the colors and patterns, but as I stitched them together, everything fell into place.
It’s fascinating how fabric, needle, and thread can create something so beautiful and heartwarming.
Today, I’m super excited to share my process with you, so let’s dive into the wonderful world of quilting together!
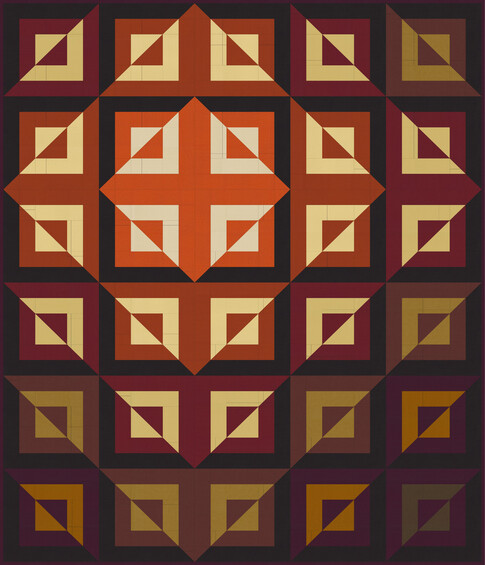
The Beauty of Color in the Just Kisses Quilt
Color plays a vital role when working on the Just Kisses quilt!
Each fabric I selected was thought out carefully to create a harmonious palette.
I used a rich blend of warm tones like cinnamon and mahogany, complemented by uplifting hues such as honey and terracotta.
Together, these colors create a stunning framework that invites warmth and comfort, much like a cozy embrace.
Not only does color set the mood, but it also helps define the pattern itself.
The small and large half-square triangles in the Just Kisses quilt really shine when different contrasts are introduced.
I can’t stress enough how the right fabric choices can make or break your quilting experience—so choose wisely!
Design Layout and Inspiration from Just Kisses
The inspiration for my Just Kisses quilt layout came from the desire to create a cozy ambiance.
I envisioned it nestled over my couch or draping beautifully across my bed.
The quilt measures 60” x 72”, making it a versatile size for cuddling up or displaying as a stunning piece of home decor.
What’s great about this pattern is that it’s suitable for quilters of all skill levels!
In thinking about the design layout, it’s essential to plan ahead—this will save you time later!
The Just Kisses quilt features a block-based arrangement which makes it fun and interactive.
As you assemble each block, you’re not just creating a quilt; you’re painting a picture with fabric!
Materials You’ll Need for Just Kisses Quilt
- 1-1/3 yards of Fabric A (Espresso)
- 1/2 yard of Fabric B (Terracotta)
- 3/4 yard of Fabric C (Garnet)
- 1/2 yard of Fabric D (Khaki)
- 3/4 yard of Fabric E (Honey)
- 1/2 yard of Fabric F (Cinnamon)
- 1/2 yard of Fabric G (Scone)
- 2/3 yard of Fabric H (Mahogany)
- 1/3 yard of Fabric I (Leather)
- 1/4 yard of Fabrics J, K, and L (Raisin, Chocolate, Roasted Pecan)
- 4 yards of Fabric for backing (Raisin)
- 7 strips of 2-1/2” x WOF for binding
Preparation Tips Before Starting the Just Kisses Quilt
Before diving into the sewing machine, take a moment to prepare yourself and your workspace.
I always find it helpful to read through the Just Kisses quilt pattern instructions completely before I start cutting fabrics.
This allows me to visualize every step and minimizes any confusion as I get into my groove.
Furthermore, make sure to press your fabric before cutting.
Smooth fabric results in more accurate cuts, which in turn leads to a tidy finished quilt.
Trust me; taking an extra moment to prepare pays off big time in the end!
Full Pattern: Click Here
Now that your materials and workspace are ready, let’s move into the hands-on portion of the Just Kisses quilt!
The pattern will guide you through the steps of cutting, assembling, and eventually piecing together your masterpiece.
Remember to keep it light, have fun, and don’t be afraid to personalize your quilt along the way!
Additional Tips for Quilting Success
Throughout the quilting journey, trust the process!
It’s completely normal to feel overwhelmed with the number of pieces involved in the Just Kisses quilt.
But take a deep breath, focus on one block at a time, and before you know it, your quilt will start coming together beautifully.
Also, don’t hesitate to consult online forums or YouTube tutorials if you get stuck.
There are fantastic communities out there filled with fellow quilters who are more than happy to lend a hand or share insights on making the Just Kisses quilt!
Connecting with other enthusiasts can help inspire you and boost your quilting confidence.
Pushing Boundaries: Advanced Techniques in Just Kisses
If you feel up for it, try experimenting with different quilting techniques as you work on your Just Kisses quilt.
For instance, consider adding in some machine quilting or hand-stitched elements to give it a personal touch.
It can feel powerful to know that you aren’t just following the pattern, but making it part of your own story!
By maintaining an open mind and willingness to learn, the Just Kisses quilt can become a canvas for your creativity.
Try incorporating unique stitching patterns or even a contrasting binding fabric to elevate your work further—after all, this quilt should speak to your personal style!
Celebrate Your Quilting Journey with Just Kisses!
Reflecting on the journey of making the Just Kisses quilt allows me to appreciate all the time, effort, and love I poured into it.
From selecting fabrics to stitching and finally seeing it all come together is a rewarding experience that’s worth celebrating.
Don’t forget to take a moment to admire your finished quilt; you earned it!
And next time you’re ready for an inspiring project, be sure to explore our blog further!
There’s a treasure trove of incredible content waiting for you, all tailored to unleash your creative flair.
Don’t miss out on the tapestry of knowledge I’ve prepared; get lost in it by clicking here!
Your quilting adventure continues.


