Hey there, fellow quilting enthusiasts!
SEE A NEW PATTERN HERE
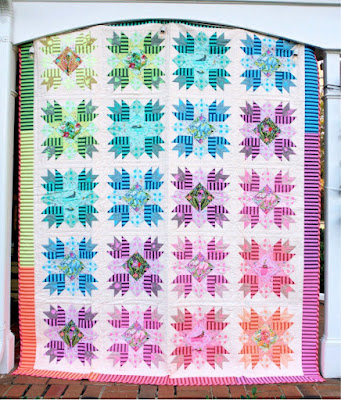
I can’t tell you enough how excited I am to share my experience making the Sparkler Quilt!
It all began when I stumbled across this vibrant pattern featuring the stunning Everglow and True Colors by Tula Pink.
Honestly, it felt like a spark ignited within me, and I knew I had to dive in and create something dazzling!
As I gathered my fabrics and supplies, memories of past quilting sessions flooded back.
Each piece I picked out for the Sparkler Quilt felt like a step on a delightful journey.
I remember the joy of seeing the vibrant colors come alive, like fireworks exploding in a night sky.
If you’re looking to evoke that same feeling, stick around, because I’m about to share some tips and tricks to ensure your Sparkler Quilt shines brightly!
A Radiant Palette: The Heart of the Sparkler Quilt
The Sparkler Quilt is all about color, folks!
Each fabric from Tula Pink’s collection adds a different dimension and flair.
With a mix of prints ranging from the playful “Neon Pom Poms” to the striking “Neon Tent Stripes,” each block in the Sparkler Quilt tells a story of its own!
When you choose your fabric, think of how the colors will create harmony or contrast.
The beauty of the Sparkler Quilt lies not only in its design but also in the thoughtful combinations of hues.
This is a quilt that can easily transform a room and match any decor pattern, making it a joyful centerpiece.
The Building Blocks: Techniques That Shine
Let’s talk technique because the Sparkler Quilt uses some pretty nifty construction methods!
Remember: you’ll be working with half-square triangles (HSTs) and quarter-square triangles (QSTs) that become the building blocks of your masterpiece.
If you haven’t tried making these before, don’t worry; they just take a bit of practice!
Don’t hesitate to make a few practice blocks before diving into the main project.
Creating HSTs and QSTs with precise cutting and seam allowance is essential for the Sparkler Quilt to maintain its clean edges and stunning form.
Sharp scissors or a rotary cutter will be your best friends during this journey!
Gather Your Materials: Let’s Get Started!
- Everglow and True Colors fabrics (variety of colors)
- Thread (Tula Pink Neons and Neutrals Thread Collection by Aurifil, 50wt recommended)
- 90″ x 108″ batting
- Rotary cutter and mat
- Cutting ruler
- Iron and ironing board
- Quilting pins
- Sewing machine
- Backing fabric (options given in the pattern)
- Binding fabric (from the Sparkler Quilt pattern)
Preparing for Your Sparkler Quilt – Pro Tips!
Before you dive headfirst into the Sparkler Quilt, it’s essential to lay out your workspace.
Organizing your materials will save you lots of time and stress while you work.
I always designate sections for fabrics, tools, and patterns to streamline the process!
Additionally, pressing your fabric before cutting can make a huge difference in accuracy.
Starching your fabric can also stabilize the fibers and make handling them much easier, especially when cutting bias edges.
Trust me, taking a few minutes to prepare can save you from frustration later!
Step-by-Step Instructions:
Now, before you get grounded in instructions, just a heads-up that the steps to create your beautiful Sparkler Quilt can be briefly browsed below!
For comprehensive instruction, don’t forget to check out the complete pattern via the link provided:
Full Pattern: Click Here
Continue the Sparkle: Additional Tips
When assembling your Sparkler Quilt, keep in mind that precise seam allowances (1/4″ or 1/8″) contribute to the final size of the quilt blocks.
Therefore, use a consistent seam allowance throughout your project!
Also, as you quilt your layers, don’t skip the basting step before quilting.
Basting can help to make sure everything stays nice and flat while you sew.
It’s a simple step, but it can make a significant difference in the finished appearance of your Sparkler Quilt.
Quilt Binding — A Beautiful Finish!
Finishing your Sparkler Quilt with binding can be the most rewarding part.
The binding frames your work perfectly.
So take your time and get it right!
I often use a contrasting color for binding to elevate the overall design and give a pop of interest!
After binding, take a moment to step back and admire your accomplishment.
The Sparkler Quilt is definitely a labor of love, and you’ll be proud to show it off!
Celebrate Your Creation!
Once you’ve completed your Sparkler Quilt, don’t forget to take a moment to celebrate your hard work!
Quilting is more than just crafting; it’s about finding joy in the process and the community we build.
And hey, if you’re eager for more inspiration or projects, delve into my blog, where you can find tons of amazing content just waiting for you.
I’ve prepared an incredible piece you can check out by clicking here.
Happy quilting!


