Hey there, quilt lovers!
Julie here, and I’m beyond excited to share a new project with you: the All A Flutter quilt pattern.
A little while ago, I found myself in a cozy corner of my craft room, surrounded by colorful fabrics, just itching to stitch.
With summer on the horizon, I wanted to create something that would capture the playful essence of fluttering butterflies.
And voilà!
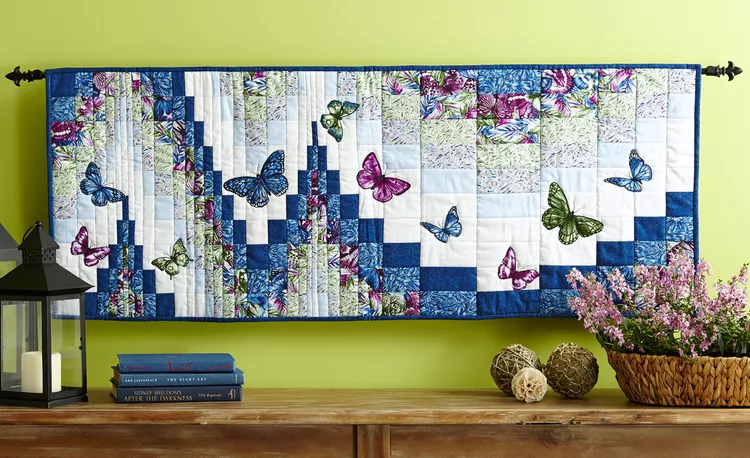
The All A Flutter quilt was born.
It’s vibrant, it’s cheerful, and best of all, it’s a quilt-as-you-go project that adds a touch of whimsy to any space.
This quilt isn’t just about fabric and thread; it’s about sparking joywhile working your magic.
I’ve always loved the look of bargello quilts, especially when they feature fussy-cut appliqués.
When I stumbled upon the All A Flutter quilt pattern designed by Ann Lauer, I knew I had to try it out!
This pattern allows you to create a stunning backdrop with many fabric strips before bringing the main element—the butterflies—into play.
Trust me; this quilt will make your heart skip a beat!
Appliqué in Motion: Why Fussy-Cutting Matters
Fussy-cutting—the technique of cutting fabric prints to highlight certain features—is one of the key elements in this quilt.
The beauty of the All A Flutter quilt pattern lies in how these butterflies come to life through carefully chosen prints.
I find that fussy-cutting works wonders in bringing your own personality to the piece, making it truly one-of-a-kind.
Consider using various fabrics from the Butterfly Forest collection by Ann Lauer; each piece tells a story!
Fun fact: You don’t have to stick with traditional butterfly prints.
You can opt for any designs that resonate with you!
My favorite is to combine florals and polka dots—yes, please!
Once you see the butterflies stitched onto your quilt, you’ll feel like you’ve added a sprinkle of sunshine.
Fussy-cutting the butterfly motifs gives you room to express yourself and add a fun, unexpected feature to your quilt!
Your Quilt Supply Checklist
- 1 5/8 yards backing fabric
- 1/2 yard dark blue tone-on-tone (for rows and binding)
- 1/4 yard each of medium blue print, butterfly collage print, multicolor fern print, green print, multicolor print, and light blue print (for rows)
- 1/2 yard white tone-on-tone (for rows)
- 18×21″ piece of large butterfly print (for appliqués)
- 24×56″ thin batting
- 3/4 yard of 54″-wide gridded flannel (optional)
- Water-soluble marking pen (if not using gridded flannel)
- Quilt basting spray (optional)
- Lightweight fusible web
Make sure you check the yardages carefully!
You want to have enough fabric so you don’t have to make a mid-project run to the store—yikes!
It’s always best to have a little extra, just in case.
Each fabric’s texture and weight play a role in how the All A Flutter quilt will turn out, so mix and match wisely!
Once you have all your supplies, take some time to plan out your design.
Lay your fabrics side-by-side to see how they interact.
This is the moment when creativity truly blossoms, and you can determine which butterflies will flutter best together on your quilt!
Preparation Tips for Success
Before diving into the All A Flutter quilt pattern, here are a few preparation tips to get you started on the right foot.
First, make sure your fabric is pre-washed and pressed.
I know—it can feel like an extra step, but trust me, it’s crucial!
Pre-washing helps prevent any surprises, such as fabric bleed or shrinkage after you stitch your quilt.
I like to use a crisp pressing technique to ensure everything lays flat; it makes cutting and sewing a breeze!
Next, if you’re using gridded flannel, center it on your batting carefully.
The grid will come in handy for ensuring your rows are aligned perfectly as you assemble the All A Flutter quilt.
This little detail can fit people who are new to quilting and those looking to hone their skills.
Remember, even small mistakes can become beautiful learning moments—embrace them!
Let’s Quilt: Here Comes the Fun!
Alright, friends!
The moment has come to follow the step-by-step instructions for this joyful project.
Below the image, you’ll find the complete instructional guide, so grab your fabrics, get comfy, and let’s begin creating the magic of the All A Flutter quilt!
Full Pattern: Click Here
Pro Tips for Finishing Touches
Now that you’ve put in all that amazing work on the All A Flutter quilt, don’t forget the finishing touches!
Use a matching thread to quilt around the edges of the butterfly appliqués carefully.
This will give them a lovely raised effect that makes them pop on your quilt.
Also, if you want a bit of texture, you can experiment with free-motion quilting in the background.
When you’re all done, don’t rush through the binding process.
It’s like framing a beautiful piece of art.
Consider using the dark blue tone-on-tone fabric for a consistent look.
The binding is often the last step but can have a significant impact on your quilt’s overall aesthetic.
Stitch carefully and take your time to really make your quilt shine!
A Bite-Sized Discovery: Reflection on the Journey
As I sit here looking at my completed All A Flutter quilt, I can’t help but feel a whirlwind of emotions.
Creating something with my hands that brings joy to my living space is incredibly rewarding.
This quilt is not only a testament to my time spent working with fabric, but it’s also a beautiful reminder that creativity knows no bounds.
Each stitch has a story and a memory attached—what a lovely gift!
Now, my wonderful readers, don’t stop here!
Explore more amazing articles and patterns that will get your creative juices flowing.
I even have something truly remarkable that you can check out by clicking here.
Celebrate your journey with all the quilts to come!
Remember, every new project is an opportunity to learn and grow!


