I remember the first time I laid my hands on a layer cake of fabrics; the colors and patterns ignited a spark of creativity within me.
I was instantly drawn to the idea of creating something unique, a piece that would bring warmth and joy to anyone who saw it.
Quilting has always been my way of expressing love and creativity, and nothing felt more thrilling than designing a quilt that could capture a sense of whimsy and nostalgia.
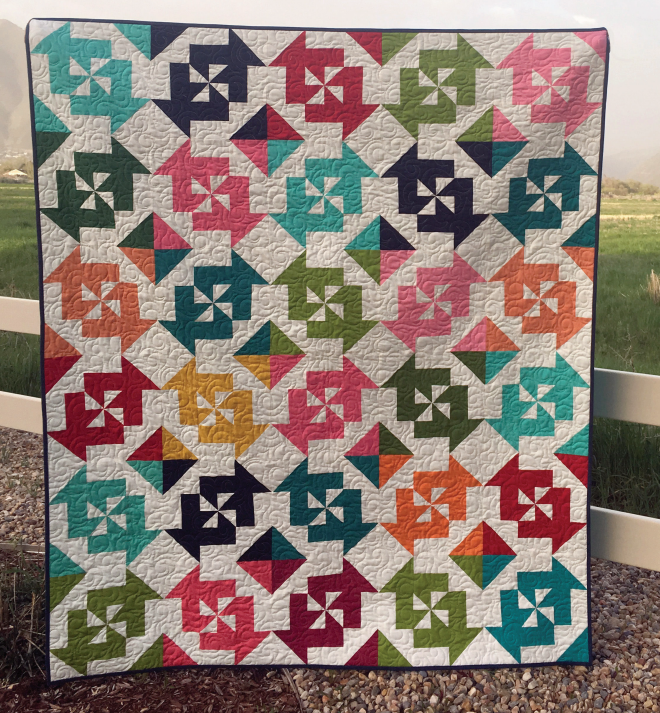
The “Candy Swirls” quilt brings back that same rush of excitement. With its bright and playful design, it reminds me of summer fairs and childhood treats.
The combination of pinwheels and charming fabric pieces creates a swirl of color, much like a candy store display. Let me take you on a journey to create this delightful quilt, a project that is sure to add a sweet touch to your quilting repertoire.
Capturing the Whimsy – The Charm of Candy Swirls
Creating the “Candy Swirls” quilt is about more than just following a pattern; it’s about capturing a feeling. The quilt features a dynamic interplay of colors and shapes, resembling a swirl of candies spread across a confectioner’s counter.
This quilt design utilizes both a layer cake and a matching charm pack, ensuring consistency and harmony throughout the quilt top. The charm of the Candy Swirls quilt lies in its simplicity and the joyful arrangement of the pinwheel and half-square triangle blocks, which together create a delightful movement across the quilt.
The Pinwheel’s Playful Dance
The heart of the “Candy Swirls” quilt is its pinwheel blocks, which dance across the quilt top with a sense of carefree whimsy. The pinwheel assembly is both straightforward and satisfying, involving basic quilting techniques that come together to form a dynamic and engaging pattern.
This quilt is perfect for quilters who enjoy playing with color and layout, allowing for endless customization based on fabric choice and block arrangement.
Materials Needed
Before we dive into the steps, let’s gather all the necessary materials to create our Candy Swirls quilt:
- 1 Layer Cake (30 prints – 10” x 10” each)
- 1 Charm Pack (30 prints – 5” x 5” each, matching the layer cake)
- 3 yards of white fabric (for the background)
- 1/2 yard of fabric (for the binding)
- 4 1/2 yards of fabric (for the backing)
Make sure to select fabrics that bring joy to your heart, as they will set the tone for your quilt. Bright, playful colors are ideal to mimic the look of swirling candy, but you can choose any palette that suits your style.
Preparing for Success – Setting Up for Candy Swirls
Before starting, it’s essential to carefully match up the identical prints of the layer cake and the charm pack. This matching will ensure consistency across the blocks and maintain the quilt’s harmonious appearance. Organize your fabric pieces and tools in a well-lit, clutter-free space. Preparing your work area will make the process more enjoyable and efficient.
Full Pattern: Click Here
Step-by-Step Instructions for the Candy Swirls Quilt
1. Cutting Your Fabric
Begin by carefully matching the 10-inch squares from your layer cake with the 5-inch squares from your charm pack. You will need one 10-inch square and one 5-inch square of the same print for each block.
- Cut each 10-inch square into four 5” x 5” squares.
- From one of these 5-inch squares, cut two 2.5” x 5” rectangles.
- Cut the matching 5-inch charm pack square into two 2.5” x 5” rectangles.
Repeat this process for all the prints in your layer cake and charm pack.
Next, cut your white background fabric:
- Cut 90 pieces of 5” x 5” squares.
- Cut 120 pieces of 2.5” x 5” rectangles.
2. Half-Square Triangle (HST) Assembly
To create the HSTs:
- Take two print 5” x 5” squares and two white 5” x 5” squares.
- Draw a diagonal line on the wrong side of each white square.
- Place each print square and a white square right sides together.
- Sew 1/4 inch on both sides of the drawn line.
- Cut on the diagonal line to create two HSTs from each pair.
- Press toward the print fabric and square up to 4.5 inches if needed.
Repeat this for all pairs to make enough HSTs for your quilt blocks.
3. Pinwheel Assembly
- Use the remaining print and white 5” x 5” squares for the pinwheels.
- Place right sides together, sew 1/4 inch around the perimeter.
- Cut diagonally twice to yield four smaller HSTs.
- Square each to 2.5 inches, then press toward the print fabric.
- Assemble four HSTs into a pinwheel pattern and sew together. The completed pinwheel should measure 4.5” x 4.5”.
4. Rectangle Assembly
- Pair up the print and white 2.5” x 5” rectangles.
- Sew each pair together along the long edge with right sides facing.
- Press towards the print fabric.
- Trim 1/2 inch from one end, resulting in a square measuring 4.5” x 4.5”.
5. Block Assembly
Now it’s time to assemble your quilt blocks:
- Lay out the HSTs, pinwheel, and rectangle units according to your desired layout for each block.
- Sew the pieces together, pressing seams open or to the side as preferred. Each completed block should measure 12” x 12”.
Repeat until you have assembled all 30 quilt blocks.
6. Quilt Top Assembly
- Arrange your completed quilt blocks in a 5 x 6 grid.
- Rotate every other block to create a secondary pattern.
- Sew blocks together row by row, then join the rows to complete the quilt top.
7. Finishing the Quilt
- Layer the quilt top with batting and backing fabric.
- Quilt as desired – simple straight lines or a more intricate free-motion design.
- Bind with your chosen binding fabric to finish.
Additional Tips
- Seam Allowances: Always use a 1/4” seam allowance unless otherwise specified. This ensures all your blocks fit together perfectly.
- Pressing Matters: Pressing seams correctly is crucial for a neat finish. Consider pressing seams open for a flatter quilt top or to the side to reduce bulk.
- Squaring Up: Consistently square up your HSTs and blocks as you go to ensure they all fit together perfectly in the final assembly.
Creating the Candy Swirls quilt is not just about crafting a beautiful blanket but also about enjoying the journey of piecing together something delightful from simple squares and triangles.
Each block you sew brings you closer to a finished quilt that is both whimsical and full of love. I hope this project fills your space with as much joy and color as it did mine. Happy quilting!


