When I first discovered quilting, I was swept away by the vibrant colors and intricate designs that came with each project.
With my sewing machine buzzing away, I realized that creating beautiful quilts was not just a hobby; it was a way to express myself and share warmth and love with anyone who would wrap themselves in my creations.
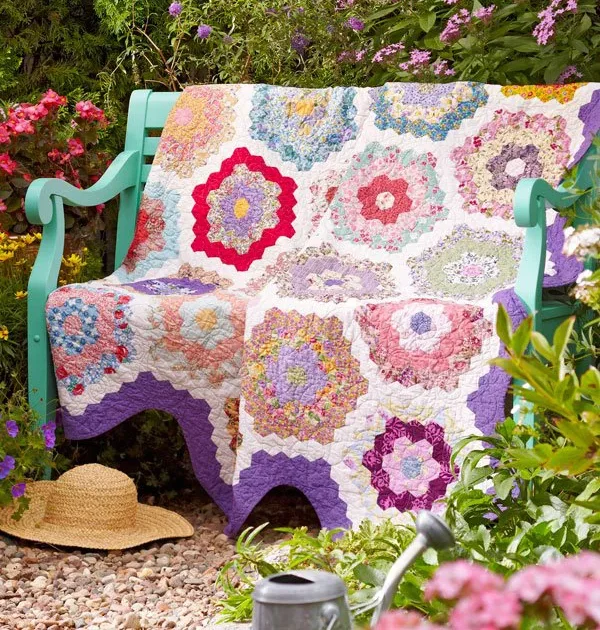
Among the quilts I fell head over heels for was the English Garden quilt—just the name evokes memories of sunlit fields filled with flowers swaying gently in the breeze.
The English Garden quilt project spoke to me because it offers a fresh take on the traditional hexagon shapes found in the classic Grandmother’s Flower Garden pattern.
Instead of the usual prints, this quilt invites modern, floral fabrics that feel radiant and summery.
Whether it’s for a picnic, a cozy night in, or just a pop of color in your living room, this quilt is a true statement piece that brightens any atmosphere!
Bringing a Modern Twist to Classic Patterns
The beauty of the English Garden pattern lies in its ability to blend the classic charm of quilting with contemporary aesthetics.
While keeping that traditional hexagonal shape, you’ll get to play around with colors and designs that truly reflect your personality.
Opting for lively, mixed florals means that each flower unit you work on can be completely unique, making the quilt not only a project but a piece of art!
During the process, I often found myself experimenting with fabric combinations, leaning into the vibrant hues of summer blooms.
Each choice I made added to the character of the quilt, allowing me to create a piece that conveyed my vision of an English garden, full of life and color.
Understanding the Components of the Quilt
To get started on this cheerful journey, it’s essential to know the project’s dimensions and components.
The English Garden quilt measures 84×102 inches, making it generous in size.
The beauty of this pattern, though, lies in the unique components—the hexagons that combine in stunning arrangements using light and dark fabrics.
Selecting your fabrics thoughtfully is crucial since that will establish the overall vibe of the quilt!
Moreover, as you choose fabrics, it’s helpful to incorporate both light and dark prints.
The English Garden pattern showcases a delightful contrast which brings out the best of each hexagon you create.
So remember, the beauty lies in the variety, and don’t be afraid to pick things that might usually seem mismatched!
Gathering My Materials
- 8 yards total assorted light prints (hexagons)
- 4 yards total assorted dark prints (hexagons)
- 4 5/8 yards solid white (sashing hexagons)
- 4 yards solid purple (border hexagons, binding)
- 7 2/3 yards backing fabric
- 92×110″ batting
- Sturdy paper (or pre-cut 1″ hexagon templates)
- Water-soluble fabric pen or chalk marker
When selecting materials, choosing high-quality cotton fabrics is key.
They stand the test of time and feel wonderful to work with.
Trust me; you’ll thank yourself when you’re wrapping up in the cozy English Garden quilt you’ve painstakingly crafted!
And let’s not forget the importance of having the right tools at hand!
A rotary cutter, ruler, and cutting mat will make the initial fabric cutting process a breeze.
Plus, a good sewing machine will be your best friend throughout the entire project.
Preparation Tips Before You Start
Preparation is everything!
Setting up your workspace to be comfortable and organized will ensure you truly enjoy making the English Garden quilt.
Finding a well-lit area allows you to see the true colors of your fabric, and using clear containers for your cut pieces can help keep things tidy.
Before diving into assembly, take the time to familiarize yourself with the hexagon cutting technique.
Whether you opt to create your templates or use pre-cut ones, practice makes perfect.
I suggest making a few practice hexagons to feel comfortable with the stitching and basting techniques required!
Step-by-Step Instructions:
Below, you’ll see a detailed breakdown of how to transform your materials into the beautiful English Garden quilt.
The full pattern can be accessed via the link provided!
Full Pattern: Click Here
Extra Tips for Success
As you work on your English Garden quilt, one tip I’d like to share is to keep a close eye on your seams.
Ensuring you have consistent seam allowances will make all the difference as they add up through the project.
It might seem tedious, but that extra attention will lead to a far more polished final piece.
Additionally, I found keeping a journal of my fabric choices and modifications was beneficial.
It helped me visualize how each unit would come together, and made it enjoyable to see my design evolve over time!
Embracing the Joy of Quilting
Completing the English Garden quilt is not just about the final piece; it’s about enjoying the creative process along the way.
Take time to reflect on each flower unit you attach, knowing that you are piecing together a colorful tapestry that tells a story of your creativity and love for your craft!
If you’re itching for more inspiration, I invite you to wander around my blog that’s bursting with amazing content tailored for passionate crafters.
And for yet another delightful read, check out something truly special here.
You won’t be disappointed!
As we wrap up this journey, I can’t help but smile at the countless memories and skills I’ve gathered along the way while crafting my English Garden quilt.
Embrace every stitch, enjoy your creativity, and happy quilting!


