Let me take you back to a cozy afternoon when I decided to tackle the Diamond Day quilt pattern.
I was surrounded by colorful fabrics and a cup of steaming tea, feeling excited yet a bit apprehensive.
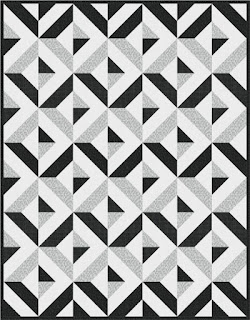
My friends had praised the beauty of this quilt, designed by Robert Kaufman Fabrics, and I was eager to dive in.
With a finished size of 70″ x 90″, Diamond Day seemed like the perfect project to elevate my quilting skills while keeping my living room vibrant!
As I laid out my fabrics—each one more eye-catching than the last—I couldn’t help but smile.
The intricate yet rewarding design of Diamond Day promised not only a beautiful quilt but also the thrill of learning a new technique.
The quilt pattern’s confident beginner level was just what I needed, allowing me to step out of my comfort zone while having fun.
Design Inspiration and Color Stories
One of the most exciting aspects of the Diamond Day quilt is its various color stories.
Each fabric carefully selected contributes to a distinct personality for the quilt, reflecting my mood and style.
Whether you fancy the Spring Colorstory or prefer to explore the options on pages 5 and 6, there’s something for every taste.
As I browsed through fabric swatches, I felt the spark of creativity ignite!
What makes the Diamond Day quilt pattern truly special is the flexibility it offers.
You can let your imagination run wild with color combinations while keeping the elegance of the design intact.
Think of it as a blank canvas waiting for your artistic flourish!
Fabric Selection and Preparation
Gathering the materials for the Diamond Day quilt is an essential first step!
Here’s what you’ll need:
- 1 yard of Chartreuse fabric (SRK-14868-38)
- 2 yards of Aqua fabric (SRK-14868-70)
- 2 yards of Violet fabric (SRK-14868-22)
- 4.5 yards of Snow fabric (SRK-14868-87)
- 1/2 yard of Binding
- 5.5 yards of Backing Fabric and Batting
Before getting started, make sure to read through the instructions thoroughly.
This will help you understand the flow of the Diamond Day pattern.
Also, remember that all seam allowances are 1/4″ unless noted otherwise.
A gentle reminder: measure twice and cut once—I can assure you that it saves time in the long run!
Ready, Set, Go!
Now that you’re equipped with all the necessary materials, let’s prepare for some fun quilting!
Before starting the sewing process, take a moment to organize your workspace.
A tidy sewing area makes it easier to focus on the intricate details of the Diamond Day quilt.
You’ll also want to press all seam allowances open after each seam is sewn, unless stated otherwise.
In this quilt, you’ll be working with strip sets and cutting triangles, so have your cutting mat and ruler handy!
Trust me, it’ll make the cutting process smooth and efficient.
Now, let’s venture into the step-by-step instructions that follow.
You can access the full pattern here.
Full Pattern: Click Here
Detailed Step-by-Step Instructions
The first step of the Diamond Day pattern is to create your strip sets!
Sew together each strip long-sides together into sets of two.
You will match Fabric A, B, and C with Fabric D.
Press those seams open, and you’ll begin to see your beautiful combinations come to life!
Next, you’ll dive into cutting triangles!
Using either the printed template or a quilter’s triangle ruler, cut four triangles from each strip set.
Very carefully, make sure that the center horizontal line is perfectly aligned with the center seam as you cut—this will help maintain the precise look of your quilt.
The fun continues as we move on to assembling the blocks.
Using the assembly diagram, sew two triangles with their long sides together.
If necessary, trim the blocks to 10.5”.
Repeat this process until you have a total of sixty-three blocks.
Once your blocks are ready, it’s time to sew them into rows!
Assemble nine rows of seven blocks each and then sew those rows together to complete your quilt top.
It’s like piecing together a magical picture, one block at a time!
Add Some Personal Touches
Before you wrap up your Diamond Day quilt, consider adding personal touches.
Maybe use a decorative stitch for your binding or incorporate a little embroidery into the design.
These tiny details can transform your quilt from simply lovely to uniquely yours!
Lastly, take the opportunity to experiment with different color stories!
The beauty of Diamond Day lies in its adaptability.
Once you’ve mastered it, you may find yourself wanting to create several versions, each with its unique flair!
Final Thoughts on Your Diamond Day Adventure
As you finish your quilt, take a moment to appreciate all the hard work and creativity that went into it.
Celebrating the completion of your Diamond Day quilt is just as important as the journey you took to create it.
Each twist and turn not only teaches you about quilting but about yourself as a creator!
If you’re looking for more inspiration or have a craving for more quilting fun, don’t hesitate to explore the rest of this fabulous blog.
We have a treasure trove of amazing content waiting for you, and I’ve whipped something special just for you, which you can check out here.
Happy quilting!


