Hey there, fellow quilting enthusiasts!
I’m Julie, and today I’m absolutely buzzing with excitement to share my journey with the incredible Half Way Home quilt pattern.
Not too long ago, I found myself staring at a stack of fabric, feeling both lost and inspired.
This was my moment to dive into the world of improvisational piecing!
With a friendly nudge from the vibrant community around me, I decided it was time to embrace my creative spirit and tackle this fantastic project.
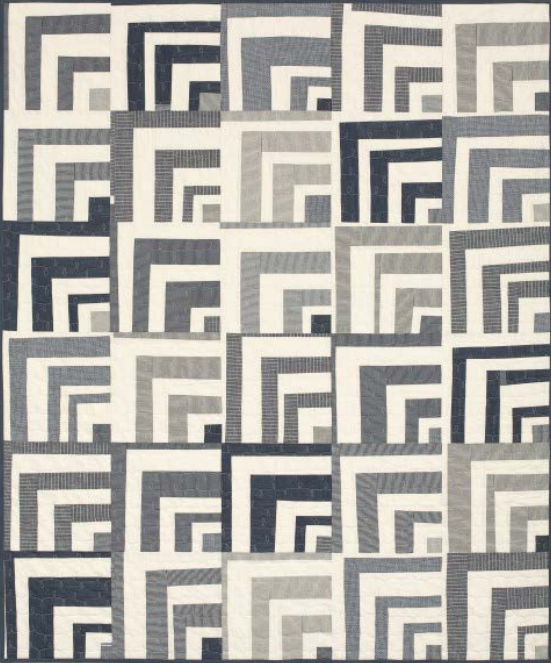
Half Way Home, designed by the talented Heather Jones, really opened the doors for my creativity to shine.
The finished quilt measures an impressive 60” x 72”, perfect for snuggling up on a chilly evening or adding a pop of color to your living space.
I must admit, the idea of learning a new trick was what drove me to this pattern, and spoiler alert: it did not disappoint!
Let’s just say, my sewing machine and I are now on excellent terms, thanks to this project.
Unleashing Creativity with Improvisational Piecing
One of the standout features of the Half Way Home pattern is its improvisational approach.
When I first read through the instructions, I was a bit intimidated by the freedom promised in the fabric choices and cutting styles.
As someone who typically clings to precision, stepping away from that comfort zone felt thrilling!
The blocks are constructed using a mix of denim, chambray, and Kona cotton, allowing for endless creative combinations.
Trust me; you’ll find this aspect as liberating as I did!
The word ‘improvisation’ might sound a little daunting at first, but it’s all about finding your flow and letting the fabric guide you.
Instead of worrying about exact measurements, you get to embrace your artistry.
The Half Way Home quilt encourages spontaneity, inviting you into a world where fabric shapes and patterns collide with the natural rhythm of your creative process.
Digging Deeper: Choosing the Right Fabrics
When it comes to selecting the fabrics for my Half Way Home quilt, I gravitated towards a stunning palette of deep indigos and soft oyster tones.
The beautiful combination of colors not only pleases the eye but also gives the quilt a calming vibe perfect for any home.
As you brainstorm your options, think about how each fabric’s texture can contribute to the overall design!
It’s important to keep in mind that the fabric widths differ.
For example, denim and chambray typically come in wider widths than standard cotton fabrics.
This means you can create some fabulous contrast in your quilt blocks.
Don’t shy away from mixing solid and patterned fabrics; it adds personality to your quilt, making every piece uniquely yours.
Materials You’ll Need for Half Way Home
- 1/2 yard Indigo Denim Fabric (A)
- 1/2 yard Indigo Fabric (B)
- 1/2 yard Denim (C)
- 1/2 yard Indigo Fabric (D)
- 1/2 yard Indigo Fabric (E)
- 2-1/2 yards Oyster Kona Cotton (G)
- 4 yards Backing Fabric
- 1/2 yard Binding Fabric
- 62” x 74” Sized Quilt Batting
Preparation: Measure and Cut with Care
Before you dive headfirst into the Half Way Home quilt, it’s essential to prepare your workspace.
First, ensure you have a clean cutting mat, a sharp rotary cutter, and a trusty ruler at hand—it makes a world of difference.
As the saying goes, measure twice and cut once!
This gives you the freedom to be imaginative while ensuring your pieces fit perfectly together in the end.
When cutting your fabrics, experiment with different strip widths, ranging from 1-1/2” to 4”.
I even found myself grabbing the scissors for some freehand cuts, and it was such a fun, stress-free approach!
Just remember that the improvisational style is not about perfection, but rather about the enjoyment of the process.
Step-by-Step Instructions:
Get ready, because we’re getting into the juicy part!
Below, you’ll find a detailed look into how to create your very own Half Way Home quilt.
I’ve included a lovely image to guide you, and you can access the full pattern via the link below for a detailed reference.
Full Pattern: Click Here
Additional Tips for Success
While working on the Half Way Home quilt, I discovered some delightful little tricks that really amped up my crafting experience.
First, don’t hesitate to mix and match your denim and chambray pieces.
Sometimes, placing misaligned strips creates unexpected yet completely beautiful designs.
Additionally, consider using a variety of sewing techniques, such as chaining your blocks together, to save time.
Also, don’t forget the value of pressing your seams open as you go—they’ll lie flatter when piecing together your quilt top.
And while you might feel tempted to rush through the assembly, taking your time ensures a polished and well-crafted final piece.
Celebrating Your Creative Journey
Completing the Half Way Home quilt is not just about creating a beautiful piece of fabric; it’s also a journey of self-expression and growth.
Given its improvisational method, I found each block telling its own unique story as I pieced it together, and that’s the beauty of quilting—each project becomes a reflection of who we are as crafters.
If you’re eager to explore more inspirations and tips, my blog is filled to the brim with stunning content just waiting for you!
So why not take a whimsical journey through more articles by hopping here?
There’s always something new around the corner to inspire your next creative adventure!
As we wrap up, I truly hope you feel inspired to embark on crafting your own Half Way Home quilt.
There’s immense joy in every stitch, and I can’t wait to see what you create!


