Have you ever walked through an antique store and had your heart catch in your chest at the sight of a beautifully made quilt?
Maybe you thought about the hands that stitched each piece together, the conversations had over cups of tea as the patches slowly formed into a pattern.
Maybe you were reminded of a time when your grandmother taught you to sew, her patient voice guiding you through each step. I certainly have.
Quilting connects us to a lineage of creators, of makers. Each time I thread a needle, I feel that connection, I become part of the narrative. Today, I want to share with you a story of such creative journey, a quilt tutorial from Riley Blake’s Meet the Makers series. Our narrative today features the fifth and final block of this series.
An Introduction to Meet the Makers Quilt Blocks
Over the past few weeks, I’ve been sharing the magic of creating quilt blocks inspired by the Meet the Makers quilt series by Riley Blake. This journey, paved with vibrant fabrics from the Gingham Girls and Sunnyside Avenue collections, culminates in this tutorial.
Today, I present you with the fifth and final block, following the previous four that we have learned together. Don’t fret if you missed them; they are always available for you here.
Gathering Your Materials
To embark on creating this final block, you will need the following fabric requirements (based on the solid version in the video):
Riley White:
- 4 rectangles 3″ x 5 ½”
- 4 rectangles 3″ x 1 ¾”
- 8 squares 1 ¾” x 1 ¾”
Riley Navy:
- 8 squares 1 ¾” x 1 ¾”
Riley Peacock (turquoise):
- 8 squares 1 ¾” x 1 ¾”
Riley Grass (green):
- 8 squares 3″ x 3″
Making It Your Own
In true maker spirit, I took a detour from the original design, replacing the four patches in the corners with traditional star blocks, similar to the first four blocks. I did this because I wanted to make fewer blocks and modify the layout to give my quilt a personal touch. The result is a quilt with a finished size of 64″ x 84″.
The fabric requirements for the block I made are a bit different, as follows:
White (background):
- 1 square 6 ¼” x 6 ¼”
- 4 squares 3″ x 3″
Yellow:
- 4 squares 3 ½” x 3 ½”
Light Print:
- 4 rectangles 1 ¾” x 3″
Red:
- 4 squares 1 ¾” x 1 ¾”
Navy:
- 4 squares 1 ¾” x 1 ¾”
Stitching It Together
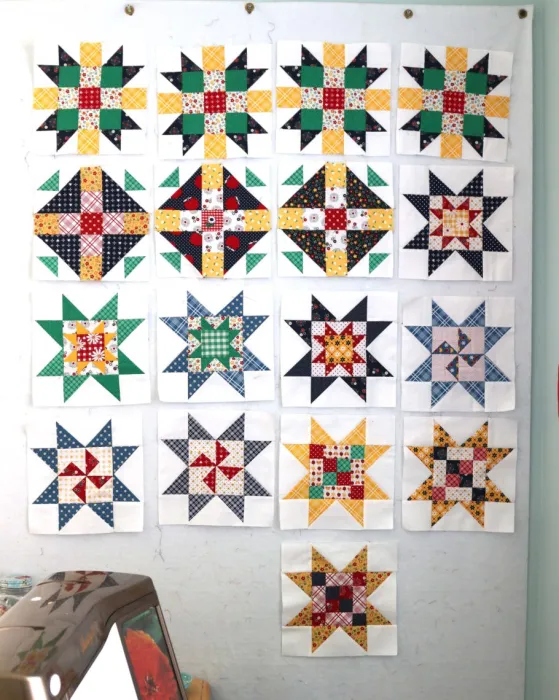
Follow along with the tutorial and before you know it, you will have your fifth and final block. If you’ve been following along with this journey, you’ll end up with 17 pieced blocks in total. It’s truly heartwarming to see how they’ve evolved and how the blocks all come together.
Final Touches
Next week, I’ll be sharing my own tutorial for the off-setting block for the quilt I’ve been crafting. The beauty of quilting is in its flexibility, its openness to personal interpretation. The final size of the quilt will be 64″ x 84″, but feel free to modify for a twin-size quilt if you need one that size.
Full Pattern: Click Here
The joy of this process is in watching the scrappy nature of this quilt come to life, combining my Gingham Girls and Sunnyside Avenue fabric collections. As you stitch each block, let your fingers trace the stories of makers before you and, more importantly, let them tell your story. Happy scrapping!


