Oh, the exhilaration of starting a new quilting project!
The first time I laid my eyes on the Hill Shine pattern, it felt as if it was calling my name.
There’s something magical about a quilt that speaks to your soul.
Just envisioning those vibrant fabrics coming together into a stunning 57” x 57” artwork excited me from the inside out.
I know it might sound dramatic, but that’s the power of quilting!
It’s not just fabric; it’s a form of self-expression, and the Hill Shine quilt perfectly captures that sentiment.
As I embarked on my quilting adventure with Hill Shine, it was not just about learning how to sew pieces of fabric together.
Each step of this process helped me discover a little more about myself.
I thought about the wonderful moments I’d spend inviting friends over for cozy tea sessions with my dazzling quilt on display, and those thoughts motivated me through the trickier stages of the project.
So many memories in the making!
Exploring the Magic of Hill Shine with Color
Hill Shine isn’t just a pattern; it’s a work of art that lets our creative spirits shine through.
Designed by Ariga Wilson for Robert Kaufman, the pattern includes beautiful geometric designs that offer a kaleidoscope of color possibilities.
Selecting the right color palette can elevate your quilt from good to absolutely stunning!
With Hill Shine, I found peace in mixing various shades that complimented each other and reflected my personality.
Color plays a significant role in the mood of your quilt.
Picking fabrics that inspire joy can create an electric atmosphere in your project.
I spent hours browsing through fabric stores, feeling the texture, breathing in the creative energy, and visualizing how each piece would complement the Hill Shine pattern.
When you choose colors that genuinely resonate with you, it’s like infusing your emotions into every stitch!
Design Inspirations and Techniques to Remember
The Hill Shine pattern is not just about stitching fabric—it’s about embracing techniques that enhance your quilt’s beauty!
Using a mix of traditional and modern quilting techniques, such as half-square triangles and simple piecing, the pattern allows both newbies and seasoned quilters to celebrate their craft while creating something breathtaking.
I loved practicing my skills with every piece I sewed, and the sense of accomplishment after mastering these techniques felt incredible.
Inspiration is all around us, and it can stem from various sources—nature, architecture, or even art.
I found that looking at quilts made by other quilters who used the Hill Shine pattern can ignite a spark of creativity.
Whether they added a personal twist or used different fabrics, it made me realize how special our quilting community is.
There’s so much to learn and share!
Materials You’ll Need for Your Hill Shine Creation
- Quilt fabric – assorted 1/4 yard cuts in your color choices.
- Backing fabric – enough to cover a quilt of dimensions 57” x 57”.
- Batting – pre-cut to match your quilt size.
- Thread – select shades that harmonize with your fabric choices.
- Rotary cutter and mat – to ensure precise cuts.
- Quilting ruler – helpful for accurate measurements.
- Sewing machine – your trusty ally throughout this journey.
- Pins or clips – for holding fabric layers in place.
- Iron and ironing board – for smoothing out seams.
- Quilting gloves (optional) – to help maneuver the fabric easily.
Preparation Gives You a Head Start
Before diving into the Hill Shine quilt, taking time for preparation can save you headaches down the line.
Imagine how delightful it is to lay out all your fabric pieces and tools in an organized manner!
I took a day to pre-wash my fabric, making sure they would behave during the quilting process.
Trust me; it’s worth it to avoid those pesky color bleeds!
I also found it helpful to cut all my fabric pieces ahead of time and store them in labeled bags.
Not only does it streamline the process, but it also allows you to visualize the different sections of the quilt.
This preparation creates an extra layer of excitement as you see all the pieces come together in your mind before even touching the sewing machine!
Step-by-Step Instructions:
Now that you’re fully prepped, below is the step-by-step process for bringing your Hill Shine quilt to life!
Follow along and let the magic unfold!
For the full pattern, check the link beneath the image.
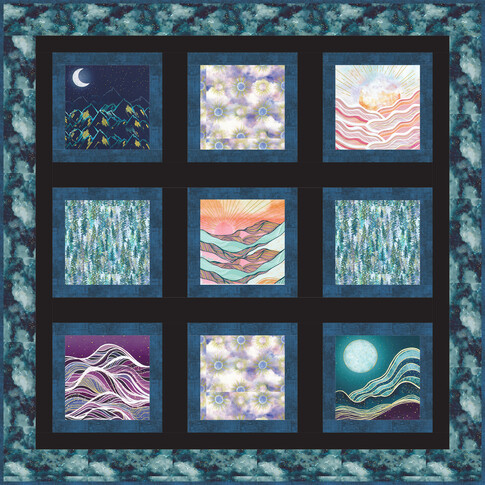
Full Pattern: Click Here
Additional Tips for Quilting Success
As you tackle the Hill Shine quilt, remember to take breaks when needed.
This is a labor of love, and rushing can lead to mistakes that take away from the joy of the process.
If you find your mind wandering or frustration creeping in, stepping away for a quick cup of tea or a gentle walk can refresh your creativity!
Moreover, don’t shy away from reaching out to fellow quilters.
Communities thrive on shared experiences and learning from one another can help elevate your skills.
Whether you join social media groups or local quilting clubs, the exchange of ideas can spark inspiration and boost your confidence as you stitch the beautiful Hill Shine quilt.
Advanced Techniques to Elevate Your Design
Once you’re comfortable with Hill Shine, you might want to explore advanced techniques to add depth to your design.
Consider playing with trapunto or adding appliqué elements that enhance the quilt’s visual narrative.
Integrating these techniques can yield a stunning interpretation of Hill Shine that showcases your creativity!
Let your imagination roam wild!
The beauty of the Hill Shine quilt pattern is that it can morph into whatever you envision.
Embrace the artistic freedom that comes with quilting and remember that there’s no limit to your creativity!
Celebrate Your Creativity with Hill Shine
Completing the Hill Shine quilt is a celebration of your hard work, creativity, and passion for quilting.
It’s not just about crafting a piece; it embodies a journey filled with moments of learning and joy.
As you wrap yourself in this lovely quilt, take a moment to appreciate how far you’ve come and the artistry you’ve created.
Every stitch tells a story—your story!
If you’re eager to dive into more quilting goodness, don’t hesitate to explore the tons of amazing content I’ve packed into this blog!
There’s something enthralling waiting for you, and I’m super excited for you to check it out by clicking here.
Keep the creative spirit flowing, and until next time, happy quilting!


