Hey there!
SEE A NEW PATTERN HERE
I’m Julie, and if you’re anything like me, then you know how important it is to have a cozy quilt wrapped around you, especially during those chilly evenings.
A while back, I decided to dive into quilting, and let me tell you, it’s been nothing short of magical!
I stumbled across the Blizzard quilt pattern, and I knew I had to give it a go.
The colors, the design, everything about it screamed creativity and warmth.
The Blizzard quilt is not just about functional warmth; it also reflects a piece of who we are!
Each square I sewed felt like a little chapter in my crafting journey.
Just to think, I could create something that’s not only beautiful but also incredibly useful brought such joy to my heart.
So come join me in exploring this delightful quilt pattern!
Creating a Winter Wonderland with the Blizzard Quilt
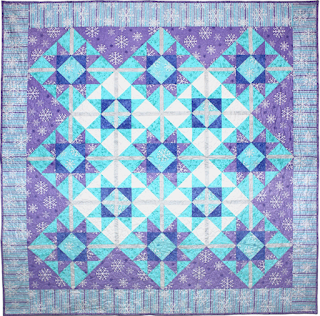
What I adore about the Blizzard quilt is that it brings the frosty charm of winter indoors.
The color palette creates a serene vibe, which is perfect for snuggling up with a hot cup of cocoa.
The fabric choices like Snowflake Stripe and various Fairy Frost tones serve as your creative playground.
As you craft this quilt, you are essentially painting a gripping story inspired by winter’s beauty!
This quilt is more than just a simple project — it’s about connecting with the season and creating something you can treasure.
From the first cut of your fabric to the final stitch, the Blizzard quilt allows you to express your creative spirit.
Let’s get into the nitty-gritty details on how to create this winter masterpiece!
Understanding the Blizzard Quilt Pattern
Each design element in the Blizzard quilt is thought out, which is part of what makes it shine.
With its confident beginner level, this pattern can help both new and experienced quilters sharpen their skills.
The quilt is constructed in blocks, which means you can easily tackle it one step at a time.
This way, you won’t feel overwhelmed, and can enjoy the journey.
Not to forget, the Blizzard quilt also allows your personality to blend into the finished piece.
You can play around with various fabric patterns and colors to suit your style and home decor.
Plus, tackling this quilt pattern can be a fun bonding experience with friends or family; you can have sewing nights, snacks, and lots of laughter along the way!
Materials Needed for the Blizzard Quilt
- 1 Yard of CM2049_BLUE Snowflake Stripe
- 1 1/3 Yards of CM2050_AMETHYST Snowfall
- 4 Yards (for backing)
- 1/3 Yard of CM2050_BLIZZARD Snowfall
- 1 Yard of CM0376_LUNA Fairy Frost
- 5/8 Yard (for binding) of CM0376_FANCY Fairy Frost
- 1/2 Yard of CM0376_PLATINUM Fairy Frost
- 1/2 Yard of CM0376_SNOW Fairy Frost
- 3/8 Yard of CM0376_CROCUS Fairy Frost
Don’t forget to gather your sewing machine, thread, scissors, rotary cutter for those crisp edges, and a cutting mat.
Doing so will set you up for smooth sailing through your crafting journey with the Blizzard quilt.
Also, it’s essential to pre-wash your fabrics to avoid any possible shrinkage after your quilt is complete.
This extra little step is so worth it to ensure the longevity of your beautiful creation!
Gear Up for the Blizzard Adventure
Before you start cutting and sewing, I recommend laying out your fabrics to visualize your quilt.
This step helps you see if the colors complement each other well and results in a beautiful finished product.
You might even come up with a few different designs for your quilt before diving in, keeping the creative juices flowing!
I also suggest ironing your fabrics before cutting them.
A smooth surface will make your cutting precise and enjoyable.
Trust me, you’ll be thankful later when your seams sew up perfectly, all thanks to that smooth, freshly pressed fabric.
Step-by-Step Instructions for the Blizzard Quilt
The following sections will guide you through the step-by-step instructions on creating this enchanting quilt!
Below, you’ll find the full pattern for the Blizzard quilt you can easily follow.
By clicking on the link, you’ll be taken to the full directions!
Full Pattern: Click Here
Additional Tips to Enhance Your Experience
As you progress through your Blizzard quilt, it’s essential to stay patient and take your time.
Mistakes can happen; after all, we’re all human!
Instead of getting overwhelmed when something goes ‘not quite as planned,’ consider it an opportunity to learn.
You may surprise yourself with the unique results!
Using a consistent quarter-inch seam allowance will yield the best results and help you assemble your blocks more easily.
Investing in a quilting ruler that shows seam allowances can be incredibly beneficial.
Plus, don’t hesitate to reach out to the quilting community online; there are tons of helpful folks waiting to share advice and encouragement!
Unveil Your Personal Touch on the Blizzard Quilt
To take the Blizzard quilt to the next level, think about incorporating some quilted designs or patterns onto your quilt top.
This process adds depth and character, turning it from a beautiful piece of fabric into a true work of art.
Whether you choose to go free-motion or use a walking foot, the design process can be as fun as assembling the patchwork!
Furthermore, consider adding a unique label to the back of your quilt, including your name, the date, and a little message to commemorate this creative endeavor.
It adds that personal touch and will be a wonderful keepsake for you or a loved one!
Celebrate Your Craft and the Journey
As you complete your Blizzard quilt, take a moment to reflect on the journey.
Each stitch represents creativity, patience, and the joy of making something unique.
It’s more than just a quilt; it’s a celebration of your growth as a crafter, the time spent, and the joy of having something warm and cozy to share.
Ready for more crafty adventures?
Be sure to check out the numerous articles I have waiting for you!
There’s so much amazing content on this blog to inspire your next project.
So, if you can’t wait to dive into another fabulous crafting journey, I’ve got a fantastic piece you can explore right here.
Happy quilting!


