Hi everyone!
Julie here, and I’ve got something exciting to share with you all today: the Fire and Water Throw quilt
Let me tell you about my little journey with this stunning design.
It all kicked off one chilly evening when I was in a cozy cabin by the lake, surrounded by nature’s canvas painted in vibrant oranges, deep teals, and soft creams.
The brilliance of the colors mirrored the essence of the Fire and Water Throw quilt, instantly igniting my creativity and passion for quilting.
As I nestled beside the warm fireplace, contemplating my next project, I realized that the warmth and calm that the patchwork quilt symbolized felt just like the duality of fire and water.
I envisioned this cozy throw draping over my lap as I worked on it, reflecting my own unique touch blended with nature’s inspirations.
Let’s dive into the colorful world of the Fire and Water Throw together!
Designing with Purpose: The Inspiration Behind the Fire and Water Throw
The Fire and Water Throw quilt is more than just a project; it’s a beautiful expression of contrasting elements that come together harmoniously.
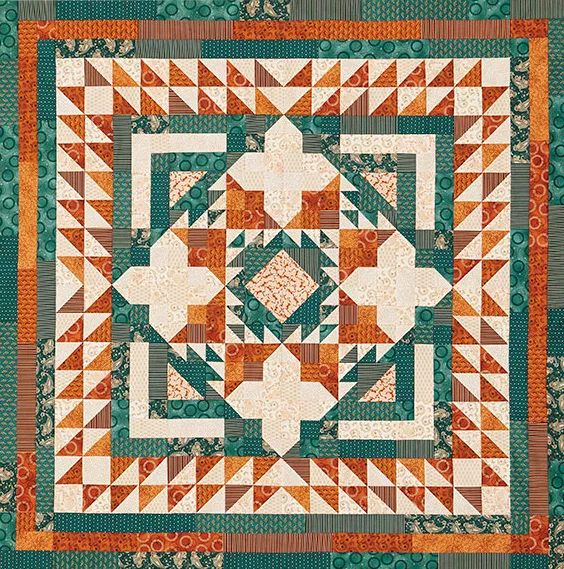
Its bold design features a stunning central star surrounded by a radiating border that showcases a playful mixture of colors.
This quilt captures the rivalry of fire and water but stitches them beautifully into a unified whole, reminding us of the beauty found in balance.
Inspired by Lynn Roddy Brown’s creativity, the design utilizes fabrics from the More Perfect Pairings collection.
The patterns within these fabrics reflect the fluidity of water and the fierce energy of fire, showcasing unique textures that harmonize while being distinct.
Every cut and stitch brings us closer to the harmonious essence that the Fire and Water Throw embodies.
Gather Your Supplies for the Fire and Water Throw!
Before we jump into creating this masterpiece, let’s make sure we have everything we need.
Here’s what you’ll require to dive into your Fire and Water Throw quilting journey:
– 2 yards total assorted cream prints (for blocks and borders)
– 3 yards total assorted teal prints (for blocks and borders)
– 1 3/4 yard total assorted orange prints (for blocks and borders)
– 5/8 yard binding fabric
– 3 7/8 yards backing fabric
– 69″ square batting
– Sewing tools (scissors, cutting mat, pins, etc.)
Tip of the Day: Prepare to Make Your Fire and Water Throw Shine
Before you start cutting and sewing, I always like to take a moment to prepare my workspace.
Clearing away any unnecessary clutter will help you focus as you work on the beautiful Fire and Water Throw quilt.
Trust me; a tidy space is key to a mindful quilting experience!
Next, lay out your fabric and make sure to press it well.
This might seem like a small step, but it really makes a difference in getting clean cuts and precise seams.
The neater your pieces are at the start, the more satisfying your finished quilt will be!
Step-by-Step Instructions for Your Fire and Water Throw
Now, let’s delve into the heart of the process!
Below, you’ll find step-by-step instructions to guide you through the making of the Fire and Water Throw quilt.
Don’t forget, you can check out the full pattern via the link provided here after the image.
Happy sewing!
Full Pattern: Click Here
Extra Tips to Master the Fire and Water Throw
As you make your way through the Fire and Water Throw quilt, I can’t stress enough how important it is to take your time.
Don’t rush through those intricate pieces!
Each triangle-square and block is a piece of art in itself.
Always ensure you’re pressing your seams at every step—this brings crispness and helps everything fit together beautifully.
If you find one of the steps challenging, don’t hesitate to refer back to the diagrams in the pattern.
Visual aids can be lifesavers!
And if you ever find yourself hitting a wall creatively, take a break, and come back with fresh eyes.
Creativity often strikes when you least expect it.
Cherishing the Creative Journey
Completing the Fire and Water Throw quilt is not just about having a gorgeous finished product but also about celebrating the entire creative journey that brought it to life.
Each stitch tells your own unique story—a tale of perseverance, creativity, and passion for quilting.
So take a moment to appreciate each block you create; it’s a piece of your heart!
If you enjoyed this journey, I invite you to explore other articles on the blog.
There’s a treasure trove of tips, patterns, and inspiration waiting for you!
Make your next move dazzling by discovering something incredible by clicking here.
Let’s keep the creative fire burning together!


