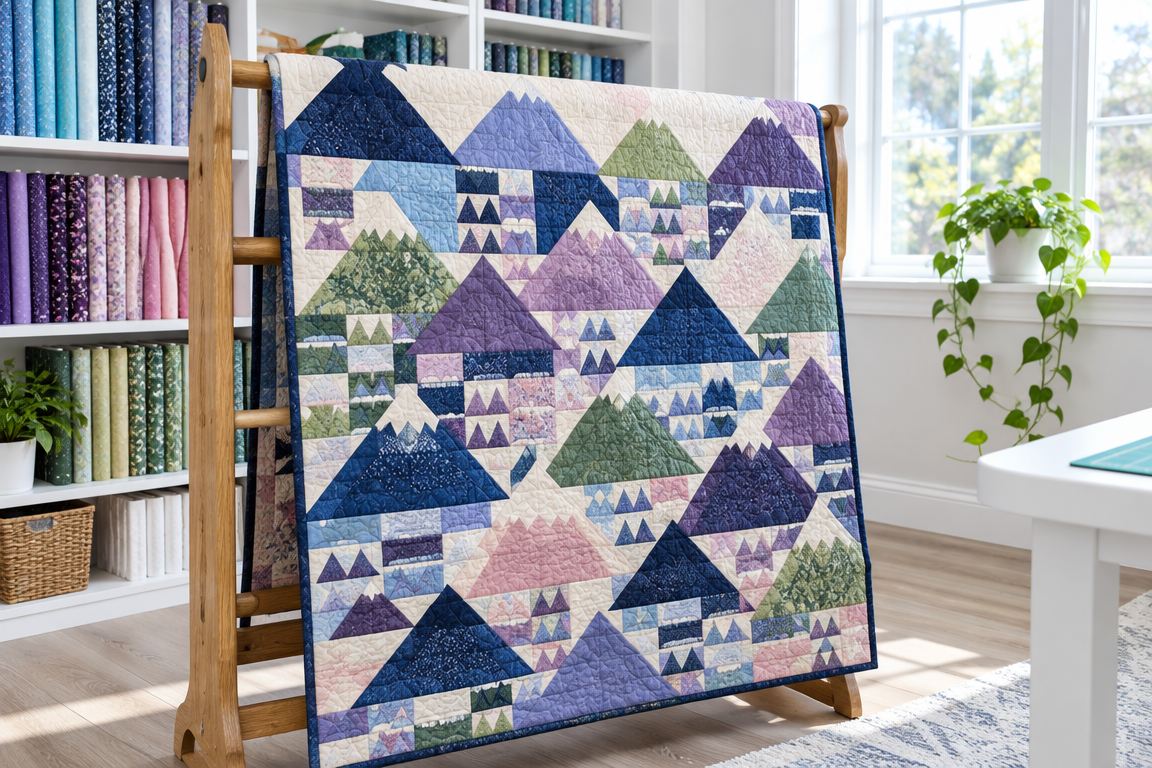
When I first pieced the Delectable Mountains blocks for Lupine Ridge, I kept finding myself pausing to stare at how the peaks looked like they were drifting across a meadow breeze.
This quilt started in my sewing room on a bright afternoon, with bolts of periwinkle and violet leaning against the rack and a potted plant quietly judging my fabric choices.
I pinned a few test rows together and loved the moment the staggered setting made the peaks overlap into one rolling ridge instead of separate block islands.
Before long, the deep indigo and cream snowcap triangles started to feel like weather—cool shadows below and soft highlights on top.
Every time I pass the light oak quilt rack, Lupine Ridge makes me smile, because it reminds me how much joy there is in layering shapes until they finally read as a landscape.
Here’s the pattern I used, with the full instructions waiting right below the photo.
SEE A NEW PATTERN HEREWhy Lupine Ridge Feels Like a Real Landscape
The look of Lupine Ridge comes from the way each Delectable Mountains block stacks a bold half-square triangle peak above a ladder of rectangles and little triangles.
When you set those blocks in staggered rows, the peaks overlap and slide into a mountain range that feels layered and gently dimensional.
The meadow palette does the rest—deep indigo anchors the scene, periwinkle and violet bring the cool bloom of lupines, and sage green keeps the horizon feeling calm.
Piecing the Peaks: A Simple Rhythm with Big Impact
I like to treat the Delectable Mountains blocks like a friendly sequence—strip piecing for the rectangles, then quick precision for the half-square triangles and tiny accents.
For Lupine Ridge, I purposely mixed values so the cream snowcap triangles pop without stealing attention from the indigo peaks.
When you alternate violet, periwinkle, and blush pink in the lower ladder areas, the mountains feel like they’re softly catching light rather than sitting flat on the quilt.
Materials for Lupine Ridge (Mountain-Ready Supplies)
- Fat quarters for assorted peaks and ladders (deep indigo, periwinkle, violet, sage green, blush pink, cream): about 10–12 fat quarters total
- Additional cream fabric for scattered snowcap triangles: about 1 yard
- Backing fabric: about 3 yards
- Batting (queen or throw size, depending on your final layout): about 2.5–3 yards
- Binding fabric (narrow sage binding): about 3/4 yard
If you enjoy fabric sorting like I do, pull your pieces into small piles by color value before you cut, and you’ll feel the quilt coming together faster.
And if you’re short on one color, it’s totally fine to substitute another close-value option—Lupine Ridge is forgiving as long as the cream and indigo anchors stay consistent.
Prep Your Workspace Like a Mini Mountain Camp
I set up a small cutting lane, a pressing station with steam ready, and a design wall area where I can shuffle rows without overthinking it.
Before I sew, I press all seams in the same direction across each row so the mountain lines stay crisp when everything overlaps.
Then I do a quick layout check—nothing fancy, just enough to confirm the stagger so the peaks read as one continuous range.
Download the Full Lupine Ridge Pattern
Below the photo, you’ll find the downloadable PDF with complete, step-by-step instructions for piecing the Delectable Mountains blocks and assembling the staggered, overlapping rows.
The full pattern is in the link below the photo, so you can follow along at your own pace and keep your seams accurate from the first block to the last.
Tips for a Cleaner Finish and Sharper Peak Lines
For those bold half-square triangles, I like to chain-piece, then press the seam carefully to support the peak without rounding the corners.
When assembling each row, take a moment to verify that each ladder section lines up so the overlap looks intentional rather than accidental.
For the narrow sage binding, press a gentle final fold before stitching so the edge stays neat and the quilt’s meadow palette frame looks polished.
A Slightly More Advanced Twist: Diagonal Grid Quilting
If you want Lupine Ridge to feel extra airy and modern, try quilting an allover diagonal grid that echoes the way the mountain shapes tilt across the scene.
You can mark the grid with a removable tool and keep the lines evenly spaced, then stitch slowly through thicker seams as needed.
For scrap mixing, consider swapping tiny triangle colors between periwinkle and violet only, while keeping cream snowcaps consistent so the “snow” highlights remain readable.
Celebrating the Finished Ridge
When Lupine Ridge is finished, I love how the mountains look like they’re layered in distance, with the cream accents catching light like little patches of snow.
Once it’s draped over the rack, it turns my bright, airy sewing room into something that feels like springtime and storytime at once.
If you’d like another mountain-inspired adventure, head back through the Quilt Dreams blog and pick a new pattern to start your next landscape with joyful momentum.