Hello, all you wonderful quilters and fabric adventurers out there!
I’m Julie, and today I’m super excited to share a truly dazzling project with you—the Made in Cherry quilt.
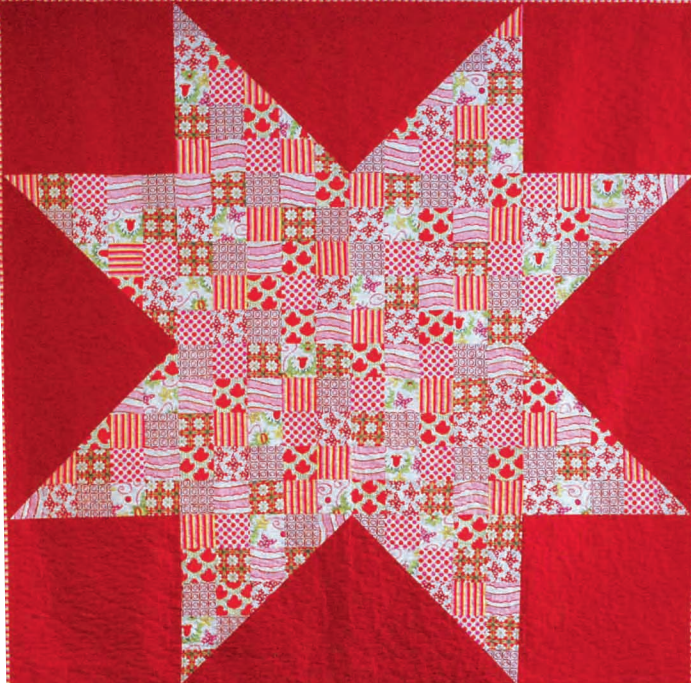
This quilt shines bright with its cherry colorway and serves as a beautiful representation of fabric artistry.
Let me tell you, stitching this quilt was a blast and a delightful adventure into color and design!
I remember the moment I laid my eyes on the vibrant cherry fabric from Sarah Fielke’s ‘St Ives’ collection.
It took me back to the days when I used to climb trees and chase butterflies under the sun, all while sipping on a cherry soda to cool off in the summer heat.
The Made in Cherry quilt inspired me to capture that feeling in fabric, and I just had to dive into this project!
A Splash of Vibrant Colors
When working with the Made in Cherry quilt, I learned how critical it is to choose the right colors to evoke the energy of cherry blossoms in springtime.
The quilt showcases not just shades of cherry red but also beautifully complements it with floral prints, adding depth and dimension to the top.
Each patch you stitch holds a tale of childhood joy and playful days!
The beautiful cherry prints in the Made in Cherry quilt are perfect for merging nostalgia with contemporary flair.
It’s amazing how certain colors can bring back so many memories.
Selecting the right palette not only boosts the quilt’s aesthetic but makes the whole process more personal and engaging.
Gathering Your Supplies
- 20” (50cm) each of eight different ‘St Ives’ prints for the quilt top
- 2.5 yards (2.2m) of plain red fabric for the background
- 28” (70cm) stripe fabric for binding
- 6.25 yards (5.5m) backing fabric
- 2.5 yards (2.25m) cotton wadding
- Cotton thread for piecing
- Rotary cutter, cutting mat, and ruler
- Sewing machine and general sewing supplies
As I gathered everything, I made sure that all fabric was 100% cotton or linen—trust me, it makes a huge difference!
The quality not only enhances the quilt’s longevity but also the final look.
Before starting with the Made in Cherry quilt, it’s a good idea to iron all the fabrics.
Wrinkles can really throw off your measurements and make piecing a hassle.
Who wants that, right?
Just smooth out everything, and you’re good to go!
Let’s Get Those Creative Juices Flowing
Now that you have all your supplies and your fabrics are ironed, it’s time to put your quilt top together.
I love the next part—the designing!
It’s where you get to decide how to lay out the Made in Cherry quilt.
You could take a photo of your design or even briefly sketch it out for reference!
There’s nothing like stepping back and looking at your design from a distance!
Stand back to see how the colors blend and the patterns interact.
Feel free to rearrange until you get that perfect balance—you have full creative control over the Made in Cherry quilt!
Step-by-Step Instructions for Crafting Your Quilt
Here comes the fun part!
The details on how to put together your quilt top will follow the image below.
You might want to dig deeper into the specifics of the Made in Cherry quilt pattern for each step and feature.
Full Pattern: Click Here
Additional Tips for a Successful Project
As you work through the Made in Cherry quilt pattern, don’t forget to enjoy the process!
Quilting is as much about the journey as it is about the destination.
If you encounter hiccups, just breathe, step back, and see what adjustments can be made.
The quilt will turn out beautifully—I promise!
Another tip: always remember to press your seams as you go.
It may seem tedious, but it creates a neat finish and prevents fabric from bunching.
Trust me, the little details make all the difference when working on the Made in Cherry quilt!
Advanced Techniques to Consider
If you’re feeling adventurous, consider experimenting with different block arrangements or trying out a new technique, like adding in a few wonky squares for quirky charm.
The Made in Cherry quilt is great for this because it allows you to see what works best for your style.
Another fun technique you might want to try is machine quilting with specific patterns.
I found that using a butterfly design really tied into the playful nature of the Cherry colorway—such charm!!!
Celebrate Your Creative Accomplishments!
Congratulations on embarking on your Made in Cherry quilt journey!
Each stitch adds to the beauty of your final piece, and there’s something incredibly satisfying about wrapping up this colorful project.
Take a moment to admire your work; you’ve poured love and creativity into every detail!
I invite you to explore more amazing articles filled with inspiration and fun!
Our blog is bursting with vibrant content that caters to all your quilting desires.
Discover more by diving into a fantastic article that awaits you by clicking here.
Your next quilting adventure is just a click away!
In closing, it’s been a blast sharing the magical process of crafting the Made in Cherry quilt.
This project not only connects us with our creative side but also serves as a potential heirloom crafted with care and love.
Let’s continue to stitch together our stories, one quilt at a time!


