Hey everyone!
It’s Julie here, and I am beyond excited to share my latest quilting adventure with you!
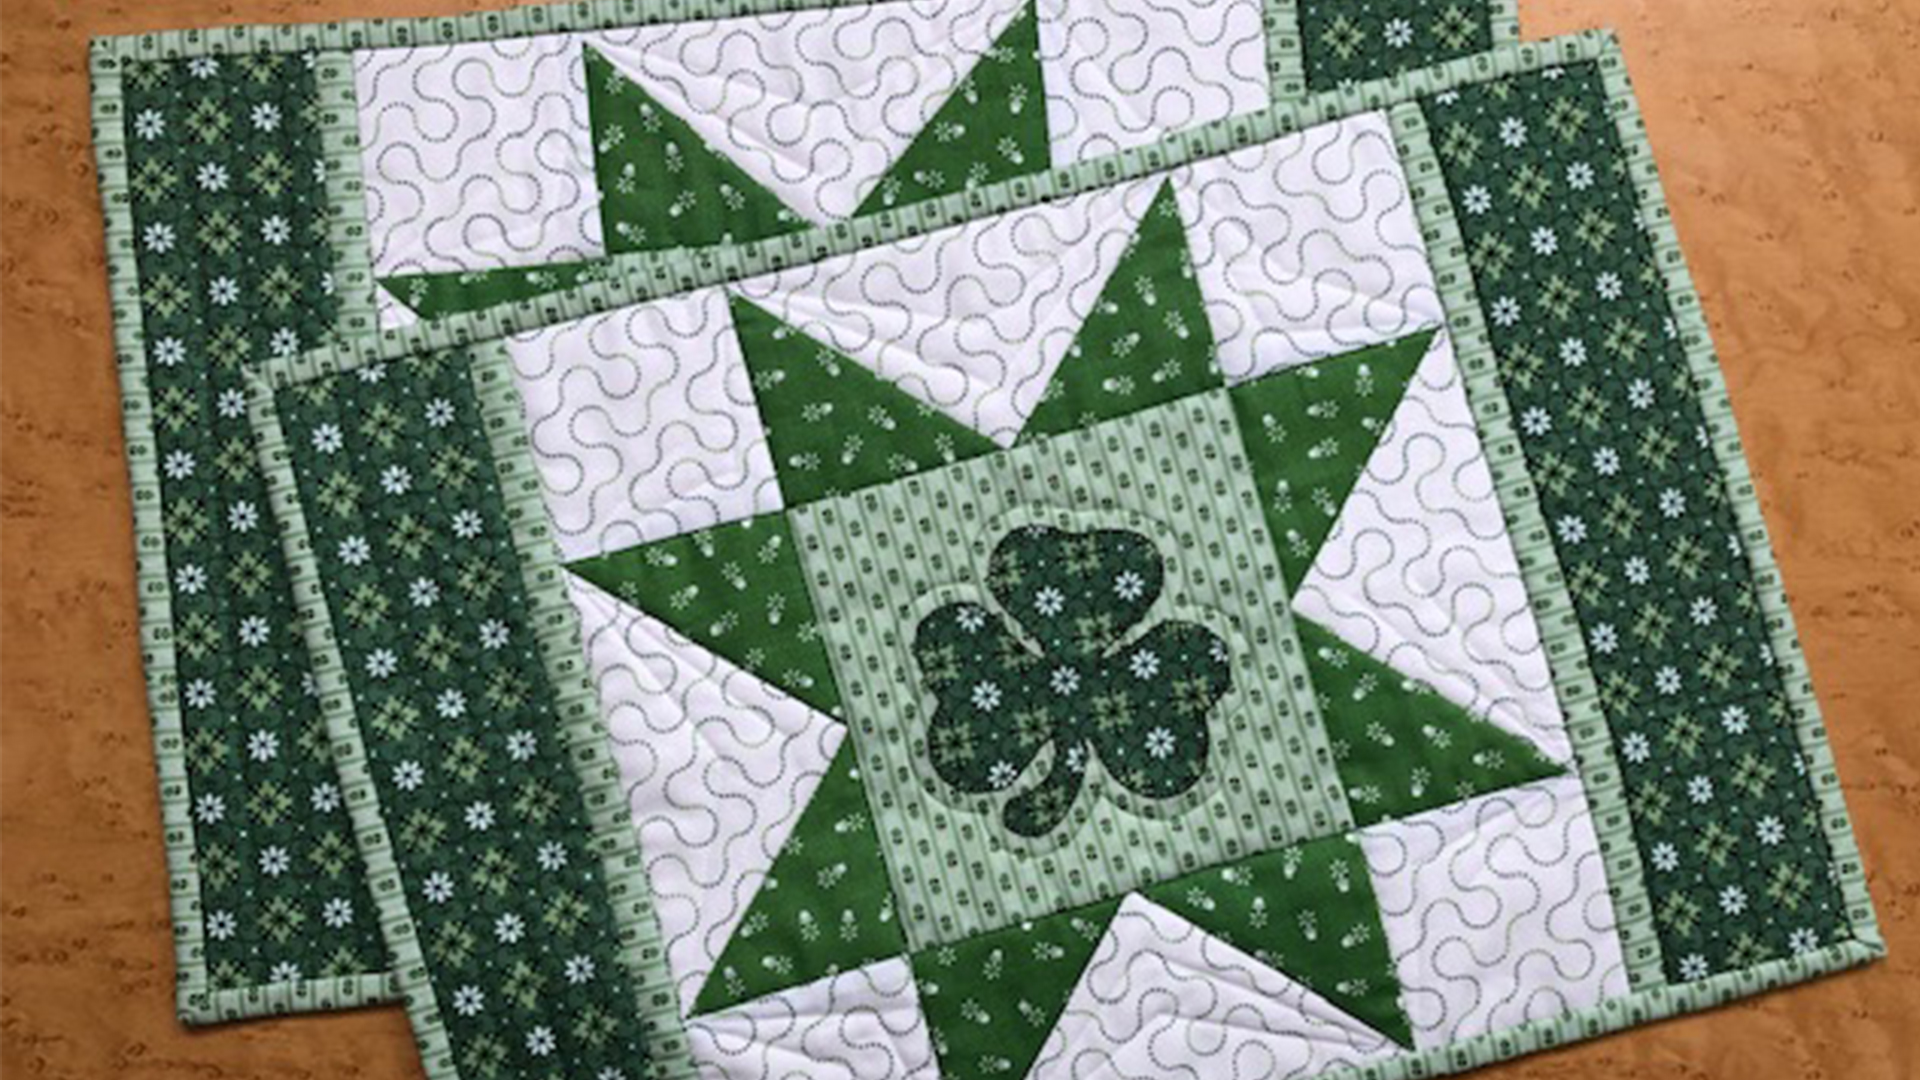
Recently, I was in the mood for something festive and cheerful, so I decided to make the Shamrock Star Placemat.
This little project not only brightened my table but also filled me with a sense of achievement.
After all, there’s something energizing about creating items that celebrate the spirit of a season or occasion.
Whether you’re preparing for St.
Patrick’s Day or just want a splash of green in your home, I’m here to guide you through it!
Now, before I jump into the nitty-gritty, let me tell you a bit about why I love making placemats, especially the Shamrock Star Placemat.
They are a wonderful way to practice specific techniques without the commitment of a larger project.
Plus, it’s always lovely when I can spread joy to friends and family around the dining table.
You’ll see how even the simplest patterns can shine brightly, and trust me, this placemat does just that!
Bringing the Shamrock Star Placemat to Life
The Shamrock Star Placemat is not just a dish holder; it’s an expression of your creativity and skill.
Each time I quilt, I find a piece of myself within the stitches.
The choice of colors, fabric types, and designs can reflect your personality or set the mood for a season.
This placemat speaks to the heart of Irish culture, weaving together the beauty of stars and shamrocks in every stitch.
Having a chance to use fun fabrics, like green stripes and charming prints, makes the Shamrock Star Placemat even more delightful.
What’s fascinating about this pattern is how the flying geese technique enhances the overall design.
You’ll find that as you delve into this placemat, it unlocks a whole new level of creativity!
Diving into All the Necessary Supplies
- 3/8 yd – dark green fabric
- 7/8 yd – green stripe fabric
- 1/2 yd – medium green fabric
- 5/8 yd – light print fabric
- 3/4 yd – backing fabric
- 20” x 50” – batting
- Rotary cutter
- Cutting mat
- Fabric marking pen/pencil
- Quarter inch seam marker
- Best Press or spray starch (optional)
- Heat-n-Bond (or similar product)
- Scissors
- Pins
- Thread for piecing
- Iron and pressing mat
As you gather these materials for the Shamrock Star Placemat, feel the excitement build!
The variety of fabrics will give you freedom to express yourself, and I can assure you that you’re going to love how they come together to form a beautiful placemat.
Be sure to have a cozy space to work in and all your tools at hand for the most enjoyable quilting experience!
Before you dive in, I highly recommend preparing your cutting area.
Take time to set up your space so it feels welcoming and is well organized.
A clean workspace makes a world of difference, especially when tackling the intricacies of the Shamrock Star Placemat.
Also, don’t forget to give your fabrics a good press.
This will ensure you work with smooth, flat pieces, letting your sewing experience flow effortlessly.
Let’s Get This Show On The Road!
Now comes the exciting part – following the step-by-step instructions below to create your very own Shamrock Star Placemat!
Each step is not only a step towards creating something beautiful but also a chance to improve your quilting skills.
Don’t forget that if you need the full pattern, you can access it via the link provided below the image.
Full Pattern: Click Here
Additional Tips for Quilting Success
Practice makes perfect, and this is especially true for the Shamrock Star Placemat!
Be patient during the construction phases, particularly with the flying geese units.
Taking your time with marking and cutting will yield beautiful results every time.
If you find the process challenging at times, don’t hesitate to visualize how each step will contribute to your final creation!
Also, if you’re unsure about any part of the pattern, re-read those instructions!
It’s always helpful to take a quick break and come back to them.
Finding your rhythm with the sewing machine and getting comfortable with constructing blocks will lead to a fantastic finished product that you’re proud to show off!
Embrace Your Unique Design Choices
As we get deeper into working on our Shamrock Star Placemat, don’t forget to make it your own!
Incorporating unique fabrics or choosing different placements will add a personal touch that transforms your placemat into something truly special.
It’s great to draw inspiration from traditional designs but remember, there’s no right or wrong here – just your fabric and your creativity colliding!
Love the pattern but want to break some rules?
Go for it!
Experiment with colors or designs that may not be the conventional choice; you might just create a new favorite go-to placemat pattern.
This is part of the fun of quilting with the Shamrock Star Placemat; it adapts to your style!
Celebrate Your Finishing Touches!
As you wrap up your Shamrock Star Placemat, take a moment to reflect on all the fun you had during the process.
Each stitch, each curve, and each little shamrock adds to the delightful energy of this beautiful placemat!
Remember to celebrate your victories, no matter how small they may seem.
If you’re eager for more delightful projects, be sure to poke around the blog!
You’ll find tons of amazing content waiting for you.
Without a doubt, you’ll have plenty of sewing fun, and I’ve prepared an incredible piece you can check out by clicking here.
So continue your creative journey with a heart full of inspiration!
In conclusion, I hope this article has sparked your interest in quilting, particularly with the Shamrock Star Placemat.
Embrace the joy as you create your own placemats, and let your creativity flow.
Can’t wait to see what you make!


