Growing up in a family where crafting was as much a part of our daily routine as breakfast, lunch, and dinner, I was always fascinated by the vibrant colors and intricate patterns of quilts.
My grandmother, a master quilter, used to say that every quilt tells a story, stitching together memories and dreams with every piece of fabric.
Her words stayed with me, and as I learned to quilt under her watchful eye, I dreamed of creating my own stories through fabric and thread.
The Folded Star Hot Pad project reminds me of those days, blending tradition with my own personal narrative.
The Folded Star pattern, in particular, holds a special place in my heart.
It was the first pattern my grandmother taught me, using scraps from dresses she had made for me over the years. Each piece of fabric was a memory, each fold a step back in time.
As I embark on creating this tutorial, I am reminded of the warmth and love that quilting brings, not just in the physical sense, but in the emotional tapestry it weaves.
The Magic of the Folded Star
The Folded Star Hot Pad is not just a functional item for your kitchen but a piece of art that tells a story through its folds and colors.
This project is a wonderful introduction to quilting for beginners, offering a step-by-step approach to creating something beautiful and practical.
The technique used in the Folded Star is traditional, yet it provides ample opportunity for personalization and creativity.
It’s a testament to the quilt’s ability to blend simplicity with complexity, allowing each maker to imprint their own style and story into the fabric.
A Patchwork of Memories
Embarking on the Folded Star Hot Pad project is like opening a book filled with colorful illustrations.
Each fabric selected becomes a character in your story, from the serene teal print reminiscent of calm oceans, to the vibrant gold print that brings a burst of sunshine.
The large dot and green floral fabrics add depth and contrast, while the turquoise dot ties it all together with a touch of tranquility.
This project is not just about creating a hot pad; it’s about weaving together pieces of fabric to create a tapestry of memories.
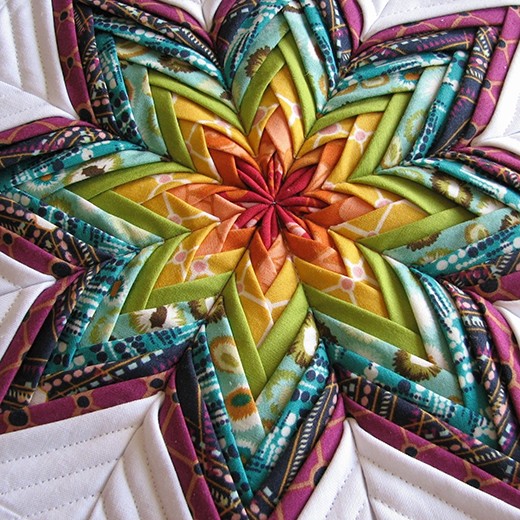
Full Pattern: Click Here
Materials Needed: A Quilter’s Palette
To bring the Folded Star Hot Pad to life, you will need:
- 1 fat quarter each of teal print, gold print, large dot, green floral, and turquoise dot.
- One 7” square of muslin for the foundation.
- One 8” square each of coordinating print for backing and cotton batting.
- Needle and coordinating thread.
- A turning stick.
These materials are your palette, each one contributing to the final masterpiece. The process of selecting and preparing your materials is the first step in the journey of creation.
Preparing for the Journey
Before diving into the construction of the Folded Star Hot Pad, it’s important to approach this project with patience and an open heart. Quilting, at its core, is an act of love and creativity. As you prepare your materials and workspace, consider the story you want your Folded Star to tell. Whether it’s a tribute to a loved one, a celebration of a special moment, or simply an expression of your personal style, let the fabric and your hands tell the tale.
Step-by-Step Instructions: Crafting Your Folded Star Hot Pad
Step 1: Laying the Foundation
Begin with the 7” muslin square, which will serve as the foundation of your hot pad. Fold this square in half twice, pressing with an iron to mark the quarters. Then, unfold and fold diagonally in both directions, pressing again to mark. These creases will guide the placement of your fabric pieces, ensuring symmetry and balance in your design.
Step 2: The First Fold
Take a 4” square of the teal print fabric and fold it in half twice, wrong sides together, to form a smaller square. Press to crease. Open up the last fold to form a rectangle, then fold each corner down to meet the center crease, creating a folded triangle. Press these folds into place. Repeat this process to make four folded triangles.
Step 3: Assembling the Star
Place the four teal triangles on the muslin foundation, aligning them with the creases to form the first layer of your star. The points of the triangles should meet in the center. Pin them in place, then machine baste around the outer edges and hand stitch the points to secure them.
Step 4: Building the Layers
Repeat the folding process with the gold print fabric to create eight triangles. Arrange these around the first set, maintaining a small gap between the points. Ensure the horizontal and vertical triangles are placed first, followed by the diagonal ones, using the muslin’s crease lines for guidance. Pin, baste, and tack as before. Continue adding layers with the large dot and green floral fabrics, then finish with the turquoise dot triangles, alternating between the 4” and 6-½” sizes for the final round.
Step 5: The Finishing Touches
Layer an 8” square of batting, the backing fabric right side up, and the hot pad right side down. Pin the layers together, then sew around the perimeter with a ¼” seam allowance, leaving an opening for turning. Clip the corners, turn the hot pad right side out, and use the turning stick to shape the corners. Press, then hand stitch the opening closed.
Additional Tips for Success
- Precision is Key: Take your time with folding and pressing to ensure precision. Accurate folds make for a more stunning star.
- Customization: Feel free to experiment with different fabric patterns and colors to personalize your hot pad.
- Basting: Use a contrasting thread color for basting so it’s easy to remove any visible stitches later.
- Quilting as You Go: For an added touch, quilt along some of the folds to add texture and detail to your hot pad.
As you complete your Folded Star Hot Pad, take a moment to appreciate the journey from simple pieces of fabric to a functional work of art. This project not only offers a practical addition to your kitchen but serves as a reminder of the stories we can tell through quilting.
Each fold, each color, and each stitch is a testament to creativity and tradition. May your Folded Star Hot Pad bring warmth and beauty to your home, and may it inspire you to keep creating, exploring, and telling your own stories through the art of quilting.

