Hey everyone!
Julie here, and I have an exciting story to share with you about my latest adventure in quilting—the delightful Barn Star quilt!
Picture this: It was a cozy Saturday afternoon, and inspiration struck like lightning!
I stumbled upon this beautiful pattern while sipping my favorite chamomile tea, and I knew I had to dive in.
The Barn Star quilt, which measures a fabulous 64 x 64, seemed to call out to me, begging for creativity and color.
I could almost see it draped across my living room couch, brightening the space with homemade warmth.
The beauty of the Barn Star quilt pattern isn’t just in its design, but in the memories it helps us create.
You know, there’s something magical about piecing together fabrics and watching a quilt transform as you sew each square and triangle with love.
I swear, every time I make a quilt, I dream up little stories around it.
Like what a friend may think when they receive it, or the perfect occasion to show it off.
Each stitch in the Barn Star quilt is more than just thread; it’s a testament to love, creativity, and a sprinkle of joy!
[Technical Brilliance of the Barn Star Quilt]
The Barn Star quilt pattern holds a special place in the quilting community.
It’s not just about creating something beautiful; it’s also about mastering simple techniques that lead to stunning results.
The construction of half-square triangles is a fundamental technique that opens the door to countless quilting patterns.
The great thing about the Barn Star quilt is that it teaches you to work with these triangles in a straightforward way without sacrificing style.
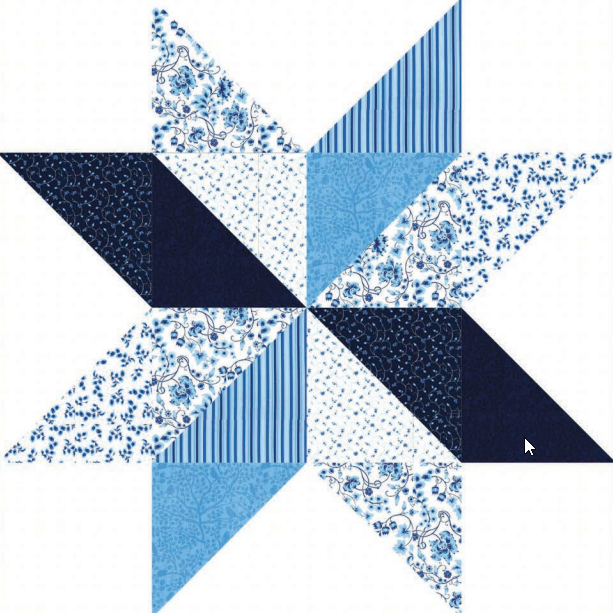
Understanding the layout is key to this pattern’s success.
The Barn Star quilt utilizes bright, contrasting fabrics along with a soft background that really makes the central star pop!
It’s a delightful mix of traditional and contemporary styles, making it a perfect project for both new and avid quilters.
Plus, you can tailor it to your color preferences, so it perfectly matches your home decor or special occasion!
[Beyond the Basics: Techniques to Enhance Your Barn Star Quilt]
When it comes to enhancing your Barn Star quilt, I always say that preparation is everything!
Before you even think about sewing, make sure you’ve labeled your fabrics properly.
Trust me; it saves a lot of confusion later on.
I like to assign numbers to my fat quarters (from 1 to 6) and my half yard piece (7), keeping relative values consistent.
This step ensures that you’re following the pattern exactly as designed, making it easier to create those stunning shapes, especially when cutting your squares and triangles!
Another tip?
Don’t skip the pressing!
After you’ve stitched your squares and triangles, take a moment to press those seams.
It may seem like a small detail, but pressing not only helps your blocks lay flat but also makes it easier to achieve precise measurements in your Barn Star quilt.
And don’t forget, a well-pressed quilt is a happy quilt!
Materials
- 1 fat quarter each of 6 colorful fabrics
- ½ yard of your favorite fabric
- 2 yards of background fabric
- 1/2 yard for binding
- 4 yards for backing
- Quilting threads in coordinating colors
- Rotary cutter, cutting mat, and quilting ruler
- Sewing machine
- Iron and iron board
[Gear Up for the Barn Star Quilt Adventure]
Before you plunge into making the Barn Star quilt, I recommend taking a few moments to gather everything you need, ensuring your workspace is cozy and inviting.
It’s much easier to get lost in the creative flow when you have your fabric, cutting tools, and sewing machine all lined up and ready to go.
Plus, a comfy chair and a playlist of your favorite tunes can truly set the mood!
Also, jot down or print the cutting instructions beforehand, so you won’t find yourself scrolling through your phone while you’re in the zone.
This is your adventure, so make it enjoyable!
Double-check to ensure you have your colors assigned and ready for the beautiful Barn Star quilt you’re about to embark on.
[Step-by-Step Instructions for the Barn Star Quilt]
Are you ready for the instructions?
Let’s get started on the Barn Star quilt!
The step-by-step process unfolds below, and for those who crave the complete pattern, check out the link provided!
Full Pattern: Click Here
Additional Tips
One of my favorite tidbits to share is this: always stay organized!
Keep your cut pieces in labeled bags so they don’t get mixed up.
Each time I make the Barn Star quilt, organization makes a HUGE difference in my workflow.
Also, don’t hesitate to make a test block before diving into the full quilt—this way, you can experiment with different fabric combos and get comfortable with the technique of sewing half-square triangles.
Lastly, embrace creativity!
The Barn Star quilt isn’t just about perfection; it’s about expressing who you are as a quilter.
Customize your Barn Star quilt with unexpected fabric choices, or even add embellishments in the end.
Make it a true representation of you!
[Reflections on Creating Your Barn Star Quilt]
As you wrap up your Barn Star quilt, take a moment to appreciate your hard work and the stories that come with every stitch.
It’s more than just a quilt; it’s a beautiful collection of moments, creativity, and your personal touch.
Celebrate this achievement!
You’ve created something to cherish and share with friends and family.
If you enjoyed this journey with the Barn Star quilt, why not explore more?
My blog is bursting with wonderful content, so jump in and discover new patterns and projects that will inspire your crafty soul!
You’ll find something incredible that speaks to you by hopping over here.
Happy quilting, everyone!


