I’ve always felt that a project should bring a smile to your face and a bounce to your step.
SEE A NEW PATTERN HERE
Diving into the world of quilting is that exact exhilarating journey!
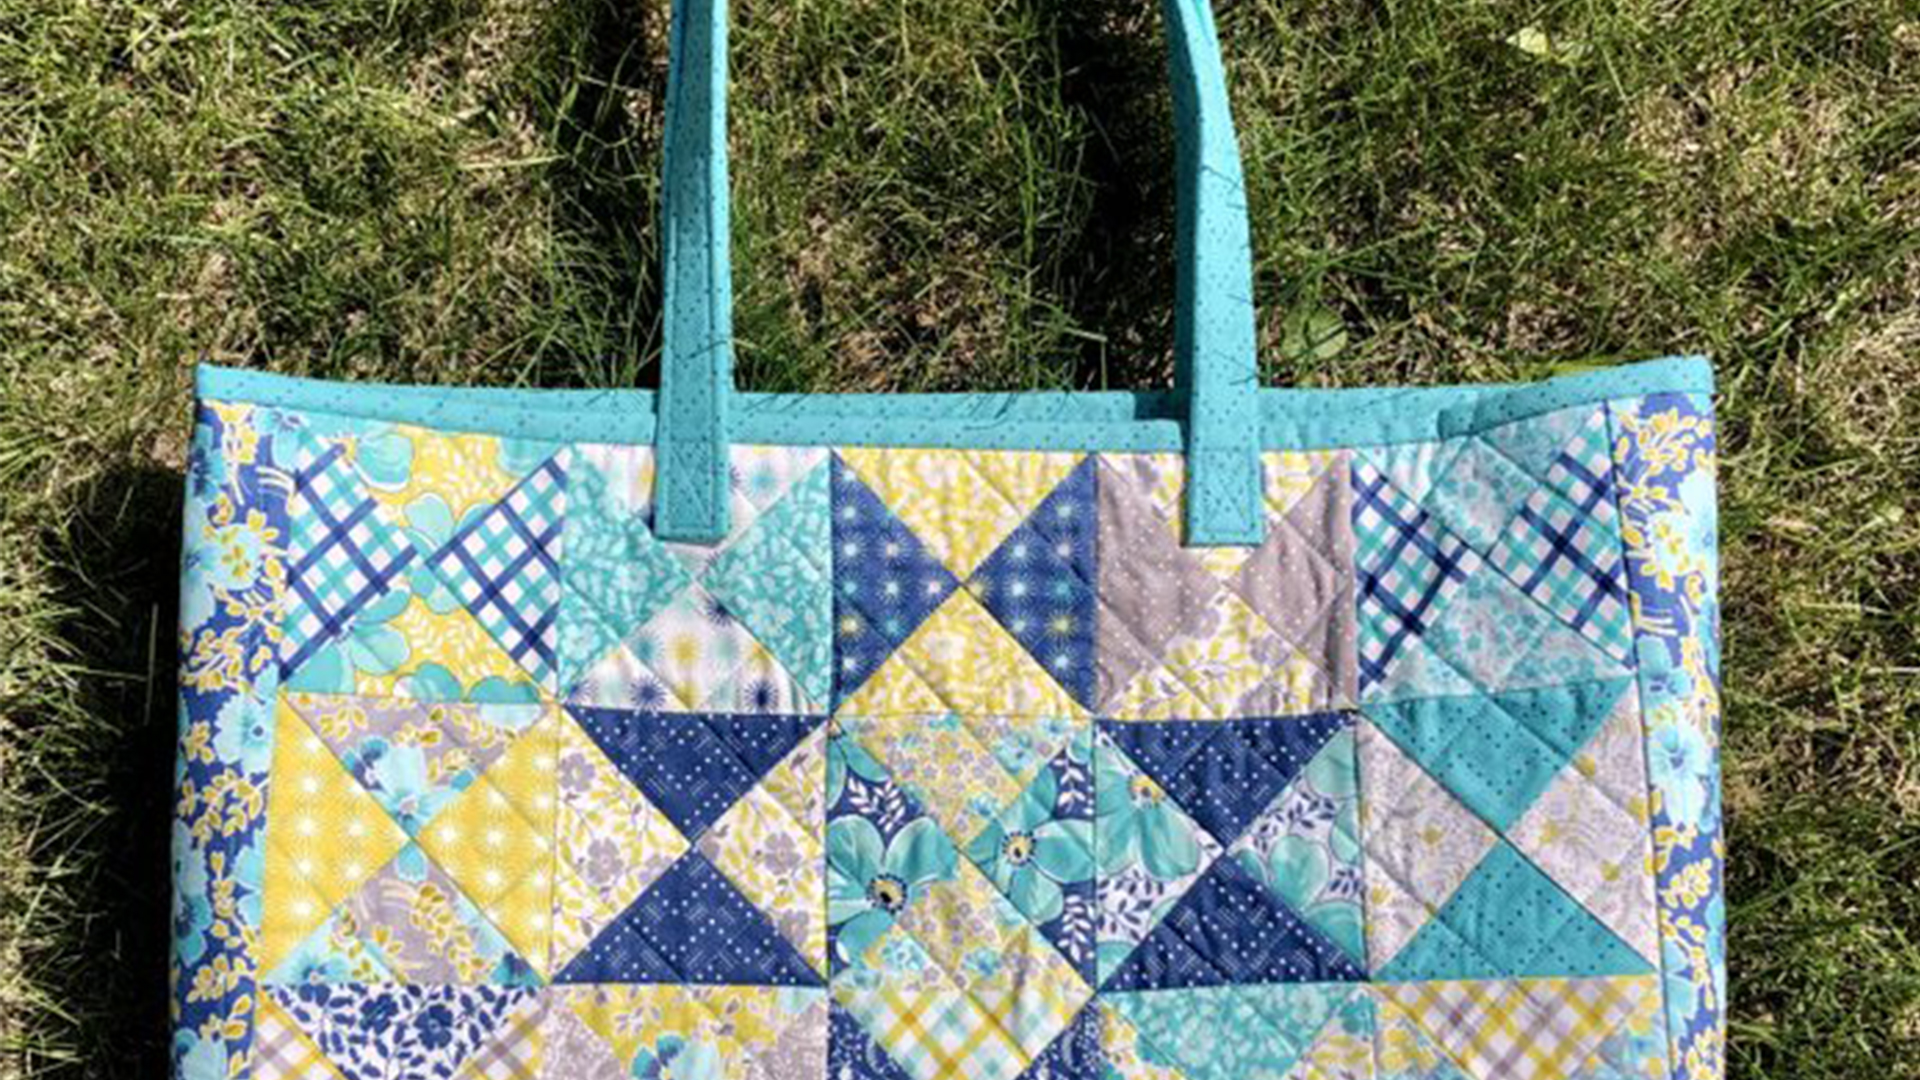
My latest love affair has been with the Touring Tote Bag.
It’s not just about crafting a tote; it’s about creating something functional with a dash of flair, perfect for my everyday adventures.
Let me tell you, there’s nothing like the satisfaction of making something beautiful that I can actually use!
So, when I first saw the Touring Tote Bag pattern, I was drawn not just to its eye-catching design but also to its practicality.
I imagined all the places I could take it – filled with books at the park, snacks for a picnic, or supplies for my next quilting project.
And as I worked through each step, I could truly feel my creativity blossom.
Let’s get you started on your own journey!
Understanding the Touring Tote Bag’s Design and Functionality
The Touring Tote Bag is an excellent introduction to quilting, offering a perfect blend of technique and fun.
It features charming hourglass block patterns, a spacious interior, and handles that are sturdy enough for all your adventures.
But what I love most is how personalized you can make it!
The choice of fabrics and colors allows for a unique twist that screams ‘you’.
This bag isn’t just about looks, though!
It cleverly combines form and function.
With the ability to hold all kinds of items comfortably, the Touring Tote Bag is structured yet flexible.
Plus, its stylish appearance means it’s not just a utilitarian item; it adds flair to any outfit.
So, as we embark on this crafting escapade, remember that each little detail is what makes your Touring Tote Bag uniquely yours!
Getting Acquainted with Essential Materials
- 1 package 5” charm squares
- 1/2 yd.coordinate A for sides/bottom
- 1/2 yd.coordinate B for binding/handles
- 1 yd lining fabric
- 1 package batting (20” x 40”) – I recommend a polyester fusible style for ease
- Packs Peltex 71F (4 strips of 1” x 30”)
- Crafter’s Choice interfacing (7” x 24” for optional pocket)
- Rotary cutter and cutting mat
- Iron and pressing mat
- Fabric glue stick, thread, pins, and scissors
Having the right tools is paramount to crafting success!
Make sure to check your inventory before diving in, as running out of materials mid-project can be a struggle (trust me, I’ve been there!).
It’s also wise to choose fabrics that coordinate well, allowing your Touring Tote Bag to shine in style as well as substance.
Once you’ve gathered your materials, it’s time to prep your workspace!
Ensure you have plenty of room to lay out fabric and pieces without clutter.
Take a few minutes to comfort your self and find your creative zen.
It’s all about setting the tone for a relaxing and inspiring craft session as we create the fabulous Touring Tote Bag together.
Setting the Stage for Your Project
Before we jump into the fun part, let’s take a moment to prepare ourselves for crafting this delightful Touring Tote Bag.
I recommend familiarizing yourself with the pattern before you start cutting or sewing.
Understanding the layout, how each component fits together, and visualizing the end results can boost your confidence and creativity immensely!
Also, don’t hesitate to test out your sewing machine’s settings.
Make sure it’s set for a quarter-inch seam allowance and that your walking foot is ready to go to handle multiple layers of fabric seamlessly.
A little preparation can go a long way in ensuring your stitching is clean and even – ultimately making your Touring Tote Bag beautiful and functional!
Step-by-Step Instructions
Now comes the exciting part!
Below you’ll find the step-by-step instructions to create your Touring Tote Bag.
The full pattern is just a click away, so make sure you follow the directions carefully to achieve a stunning result!
Full Pattern: Click Here
Additional Tips for Crafting Success
As you work through your Touring Tote Bag project, remember to press seams often.
This habit helps maintain structure and gives your bag a more professional finish.
If you get a little stuck during construction or some pieces aren’t aligning perfectly, don’t get discouraged!
Just take a breath, assess your progress, and adjust as needed.
Every quilter has their hurdles; it’s part of the learning process!
Also, be sure to step back and admire your work periodically.
Each time you finish a block or section, give yourself a pat on the back.
Celebrate your little victories – they add up!
The joy in creating is just as important as the finished product, especially when it comes to the enchanting Touring Tote Bag!
Embracing Your Creative Journey
As you join me in completing the Touring Tote Bag, take a moment to reflect on the joy and satisfaction that comes with crafting.
You’re not just stitching fabric; you’re weaving memories and experiences into your project!
There’s something indescribably beautiful about seeing your vision come to life, transforming fabric into a gorgeous, functional accessory.
I encourage you to explore more of my blog, where you’ll find tons of amazing content waiting for you.
There’s always more to learn, so let’s keep the creative juices flowing!
You can dive into another fantastic piece by embarking on a new adventure by clicking here.
Trust me; your next project is just around the corner!
With your newly completed Touring Tote Bag in hand, I can’t wait to see where your creativity takes you.
Happy crafting!


