Every quilt has a story, and every story is a unique thread in the grand tapestry of life.
One such thread in my tapestry was spun on a balmy summer day in a sleepy town’s antiquities shop, where I chanced upon the Churn Dasher quilt pattern.
It was one of those rare, tranquil afternoons where time seemed to stand still.
The shop was a treasure trove of historical artifacts, but a beautiful, rustic quilt, adorned with the intricate Churn Dasher pattern, caught my eye. It was love at first sight.
My curiosity piqued, I asked the elderly shopkeeper about the quilt’s origins. To my surprise, she revealed that it was a locally crafted quilt, a staple in many homes in the region.
The Churn Dasher pattern, she explained, was a beloved classic, woven with the love and resilience of the local quilting community.
I was deeply moved by this narrative and found myself increasingly drawn to the Churn Dasher pattern. It was more than just a beautiful design; it was a symbol of unity, craftsmanship, and history.
It was an age-old tradition that thrived in the warm corners of countless homes, whispering tales of comfort and camaraderie.
With the Churn Dasher quilt in my possession, I set out on a quest to decipher this beautiful design.
This journey led me to the world of quilting, where every stitch, every fabric, and every pattern carries a story. Today, I am thrilled to share the magic of the Churn Dasher pattern with you.
Unveiling the Churn Dasher
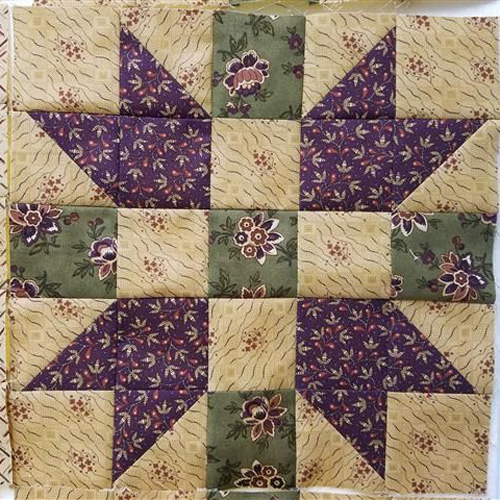
The Churn Dasher is a timeless quilt block pattern, appreciated for its balanced design and simplicity. Its charm lies in its versatility, fitting beautifully in traditional and modern quilts alike.
Gathering Your Materials
Before we dive into the heart of the Churn Dasher pattern, here is a list of materials you’ll need for your quilting journey:
- A cutting mat, rotary cutter, and quilting ruler
- Two contrasting fabrics (Fabric A for the background and Fabric B for the dashes)
- Sewing machine
- Coordinating thread
- Pins and a pin cushion
- Iron and ironing board
- Quilting needle
Step-by-Step Instructions for Churn Dasher
Step 1: Gathering Your Materials
Having all the necessary materials at hand before you start will ensure a smoother process. For the Churn Dasher quilt, you will need: a cutting mat, rotary cutter, quilting ruler, two contrasting fabrics (Fabric A for the background and Fabric B for the dash), a sewing machine, coordinating thread, pins and a pin cushion, an iron and ironing board, and a quilting needle.
Step 2: Understanding the Pattern
Before you begin cutting and sewing, spend a little time understanding the Churn Dasher pattern. Look at examples online, and draw out a rough sketch if it helps. You’ll be making four half-square triangles (HSTs), a central square, and four rectangles.
Step 3: Cutting Your Fabric
Proper cutting of your fabrics is the foundation of your quilt block. Here’s what you need:
- From Fabric A, cut:
- Four 2-7/8″ x 2-7/8″ squares
- One 5-1/2″ x 5-1/2″ square
- From Fabric B, cut:
- Four 2-7/8″ x 2-7/8″ squares
- Four 1-1/2″ x 5-1/2″ rectangles
Step 4: Marking the Diagonals
Take each of your 2-7/8″ squares of Fabric A and draw a diagonal line from one corner to the opposite on the back of each square. This will be your stitching guide for creating the HSTs.
Step 5: Sewing the Half-Square Triangle Units
Pair up a Fabric A square with a Fabric B square, right sides together. Sew along each side of the diagonal line, 1/4″ away. You should end up with a sort of ‘V’ shape. Cut along the drawn line to end up with two separate HST units. Press the seams towards the darker fabric to avoid it showing through the lighter one. Repeat with all square pairs.
Step 6: Assembling the Block
Arrange your HSTs, the central square, and rectangles to form the Churn Dasher pattern. Sew together each row of pieces using a 1/4″ seam allowance, pressing the seams towards the darker fabric after each step to keep your work neat.
Step 7: Sewing the Rows Together
Now, sew your assembled rows together, also using a 1/4″ seam allowance. Be careful to line up your seams so the pattern meets nicely at the corners. Again, press the seams towards the darker fabric.
Step 8: Repeat for More Blocks
Now that you’ve completed one Churn Dasher block, you can repeat the process to make as many blocks as you need for your quilt. Remember to stay consistent with your seam allowances and pressing directions.
Step 9: Assembling the Quilt Top
Once you have enough blocks, you can start sewing them together to form the quilt top. Lay them out in your chosen arrangement, then sew together row by row, and then each row together.
Step 10: Making the Quilt Sandwich
Once your quilt top is finished, you’re ready to make the “quilt sandwich.” This involves laying down your backing fabric (wrong side up), then your batting, then your quilt top (right side up). Make sure everything is smooth and flat before basting together.
Step 11: Quilting
Now you can start quilting! This involves sewing through all three layers of your quilt sandwich to secure them together. You can follow the Churn Dasher pattern, do free-motion quilting, or choose another design that you like.
Step 12: Binding the Quilt
The final step in making your quilt is to bind the edges. This involves cutting strips of fabric, sewing them end-to-end to create one long strip, then folding in half and attaching to the front of your quilt using a 1/4″ seam. Then, fold over the binding to the back of the quilt and hand-stitch it down.
Step 13: Enjoy Your Quilt!
Congratulations! You’ve made a beautiful Churn Dasher quilt. Now, it’s time to enjoy the fruits of your labor. Whether you’re snuggling under it on a chilly day, gifting it to a friend or family member, or displaying it in your home, remember the love and hard work that went into each stitch.
Full Pattern: Click Here
Crafting a Churn Dasher quilt is a remarkable journey, one that intertwines history, craftsmanship, and personal creativity. It’s a testament to the timeless charm of traditional quilt patterns and the community that keeps these traditions alive.
The Churn Dasher, with its elegant simplicity, is a perfect canvas to express your creativity. Whether you’re a beginner exploring the vast quilt universe or an experienced quilter searching for a nostalgic journey, the Churn Dasher welcomes you with open arms.
As you dive into the Churn Dasher pattern, remember that every stitch you make, every fabric you choose, and every pattern you create are woven into the tapestry of your unique quilting story. You’re not just making a quilt; you’re continuing a legacy.
So, immerse yourself in the delightful world of the Churn Dasher. Happy quilting!


