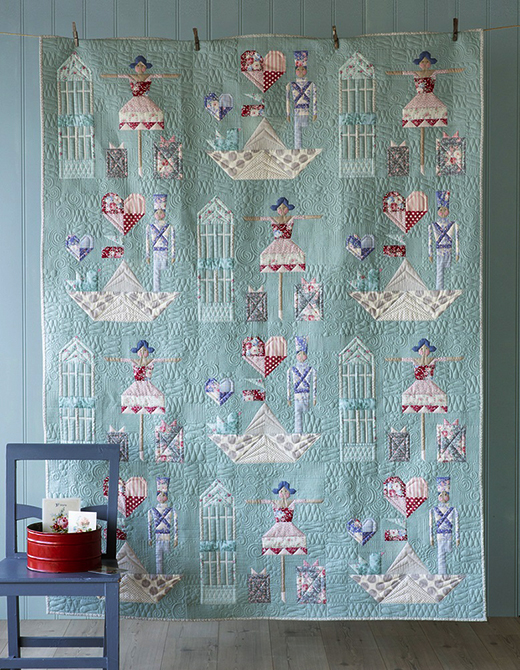
The Brave Tin Soldier Quilt brings Hans Christian Andersen’s poignant story of the steadfast tin soldier and his ballerina to life through fabric.
Inspired by the tale of unwavering love and courage, this quilt captures key elements of the story in a charming, detailed design.
With two distinct blocks—the ballerina and the soldier—this quilt is filled with thoughtful motifs that make it a treasure for generations to come.
This quilt may appear intricate, but by following the diagrams closely and paying attention to measurements, you can recreate this magical scene with precision.
Each block tells part of the story, and when they come together, the result is a heartwarming and visually stunning quilt.
Storytelling in Fabric: The Design of the Brave Tin Soldier Quilt
The Brave Tin Soldier Quilt is built from two block types: the ballerina and the tin soldier. Each block consists of multiple sections that represent important motifs from the tale, such as the ballerina’s castle, skirt, and gifts, as well as the soldier’s helmet, jacket, and boat. Together, these blocks form a 3×4 layout, with vertical and horizontal sashing strips to unify the design.
The quilt’s use of fabric colors and patterns brings the characters to life, while the mix of simple squares and more complex piecing techniques adds visual interest. The finished quilt is a generous 59″ x 78″, making it perfect for a throw or bed covering.
Building a Tale: The Materials for the Brave Tin Soldier Quilt
This quilt requires a wide variety of fabrics to capture the colorful, whimsical details of the story. Each fabric brings a different part of the scene to life, from the ballerina’s rosy skirt to the soldier’s dashing uniform. You’ll also need some additional tools for precision cutting, piecing, and quilting.

Full Pattern: Click Here
Materials:
- Fabric 1 (solid blue sage for sashing): 4½ yards
- Fabric 2 (solid warm sand): ⅛ yard
- Fabric 3 (solid dusty rose): 7″ square
- Fabric 4 (solid lupine): ⅛ yard
- Various patterned fabrics (Fabrics 5-27): Refer to the original materials list for specific cuts and colors
- Backing fabric: 4⅞ yards
- Binding fabric: ⅝ yard (Sophie teal)
- Wadding (batting): 67″ x 86″
- Other tools: Quilter’s ruler, rotary cutter, removable fabric marker, thick card for appliqué templates, black embroidery floss
Finished quilt size: 59″ x 78″ (after binding)
Step-by-Step Instructions:
Step 1: Cutting the Fabric
- Before starting the blocks, cut all the necessary pieces. The ballerina and soldier blocks are made up of many small squares, rectangles, and triangles. Refer to Figs C and D for specific cutting instructions for both the ballerina and soldier blocks.
Step 2: Making the Ballerina Block The ballerina block is divided into four sections: castle, head and arms, skirt, and gifts/leg. Let’s start with the castle.
- Castle: Sew the roof triangles by marking diagonal lines on squares, sewing them to the corners of a rectangle, and trimming the excess (Fig G). Piece the columns (Fig H) and then sew them together with the roof (Fig I).
- Head and Arms: Create the hair bun triangles using the corner triangle technique, then follow Fig J to assemble the face and arms. Piece together the chest section using a tall triangle technique (Fig K).
- Skirt: For the upper skirt, create triangle corners using small squares, and for the lower skirt, piece together half-square triangles and flying geese units (Figs L, M, N).
- Gifts and Leg: Assemble the gifts using half-square triangles (Fig O), then piece together the gifts and leg section (Fig P).
- Final Ballerina Block Assembly: Sew all sections together to complete the ballerina block (Fig P). Repeat to make six blocks.
Step 3: Making the Soldier Block The soldier block includes the small heart, bird, large heart, flags, sail, and the soldier’s body.
- Small Heart and Bird: Use corner triangle techniques to create the heart, and half-square triangles for the bird (Figs Q, R).
- Large Heart, Flags, and Sail: The large heart is constructed similarly to the small heart, and the flag uses a half-rectangle triangle method for precise angles (Figs S, T).
- Soldier: The soldier’s helmet is pieced similarly to the ballerina’s chest (Fig U). The jacket is embellished with straps and then pieced using angled seams (Fig V). Assemble the helmet, body, arms, and legs (Fig W).
- Boat: The boat is made using corner triangles (Fig X).
- Final Soldier Block Assembly: Sew all sections together (Fig Y) and make six blocks in total.
Step 4: Adding the Cheeks and Eyes
- Create cheek appliqués for both the ballerina and the soldier by making small fabric circles using the gathering method (Fig Z). Sew these circles onto the faces with small stitches, then embroider the eyes using black embroidery floss and French knots.
Step 5: Assembling the Quilt Top
- Lay out the 12 blocks (six ballerina, six soldier) in a 3×4 grid, alternating between the two designs. Sew the rows together, adding vertical sashing strips between blocks and horizontal sashing at the base of the quilt (Fig B).
Step 6: Quilting and Finishing
- Once the quilt top is complete, layer it with batting and backing fabric. You can quilt it yourself by basting the layers together or use a professional long-arm quilter. For the binding, sew the strips of Fabric 1 around the quilt edges, mitering the corners for a clean finish. Turn the binding over to the back and slipstitch in place for a neat edge.
Additional Tips:
- Mark Your Seams: Use a removable fabric marker to ensure your seams are precisely aligned, especially when working with angled pieces.
- Stay Organized: Since the quilt has many small pieces, it’s helpful to keep each block’s cut pieces organized in labeled piles.
- Appliqué Technique: Be patient when working with the small appliqué circles and make sure to press them well for a smooth finish.
The Brave Tin Soldier Quilt is a heartfelt tribute to a timeless story of courage, love, and perseverance. As you piece together each block, you’ll see the characters and motifs come to life, creating a quilt that is more than just fabric—it’s a story stitched in time. Whether you make this quilt for yourself or a loved one, it is sure to be treasured for years to come.


