As someone who loves to craft, there’s something truly magical about transforming a stack of fabric and a few bits and bobs into a useful, personalized item.
I remember the first time I laid eyes on the Mini Maker Station pattern, a little light bulb popped into my head.
Here was a project that combined my love of quilting with practicality.
I can’t begin to tell you how many times I’ve had my supplies scattered all over my workspace.
The need for organization was clear!
Experience shows professional crafters spend most of their time managing supplies, scouring for misplaced scissors, or even worse, letting thread get tangled!
That’s when I realized that the Mini Maker Station could be my creative sidekick.
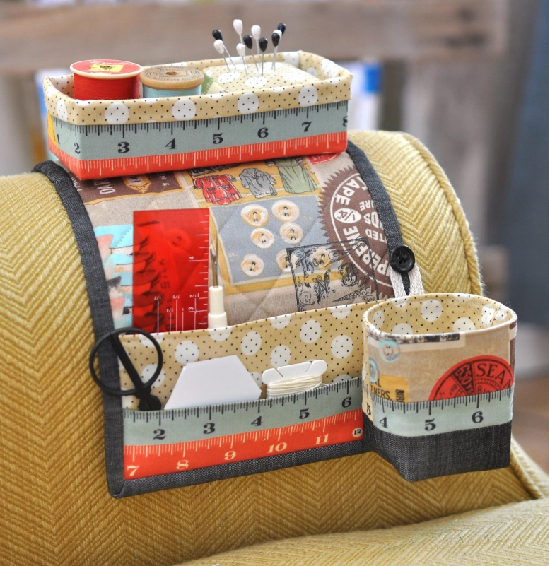
With the option of two sizes, I could customize it to fit right beside my favorite armchair, ready to catch all my crafting essentials in style!
Exploring the Hidden Superpower
The beauty of the Mini Maker Station lies not just in its design but also in its functionality.
It hosts a thin piece of metal inside the body, making it magnetic-friendly!
That’s right – it can hold more than just threads; it has a little hidden superpower.
You can stick all those fancy magnetic accessories, like pincushions and storage baskets!
Imagine organizing your workspace while adding a bit of fun to the mix.
It’s like having your very own crafting sidekick cheering you on!
This pattern is an ideal project for advanced beginners, allowing you to enhance your quilting skills while seeing a quick transformation in your work space.
So, whether you’re looking to declutter your craft corner or wanting a functional, chic station, this project is where you need to be!
Perfect Pockets and Customization
One of the standout features of the Mini Maker Station is its handy pockets.
With options for Pocket A and Pocket B, you can easily organize items such as scissors, pens, or even crochet hooks.
I love how versatile the pockets are.
Keeping things organized is not only satisfying but also encourages creativity!
Knowing where everything is while you work on your projects can make all the difference.
And customization?
Oh, it’s endless!
I was able to mix and match fabrics that suited my style, which was a delightful creative outlet in itself.
In a way, the Mini Maker Station helps you not only in crafting but also in defining your unique aesthetic!
Materials for Your Mini Maker Station
- Two pieces of fabric for the body (cut to width x 17”) – front and back
- One piece of batting (the same width x 17”)
- One strip of Pellon SF101 Interfacing (cut to width x 2.25”)
- Two pieces of Pocket A fabric (cut to width x 7”)
- One piece of Pellon SF101 Interfacing for Pocket A (cut to width x 3.5”)
- Two pieces of Pocket B fabric (cut to width x 4”)
- One piece of Pellon SF101 Interfacing for Pocket B (cut to width x 2”)
- Two WOF strips for binding (cut to 1.5” each)
- One piece of 26 gauge galvanized sheet metal
- Three round disc magnets for the basket
- One round disc magnet for the pincushion
- Fabrics for a pincushion and fabric basket as described in the pattern
Get Ready for Fun!
Before you dive into your Mini Maker Station project, I highly recommend that you gather all your materials in one place.
This isn’t just about organization; it’s a huge part of enjoying the crafting process!
Also, skim through the entire pattern before you start.
Knowing the different components ahead of time will help you visualize the final product and set up your workspace correctly.
And remember, don’t rush it!
Take your time choosing the fabrics and prepping your materials.
This is a fun and rewarding process, and soaking in the creative energy will absolutely make a difference!
Step-by-Step Instructions:
Now that we’ve covered the exciting details, I’m pleased to share that I’ve detailed the step-by-step instructions for completing your Mini Maker Station just below this section.
Trust me, once you see it starting to come together, the excitement is infectious—and the results are incredibly satisfying!
You can access the full pattern through the link below.
Full Pattern: Click Here
Additional Tips for Success
Be sure to keep a trusty seam ripper on hand.
Trust me, no matter how skilled you are, mistakes happen and are part of the crafting process.
That seam ripper will be your best friend as you work on your Mini Maker Station!
Also, don’t hesitate to personalize the pockets with different stitches; this not only serves a decorative purpose but also adds a touch of heart!
Have fun selecting your fabrics!
If you’re anything like me, you’ll find yourself going down the rabbit hole of fretting over which colors tie together best.
Keep it light-hearted; there are no wrong choices in creativity!
This project is meant to inspire and uplift your crafting adventure.
Crafting with the Mini Maker Station
Once you’ve completed your Mini Maker Station, don’t forget to brag about your achievement!
Show off your finished project on social media with an attached ‘#minimakerstation.’ Whether you’re proud of the neat pockets or satisfied with how everything holds together, this pattern reflects your crafting skills, and why not share that joy with others?
For more fabulous articles filled with insightful tips and creative projects, feel free to roam around the blog!
There’s a treasure trove of ideas waiting for you to uncover.
I’ve prepared a super exciting piece you can discover by clicking here!
Your next creative endeavor could be just a click away!
Celebrate Your Crafting Journey!
Looking back, my journey with the Mini Maker Station has been nothing short of fulfilling.
It’s not just about the project completion, but the joy and sense of peace it brings to my crafting space.
I encourage you to celebrate every victory, no matter how small, along your creative path!
So, get those materials ready and let’s make something amazing together!
The Mini Maker Station is about to become your new favorite companion, transforming not just your workspace but also enhancing your crafting experience.
Happy crafting!


