Hey there, fellow quilting enthusiasts!
SEE A NEW PATTERN HERE
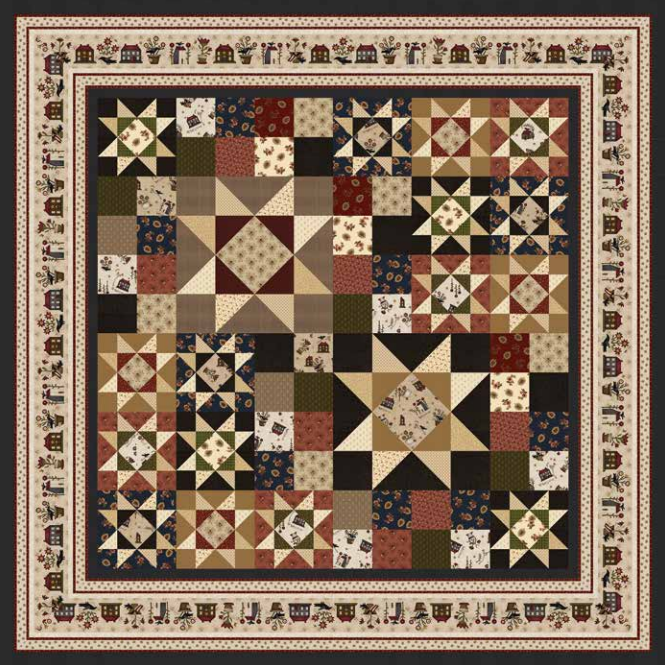
Julie here, and I’m beyond excited to share my adventure with the Buttermilk Blossoms quilt pattern!
🎉 Let me tell you, every stitch of this project is a journey, woven with warmth and creativity.
It started when I stumbled upon a beautiful collection of fabric that just whispered inspiration to me, nudging me towards the Buttermilk Blossoms quilt.
With a finished size of 68”x68”, it became more than just fabric; it became a cozy dream waiting to be realized.
As an avid quilter, I’ve always believed in the magic that lies within the needle and thread.
The Buttermilk Blossoms quilt pattern swept me off my feet with its charming design and inviting colors.
I’ve often said that quilting is like telling a story, and this quilt has a lovely tale to share about the blooms and buds of spring—even if it’s just me and my creative escapade at home!
So, gather your supplies, and let’s embark on this colorful journey together!
Finding the Perfect Fabric
Choosing fabrics is one of the most rewarding parts of quilt-making!
When working with the Buttermilk Blossoms quilt pattern, I was drawn to the vibrant shades from the Pumpkin Farm and Spirit of America Yarn Dyes collections.
Each piece felt like adding a small piece of joy to my quilt.
From the Leaf & Spray Toss to the Ivy Mini varieties, the selection created such a picturesque palette that made my creative heart sing.
Being meticulous about fabric selection is crucial; it sets the tone of the entire quilt.
The Buttermilk Blossoms quilt pattern truly shines with carefully chosen fabrics that complement each other, creating a cohesive look.
It’s all about layering colors and seeing how they play together in the sunshine!
Understanding the Quilt Design
The Buttermilk Blossoms quilt isn’t just pretty—there’s a delightful synergy in the way the blocks fit together.
Each section of the quilt tells its own story while contributing to the overall harmony of the piece!
I love how the geometric patterns intertwine seamlessly to create a stunning visual effect.
The blocks are not overly complex, making it an ideal project for those looking to dive deeper into their quilting skills, yet they also stage a playful challenge for seasoned quilters.
Moreover, the Buttermilk Blossoms quilt embodies the spirit of joy and coziness.
It captures the seasonal whimsy we all adore during springtime when flowers bloom and vibrant colors come alive.
Each time I glance at the quilt, I’m reminded of beautiful sunny days ahead!
Materials Needed
- ¼ yard Leaf & Spray Toss – Cream
- ¼ yard Large Glen Plaid – Olive
- ⅜ yard Diamond Dobbie – Cream
- ⅜ yard Calico Toss – Cream
- ⅜ yard Shirting Foulard – Cream
- ⅜ yard Ivy Mini – Cream
- ½ yard Leaf & Spray Toss – Navy
- ¾ yard Dash Dobbie – Charcoal/Black
- ⅜ yard Bud & Leaf Spray – Taupe
- ¼ yard Ivy Mini – Red
- ½ yard Dot Mini – Caramel
- 4 ½ yards Novelty Toss – Cream for backing
- 2 ⅛ yards Border Stripe – Cream
This list offers a plethora of colorful options to bring the Buttermilk Blossoms quilt to life!
The choice of fabric will certainly influence the finished look.
I recommend laying everything out and just enjoying the visual feast before you start cutting!
Prep Tips Before You Start
Before I dive in, prepping is essential!
I cut all my fabric pieces while listening to some cheerful music.
It truly puts me in a quilting zone and puts a bounce in my step.
Make sure to have all your materials at hand, and organize your cutting area for a smooth experience.
It’s worthwhile to wash and iron your fabrics beforehand.
This ensures that there are no unexpected surprises later, such as fading or shrinkage.
A crisp fabric will make your stitching easy and enjoyable while yielding beautifully precise pieces for the Buttermilk Blossoms quilt!
Let the Fun Begin!
Now, let’s get ready for the step-by-step instructions!
Below, you will find all the details necessary to complete the Buttermilk Blossoms quilt—as well as a link for the full pattern.
I’m wrapping this portion of the post with eagerness, ready to watch your creativity flourish!
Full Pattern: Click Here
Additional Tips for Your Quilting Journey
Throughout the Buttermilk Blossoms quilt project, don’t forget to take breaks and enjoy the process!
While it can be tempting to rush, savoring each moment will lead to an end result that feels even more rewarding.
If you’re not sure about any particular technique, it’s always handy to check out tutorial videos or quilting blogs for extra guidance.
Trust me, the community is incredibly supportive!
When sewing sections together, always keep a consistent seam allowance.
This is crucial as it allows all pieces to fit together smoothly in your final quilt assembly.
I also find that taking the time to pin your seams saves so much tedium later!
Embracing Your Creative Spirit
Congratulations on reaching this point!
Every piece you stitch together for the Buttermilk Blossoms quilt is an achievement in itself.
I encourage you to embrace both the challenges and joys that come with creating something beautiful and durable.
Whether this quilt is for a gift or as an addition to your own home, celebrate every stitch and the stories they carry.
If you feel inspired, do browse through other articles on the blog that are packed with wonderful projects just waiting for your unique flair.
I’ve prepared a special creative gem you can discover by clicking here.
Let’s keep this crafting journey alive together!
And remember, once you’ve finished your Buttermilk Blossoms quilt, take a moment to appreciate all the hard work you poured into it.
I can’t wait to see your versions of this stunning quilt emerge!


