Oh, hello, fellow quilting enthusiasts!
I hope you’re as excited as I am to dive into the cozy world of fabric and stitches.
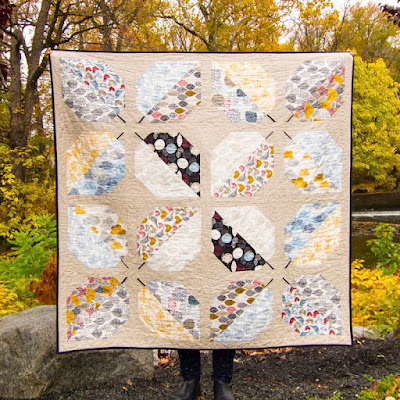
Let me tell you about the first time I just fell head over heels for the beauty of the Turning Leaves Quilt.
I was browsing online, looking for a project that made my heart sing with vibrant autumn colors, and there it was!
The delightful turning leaves design caught my eye immediately, and I just knew it was going to be my next adventure.
So here I am, ready to transform those stunning prints into a warm and cheerful quilt.
Having completed my first Turning Leaves Quilt, I call it my happy place!
There’s a certain magic in watching the leaves turn into art while snuggled in one’s favorite spot with a cup of tea.
The gentle curve of the quilt pieces reminded me of how beautifully nature changes.
Not only did I create something beautiful, but I also learned a ton of techniques that I can’t wait to share with you.
So let’s roll up our sleeves and get started!
Adding Vibrant Dimensions
The Turning Leaves Quilt isn’t just another quilt; it’s a celebration in fabric form.
Each patch reflects the hues of changing seasons, making it not just visually appealing but also quite meaningful.
It signifies transformation, much like the leaves that change with the seasons and bring about new beginnings.
By incorporating different colors and patterns from varying fabric collections, you’ll create a stunning piece that radiates warmth and personality.
Moreover, while making this quilt, I found myself inspired by the rich texture of the fabrics I was working with.
The combinations of prints and solid colors knit together an enchanting quilt that easily brings joy into any room.
I learned that while it’s important to accurately follow the measurements and assembly instructions, it’s entirely okay to add your unique flair as you go along!
What You Need to Get Started
- 1 fat quarter each of 8 prints: Autumn Wonderland, Forest Floor, Passing Clouds (Gold & Blue), Bird Song (Gold & Berry), Winter Woodland, and Nature Trail
- ¾ yard or 2 fat quarters of Line Leaf in Gold, Gray, Blue & Black
- ¼ yard of black solid fabric for stems
- ½ yard of black solid fabric for binding
- 2½ yards of background fabric (linen recommended)
- 3½ yards for the backing
- 16 total squares measuring 13” x 13” (2 each of Line Leaf Gold, Gray, Blue & Black)
- 16 strips measuring ¾” x 6” for stems
- 2 squares of 4½” for corners
- 12½” x 2½” sashing strips
- 5 strips measuring 54” x 2½” sashing (to be pieced)
- 2 strips measuring 60” x 2½” sashing (to be pieced)
Prepping for the Adventure
Before we jump into sewing, let’s take a moment to prepare our materials.
Measure out and cut your fabrics with care.
Laying everything out in an organized manner will save loads of time later on.
I love to sort my fabric piles by color and project, laying out everything I need before getting started.
It’s a honest-to-goodness game-changer!
Don’t forget to properly press your fabric—this step can’t be overlooked!
A well-pressed fabric not only looks better, but it helps maintain accuracy in cuts and seams, ensuring those beautiful lines stay crisp.
Trust me, you’ll be thanking yourself later when everything fits perfectly during assembly.
Let’s Create Magic!
Ready to work your fabric magic?
Below, you’ll find a structured step-by-step breakdown for creating your own Turning Leaves Quilt.
The full pattern is linked, so you’ll never lose your way as you dive into this creative endeavor.
Follow along, and let’s make some quilted memories!
Full Pattern: Click Here
Finishing Touches and Helpful Hints
Now that you’ve put in the hard work molding your quilt, let’s talk about those finishing touches!
Binding is usually my favorite part, as it wraps everything up and gives your project that polished look.
Make sure to cut the binding strips on the bias to ensure maximum stretch—this makes applying them a lot easier!
Make time for the quilting process itself.
I love to experiment with different patterns and stitches.
You can quilt straight lines for a classic effect or get creative with more intricate designs that highlight the beauty of the leaves.
It’s entirely up to you!
Remember, there’s no wrong way to finish your quilt.
Modern Twists on a Classic Design
One of the fun aspects of the Turning Leaves Quilt is the endless possibilities you have for modern twists!
Why not try mixing up the color palette?
Traditional autumn hues are lovely, but vibrant colors can give it a fresh spin.
You can also explore adding unique borders or even experimenting with different fabric textures—think flannel or minky!
It’s an excellent way to personalize your project based on your tastes.
Consider exploring advanced techniques, such as adding applique elements or using embroidery to embellish your quilt.
These techniques can elevate your Turning Leaves Quilt from stunning to show-stopping, adding that wow factor that your friends will talk about for ages!
Celebrate Your Creations!
As we wrap things up, take a moment to really reflect on the journey you’ve just embarked on.
Completing your Turning Leaves Quilt is no small feat!
Celebrate the creation of your quilt because it represents time, creativity, and love put into every stitch.
It’s not just a quilt; it’s a timeless treasure that’s going to keep you warm for many seasons to come.
If you’re ready for more incredible quilting inspiration, I’ve considered overflowing with fantastic articles waiting just for you.
Dive into our treasure trove of creative articles by browsing the blog—it’s filled with projects that spark joy!
Seriously, you don’t want to miss exploring our fantastic resource of crafting fun just waiting for you—give it a look by clicking here! I’m so proud of your effort, and I can’t wait to hear about your adventures with the Turning Leaves Quilt!


