I absolutely adore quilting!
The moment I first picked up a needle and thread with the intention to create something beautiful, I was hooked!
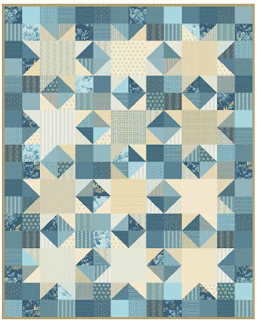
Fast forward a few years, and here I am, showcasing one of my favorite patterns: the Ring Bearer quilt.
I remember the first time I saw this quilt; the blues and creamy tans simply sang in harmony, and I knew I had to make one.
Not only is it visually stunning, it also embodies joy and celebration, perfect for weddings and special occasions!
As I dove into the world of quilting, Ring Bearer became more than just a pattern for me; it became a fun project that brought family and friends together, bonding over fabric choices and stitching techniques.
It’s an enchanting quilt designed by the talented Edyta Sitar, featuring the lovely Something Blue collection by Laundry Basket Quilts.
I can’t wait to share everything you need to know to take on this delightful project!
Understanding the Heart of the Ring Bearer Quilt
The Ring Bearer quilt is not only about its beauty but also the craftsmanship that goes into each stitch.
This quilt celebrates love and unity, combining playful blues and warm tan tones that fit perfectly in a variety of settings.
It measures 56″ x 72″, making it ideal for snuggling or as a stunning wall hang decoration.
What I love most is how this quilt pattern allows you to explore color combinations.
Using the Something Blue fabric collection adds a burst of vibrant blues, with tans and creams providing a kind and gentle balance.
You’re presented the opportunity to express your personality while crafting something truly special!
Getting to Know the Materials for Your Adventure
- 2 – 10″ square packs of Blues and Tans/Creams
- ⅔ yard of additional fabric for blocks/reinforcement
- 3 ¾ yards of backing fabric (8835-N, 8827-L)
- Binding: 7 strips measuring 2 ½” x WOF
- Backing: Cut 2 strips measuring 64″ x WOF (to be sewn together)
- Thread matching your fabric colors
- Rotary cutter, ruler, and mat for precision cutting
- Iron for pressing seams
Gathering your materials will be the first exciting step you take toward creating the Ring Bearer quilt.
Having everything organized not only helps streamline the process but also ignites a spark of creativity!
Tip: Make sure to have a designated workspace; it makes all the difference as you become lost in the rhythm of sewing.
Before cutting your fabric, take a moment to read through the instructions.
I know it can be tempting to jump straight in, but trust me, a thorough read will save you time and fabric in the long run.
Understanding the flow of assembly gives you a clearer mental image of what’s to come!
Let’s Begin Crafting the Ring Bearer Quilt
Now that you have your materials lined up, it’s time for a delightful journey of stitching!
The step-by-step instructions are outlined here for you to follow.
Remember to check the inserted image that accompanies each step, ensuring you have everything right!
You can also access the full pattern via the link below.
Full Pattern: Click Here
Extra Tips for Success
As you tackle the Ring Bearer quilt, be sure to take breaks between sections of stitching.
It’s easy to get lost in the excitement, but giving yourself some downtime will keep your creative juices flowing!
Additionally, make sure to keep your work organized; perhaps label your blocks or keep them in separate bags to avoid a jumble of pieces.
And here’s another quick tip: don’t stress too much if things aren’t perfect!
Quilting is a journey, and each piece you sew creates a memory.
If a block doesn’t come out the right size, use it creatively – perhaps it will make the perfect patch for a new project!
Advanced Techniques to Consider
If you want to elevate your Ring Bearer quilt even further, consider adding unique embroidery details around the edges or customizing the blocks with initials or dates.
This will add a personal touch that transforms the quilt from a beautiful pattern into a cherished keepsake.
You might also want to explore creating a pieced backing for the quilt.
Instead of a single color, blending several fabrics together can enhance the overall aesthetic and give the quilt a more layered, sophisticated look!
Celebrate Your Creativity!
As you approach the end of your journey with the Ring Bearer quilt, take a moment to step back and admire your work.
Quilting is not just about the finished product but about the love and creativity you poured into every seam and stitch.
It’s a celebration of your journey, a reminder of your skills and passion!
If you’re on the lookout for more inspiring projects or tutorials, don’t hesitate to explore other articles on my blog!
There are tons of amazing content just waiting to spark your creativity.
You can dive into another exciting piece I’ve prepared by navigating here.
Happy quilting, my friends!


