When I first stumbled upon the Amethyst Amore pattern, I was instantly taken aback by its vibrant colors and intricate design.
SEE A NEW PATTERN HERE
I had been looking for a project that wasn’t just about the end product but also about enjoying the process.
Little did I know, I was about to embark on a delightful journey that would have me falling in love with quilting all over again.
The project seemed manageable, and let me tell you, it was incredibly rewarding!
As I gathered my materials and set up my workspace, I could almost feel the creative energy bubbling up inside me.
The Amethyst Amore pattern radiated joy, and I was excited to see where it would lead me.
With each cut and stitch, I knew I was crafting something special—a tabletopper that would not only beautify my space but also give me that sense of fulfillment I crave.
Are you ready to craft your very own piece of art with Amethyst Amore?
Let’s dive right in!
Setting the Stage for an Inspired Project
The uniqueness of the Amethyst Amore pattern lies in its intricate use of colors and shapes.
Each fabric plays a crucial role in breathing life into the design.
For this tabletopper, I’ve chosen six different colors, each representing a distinct part of the finished product.
It’s essential to visualize how these pieces will come together as you pick out your fabric.
Trust me, it will make your quilting journey so much smoother.
The beauty of Amethyst Amore is in its versatility.
Whether you’re aiming for vibrant tones or soft pastels, each choice will yield a different atmosphere for your final piece.
This is what makes it so special!
So take a moment to reflect on the colors that make you smile.
This is your canvas, and you have the power to choose how you want it to look!
Must-Have Supplies
- 6 colors of fabric:-
- 1/3 yd – Fabric 1 (white)
- 1/3 yd – Fabric 2 (light)
- 1/3 yd – Fabric 3 (light/medium)
- 1/3 yd – Fabric 4 (medium)
- 3/8 yd – Fabric 5 (medium/dark)
- 1/3 yd – Fabric 6 (dark)
- 1/4 yd binding
- 3/4 yd backing
- 28” square of batting
- Rotary Cutter
- Cutting Mat
- 8” x 14” ruler or similar
- 4-1/2” square ruler or Tucker Trimmer I
- Fabric marking pen/pencil
- Quarter Inch Seam Marker (optional)
- Best Press or spray starch (optional)
- Scissors
- Pins
- Thread for piecing
- Iron and pressing mat
Preparation is Key
Before diving headfirst into the Amethyst Amore pattern, a little organization helps pave the way for smooth sailing.
Start by cutting your fabric pieces according to the specified sizes and quantities.
I like to lay them out in front of me so I can see my entire color palette.
It really gets the excitement going!
Also, don’t forget to set up your workspace.
Whether it’s a cozy corner of your living room or a dedicated craft room, having all your supplies within reach will help keep you focused.
Trust me, nothing sunders the creative flow like having to stop midway because you can’t find your scissors!
So, gather everything you need, take a deep breath, and let’s create some magic!
On to the Fun Part!
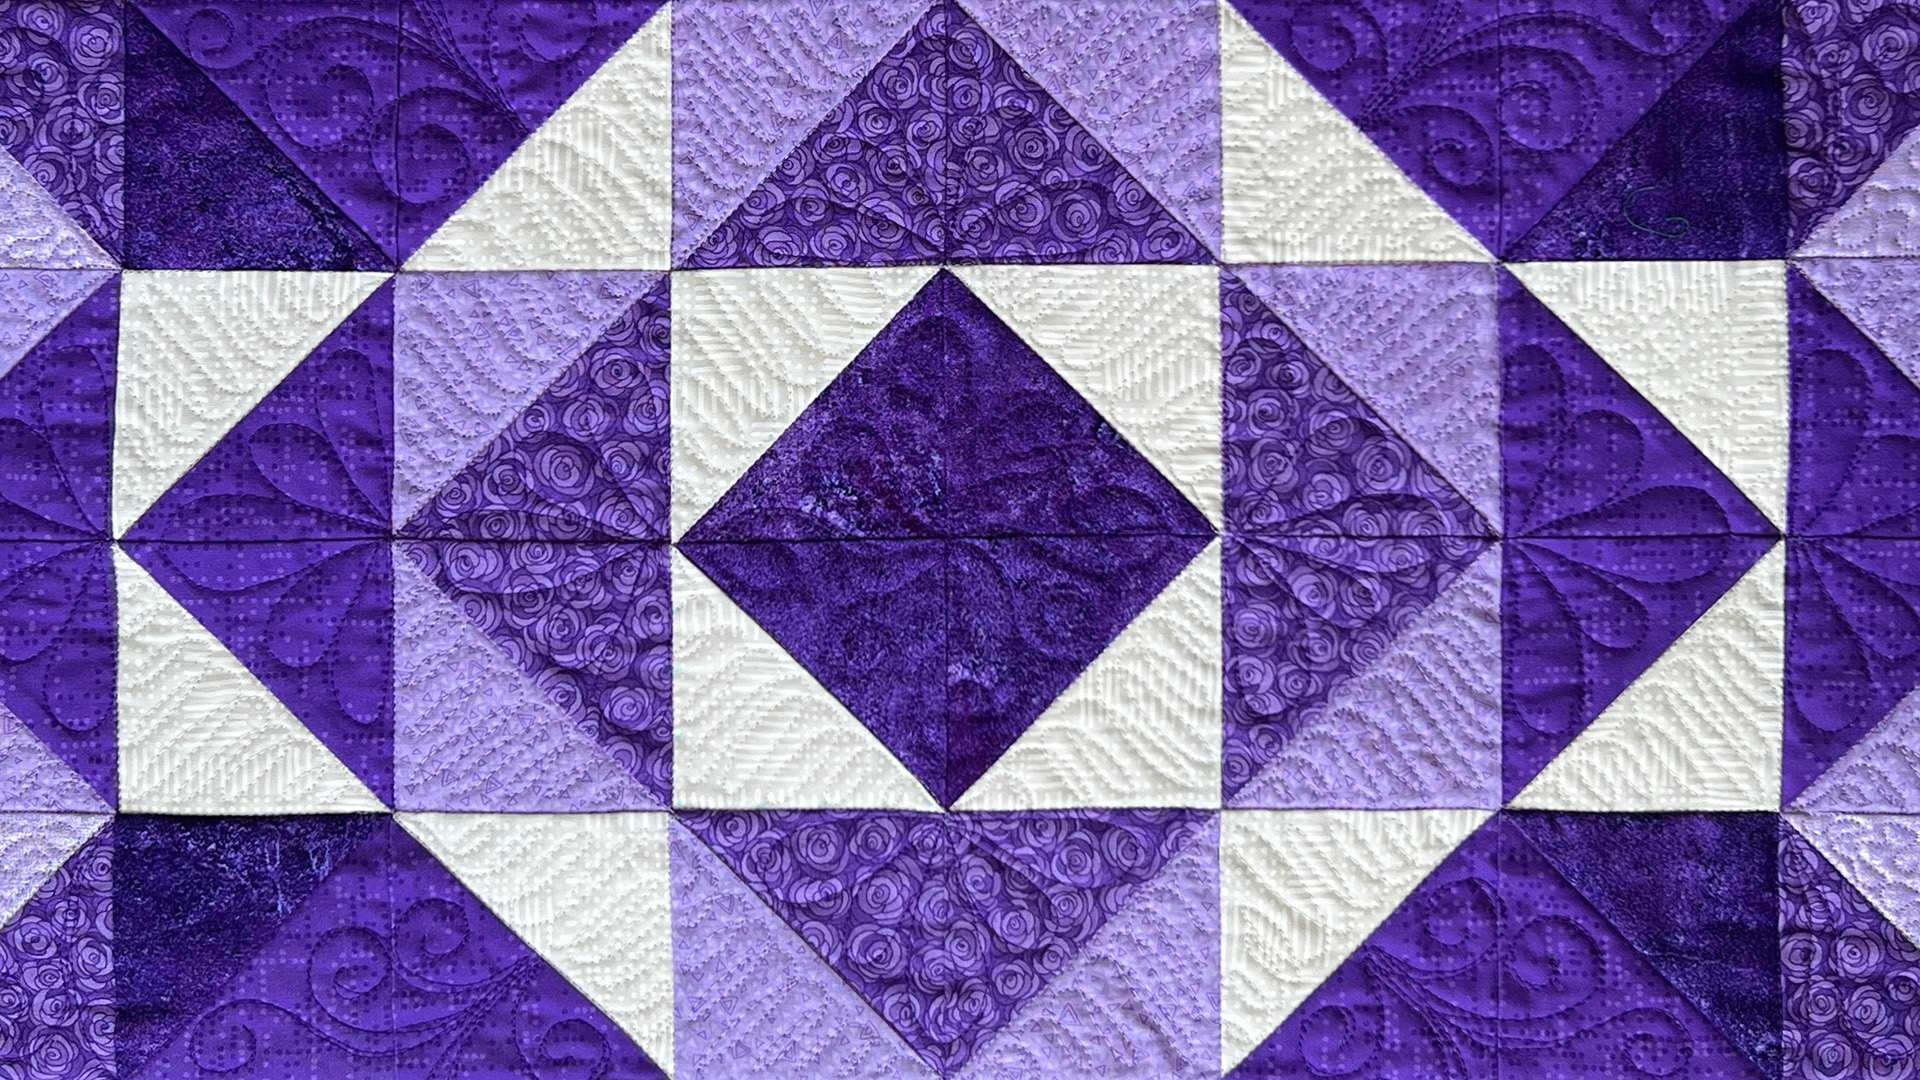
Step-by-Step Instructions:
Now that everything is set, let me share the step-by-step guide for making your Amethyst Amore tabletopper.
Below the image, you’ll find details on how to piece together those gorgeous fabrics to create your stunning quilt.
The full pattern can be accessed through the provided link!
Full Pattern: Click Here
Additional Tips for a Flawless Finish
As you get into the groove of working with the Amethyst Amore pattern, remember to press your seams well!
It makes such a difference in the overall look of your finished quilt.
I also recommend that you take your time during the cutting process.
Accurate cuts lead to better-fitting seams, which in turn gives a professional finish to your quilt.
Don’t hesitate to experiment with placing your half-square triangles!
The arrangement can completely change the feel of your project, and it might surprise you with what you come up with.
Trust your instincts as a creative seamstress—it works wonders!
Exploring Advanced Techniques
For those who find themselves feeling adventurous, consider incorporating the Eight at a Time Half Square Triangle method!
It not only accelerates the process but also ensures precision in your pieces.
Balancing efficiency with craftsmanship is the sweet spot of quilting, don’t you think?
As you get more comfortable with Amethyst Amore, try challenging yourself with different methods.
It’s about pushing your creative boundaries and uncovering new skills.
Who knows, you may stumble upon a technique that becomes a staple in your quilting repertoire!
Celebrate Your Quilting Triumphs!
In conclusion, working on the Amethyst Amore pattern is more than just crafting a beautiful tabletopper; it’s about embracing the journey of creativity.
Each stitch tells a story, and each choice reflects a moment of inspiration.
Celebrate your hard work and display that stunning piece with pride—it’s a testament to your skill and dedication!
If you’ve enjoyed this journey and want to keep the creative juices flowing, don’t forget to check out the rest of the blog!
There are tons of amazing projects waiting for you to explore.
I’ve prepared an incredible piece you can take a peek at by clicking here.
Every stitch can lead you closer to your next masterpiece!


