Oh my goodness, I can hardly contain my excitement!
Last summer, I picked up quilting and it has turned into a full-blown obsession.
There’s just something magical about piecing together little fabric squares, watching a stunning quilt emerge from what was once a mere stack of fabric.
It’s like creating a colorful story that comforts both the maker and anyone lucky enough to receive it.
If you’ve been following along, you might have heard about the innovative project called QM Bitty Blocks.
I jumped right in!
Honestly, what is not to love about these little 4″ squares?
The journey through each month with a new bitty block brings a fresh wave of creativity.
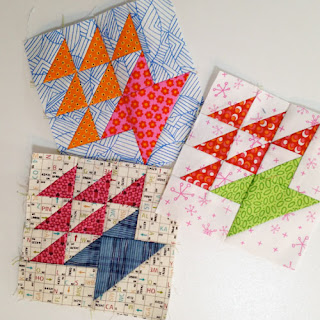
The February block is particularly close to my heart—a charming little basket!
As I embarked on creating this bitty block, I felt as if I was not just making a quilt, but stitching together a memory of joy and creativity that I want to share with all of you!
Breaking the Mold with QM Bitty Blocks
The QM Bitty Blocks are not your typical quilt blocks.
They break away from the conventional sizes and designs, daring to introduce playful and compact squares that pack a punch!
Envisioning a vibrant quilt mixed with a variety of colors in tiny formats is like trying to capture the essence of joy within those little patches.
Each month brings a new surprise, enticing both beginners and seasoned quilters alike.
These blocks are designed to inspire creativity and inclusivity.
Are you new to quilting?
No problem!
Perhaps you’re a seasoned expert—these bitty blocks can reignite the spark of simple experimentation.
This project fosters a sense of community among us, with our shared excitement expressed through social media, inspiring a collective journey of creativity.
The phrase #qmbittyblocks is becoming a delightful anthem for us all!
Navigating Your Bastket Bitty Block
Now, let’s delve into the specifics of the super adorable Basket bitty block pattern.
This bitty block is uniquely captivating and can be created using simple sewing techniques, perfect for anyone looking to spice up their quilting game.
The exquisite designs, with dimensions of 3″ or 4″, allow the beauty of your fabric choices to shine through in a condensed format.
Each one inspires artistry while encouraging confidence in the sewing machine!
For the February block, getting the proportions just right is what makes all the difference.
So, rally your fabric stash and let’s bring joy to life, one bitty block at a time!
Materials You Will Need
- Background Fabric: (4) 1-7/8″ squares, (1) 2-7/8″ square, (2) rectangles 1-1/2″ x 2-1/2″ (light gray dot)
- Basket Fabric #1: (3) 1-7/8″ squares (teal)
- Basket Fabric #2: (1) 1-7/8″ square, (1) 2-7/8″ square (red)
- Sewing Machine and Basic Sewing Supplies
- Iron and Ironing Board
- Scissors
- Cutting Mat and Rotary Cutter
Preparation Advice for Success
Before diving headfirst into creating your bitty block basket, a little preparation can go a long way.
Organize your fabric pieces and ensure they are neatly pressed.
This not only helps in avoiding wrinkles but also guarantees that you achieve precise cuts, a vital aspect when working with bitty blocks.
A small investment of your time upfront will pay off tremendously later!
Also, take a moment to familiarize yourself with the triangle-squares technique you’ll be using.
Knowing how to create those cute triangle squares efficiently will set you on the right path to a beautifully finished quilt!
After all, the quilt-making process should be a joyous experience, not a rushed one.
Step-by-Step Instructions:
Below you will find an easy-to-follow process for constructing your delightful bitty block basket!
The full pattern can be accessed via the link provided below the image.
Let’s jump into the fun!
Full Pattern: Click Here
Additional Tips for Constructing Your Block
As you work on your bitty block, keep a few practical tips in mind!
Make sure to press your seams in opposite directions as you assemble the triangle squares.
This technique, often called “nesting seams,” makes it much easier to align the pieces together, ensuring precise matching of corners.
Trust me; your future self will be thanking you for it!
Besides that, don’t hesitate to share your progress on social media with the hashtag #qmbittyblocks.
It’s a great way to connect with fellow quilt enthusiasts and share tips or inspiration along the way!
Remember, we are all in this creative journey together!
Exploring Beyond the Basics
Once you feel comfortable with the basics of constructing your bitty block basket, the next step is to get creative!
Experiment with various fabric combinations to create a unique style that reflects your personality.
Different colors and patterns can transform the entire feel of your quilt, making each basket a treasure in its own right!
Additionally, consider playing around with the layout of your blocks.
Whether you choose to go with a traditional layout or something wildly creative, your bitty blocks quilt will be a true reflection of your artistic spirit!
Celebrate Your Crafting Journey
As we bring this article to a close, take a moment to celebrate the sweet joy of crafting your bitty block basket.
Remember, every stitch is a step towards embodying your creativity.
Whether you choose to create just a few blocks or embark on an adventurous full quilt, the experience of making is what truly matters!
Now that you’re equipped with the knowledge to create your very own basket, why not explore other incredible articles on the blog?
There’s a world of amazing content waiting for you, just like this stunning bitty block basket you’re about to make!
So grab your tools, dive in, and create something wonderful by clicking right here!


