Morning light found my quilt first, spilling across the patchwork as if the blocks were still warming up from last night’s stitching session.
SEE A NEW PATTERN HERE
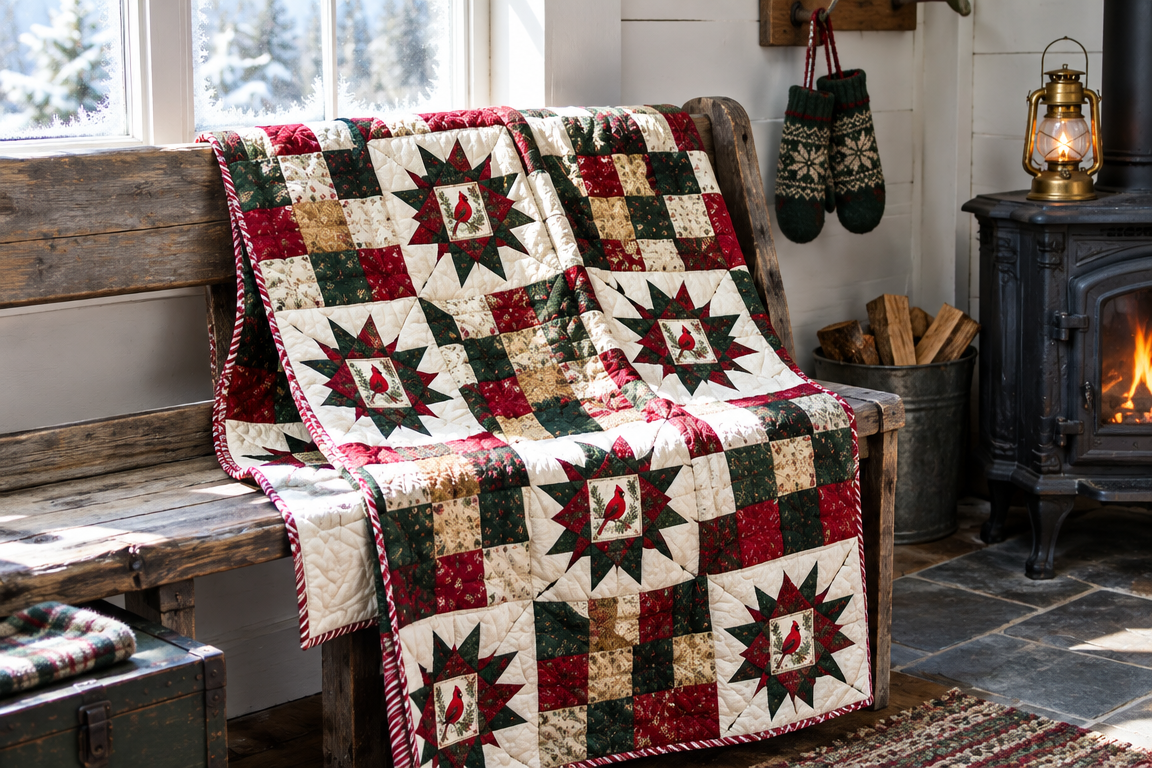
I made Candlelight & Cedar to feel like a starlit hearth—snug, welcoming, and a little nostalgic—so I kept coming back to that alternating rhythm of Sawtooth Stars and simple four-patch squares.
Some quilts look dramatic on a wall, but this one loves being close, tucked over a lap or draped across a bench where everyday life happens.
When I fussy-cut the tiny cardinals for the star centers, I pictured them perched in a quiet “welcome home” moment, right where your eyes naturally rest.
After quilting with a warm cream thread and an allover swirling snowflake pattern, the whole top started to look soft and washed in the best way, like it’s already been through many December evenings.
Before you sew anything, I want you to feel that cozy mood—because it guides every choice, from the piney greens to the candy-stripe binding.
Why Candlelight & Cedar Feels Like Christmas Hearthlight
The alternating 9-inch Sawtooth Star blocks and crisp four-patch squares create a little “breathing space” between the sparkle of the stars and the calm of the grid.
Deep pine green and cranberry red bring that classic hearth contrast, while creamy snow white keeps the stars bright enough to feel like starlight rather than holiday clutter.
The slim antique-gold corner accents are tiny, but they add a lantern-like glow at the edges of each unit.
And those cardinals tucked right into the star centers make the whole quilt feel personal, like you’re sharing the moment with someone who’s always home.
Fabric Play: Pine, Berry, and Snow with a Gentle Gold Wink
I chose fabrics that read like winter textures—slightly muted crimsons, inky greens that don’t go flat, and a creamy white that stays warm instead of icy.
For the antique-gold corners, I kept the print small and delicate so it frames each block without turning the quilt busy.
If you’re swapping prints, use the same guiding rule: solids or low-contrast prints for the four-patches, and a focus print only where it can spotlight the stars.
Materials I Used for This Lap Quilt
- Approx. 1 yard deep pine green fabric for the Sawtooth Star triangles and supporting sections
- Approx. 3/4 yard cranberry red fabric for the star points and accents
- Approx. 1-1/4 yards creamy snow white fabric for the star backgrounds and four-patches
- Approx. 1/4 yard antique-gold micro-print or small-scale accent for slim corner details
- Approx. 3/4 yard red-and-white candy stripe fabric for the binding
- Approx. 2-1/2 yards backing fabric (choose something cozy and substantial)
- Approx. 1 package batting for a lap quilt (choose twin or throw size equivalent)
- Warm cream thread for quilting (or match your favorite neutral)
I always plan a little extra for cutting mistakes when fussy pieces are involved, and the star centers are worth giving yourself that breathing room.
If you’re unsure about yardage, you can round up the background and backing slightly so the quilt feels lush when it’s fully assembled.
Prep Day: Set Up Your Workspace for Crisp Stars
I clear my table, iron everything flat and dry, and keep my rotary cutter and a fresh blade within arm’s reach so I’m not hunting mid-cut.
Before I start piecing, I double-check my 1/4-inch seams and press my units the same way each time so the Sawtooth Stars line up beautifully.
I also label my stacks—stars in one pile, four-patches in another—because nothing speeds up quilting like knowing exactly what to grab next.
Your Downloadable Pattern (Full Instructions Below the Photo)
The full Candlelight & Cedar pattern includes the block-building steps, layout, and assembly guidance, with all the fiddly bits for those star centers and cardinals.
Everything you need to sew it at home is in the downloadable instructions below the photo, so you can follow along confidently from cutting through binding.
Cleaner Finishes: Pressing, Matching, and Calm Corners
To keep the quilt crisp, I press seams toward the darker pieces in each unit so intersections don’t fight each other.
When joining rows, I lay the seams down on the ironing board and finger-press the first few block connections to help everything meet without tugging.
For those slim antique-gold corners, gentle handling is key—crease-free corners look like a tiny frame, not a rushed fix.
And for the binding, I take a moment to square the quilt top and bottom edges first, because straight edges make the candy stripe feel extra tidy.
Optional Upgrade Ideas for a More Advanced Cozy Look
If you want to push the design a little further, consider swapping the allover snowflake quilting for a more “echo” feel by stitching larger swirls around the star centers before filling in the rest.
Another fun idea is to add a narrow inner border using scraps from your gold and red stash, which can help the stars feel even more framed.
For free-motion lovers, you can stipple lightly in the four-patch areas and reserve the swirling snowflake pattern for the stars so the texture becomes a feature.
Candlelight & Cedar: Finished, Loved, and Ready for December Mornings
When I finally draped it over that scarred plank bench, it looked like it belonged there—like the quilt had always known where it would rest.
Wool mittens drying by the woodstove, a brass lantern glowing, and frost-edged morning light catching the patchwork is the kind of scene that makes every seam feel worth it.
If you’re ready for your next hearthside project, come explore more quilts on the blog—Candlelight & Cedar is just one cozy chapter in Quilt Dreams.