Hello fellow quilters! I’m Julie, a self-confessed fabric junkie and a lover of bright cotton scraps.
Today, I’m thrilled to share a personal story and a wonderful project with you: the Cathedral Windows Quilt Squares.
It all started on a rainy afternoon when I was sorting through my fabric collection.
Amidst the colorful chaos, I stumbled upon some vibrant cotton scraps that brought back memories of my grandmother’s quilts.
Inspired, I decided to create something beautiful from these tiny treasures, leading me to the captivating world of Cathedral Windows Quilting.
Why Cathedral Windows?
The Cathedral Windows quilt pattern is more than just a method; it’s a journey into the heart of traditional quilting, where each stitch tells a story and every fabric piece holds a memory.
This pattern, known for its intricate beauty and historical significance, allows quilters to showcase a diverse array of fabric scraps, turning what might be seen as mere remnants into a stunning visual feast.
The charm of this pattern lies in its ability to transform simple materials into a quilt that resembles the intricate stained glass of a grand cathedral. Each window created in the quilt is a portal into the quilter’s imagination, where the vibrancy of colors and the textures of different fabrics come together in perfect harmony.
Supplies Needed
- Solid cotton material (7″ square yields about 3″ of quilt)
- 2″ squares of assorted prints
- Ruler
- Fabric shears
- Hand sewing thread and needle
- Pins
- Iron
Step-by-Step Guide
Step 1: Cut Your Squares
Begin by selecting your solid fabric – this will be the foundation of your quilt squares. Lay the fabric flat and use a ruler to measure and mark 7″ squares. The precision in measuring ensures uniformity in your quilt. Cut as many squares as needed for your project size. Next, dive into your collection of bright prints. Cut 2″ squares from these fabrics. These smaller squares can be from various sources – think of using scraps from previous projects or even old clothing for a sentimental value. This step is where your creativity starts to shine through!
Step 2: Press Over Edges
Take each 7″ square and carefully fold over each edge by exactly 1/4″. This step is crucial for the consistency of your quilt’s appearance. Use an iron to press these folds neatly, ensuring each edge is sharp and even. This precision sets the stage for the elegant look of your finished quilt squares.
Step 3: Stitch It in Half
Now, fold your square in half, ensuring the ironed edges are facing outward. This creates a neat and tidy look for your seams. Use a hand sewing needle and thread to whip stitch along the short sides of the folded square. Be meticulous with your stitches for durability and appearance. Once stitched, gently turn the square right-side out, revealing a neatly stitched half-square.
Step 4: Stitch the Center
Align the seams of your now rectangular piece and whip stitch across the top edge. This step is not just about joining the pieces but also about ensuring the square lays flat and even. When you’ve stitched across, lay the piece flat and press it. You will see an ‘X’ formed at the center – this is a key feature of the Cathedral Windows pattern.
Step 5: Fold Up & Stitch Corners
Carefully fold each corner of the square towards the center, strategically covering the seams that form the X. This step starts to reveal the classic Cathedral Windows look. Press each corner down firmly, ensuring they’re evenly placed. Now, stitch just the tip of each corner, making sure to go through all layers of fabric. This not only secures the corners but also sets up the structure for your quilt squares.
Step 6: Stitch Your Squares Together!
Once you have a collection of these prepared squares, it’s time to stitch them together. Place two squares side by side with their folded edges aligned. Use a whip stitch along these edges to join the squares. After stitching, lay the joined squares flat and press them. This ensures that they lay neatly as you continue to add more squares.
Step 7: The Pretty Part
Now for the most visually rewarding part! Focus on the diamond shapes formed at the junctions of the squares. You may want to trim the edges and corners of your 2″ patterned squares for easier placement. Tuck these patterned squares under the folded edges of the diamond shapes, creating a colorful contrast. Use an invisible stitch to secure these in place, being careful to stitch only through the top layers to form a pocket underneath. This step brings a burst of color and design to your quilt, showcasing your bright fabric scraps.
Final Step: Unleash Your Creativity!
Now, keep adding squares to achieve your desired size. This technique is versatile, allowing you to create anything from a full-sized quilt to a purse.
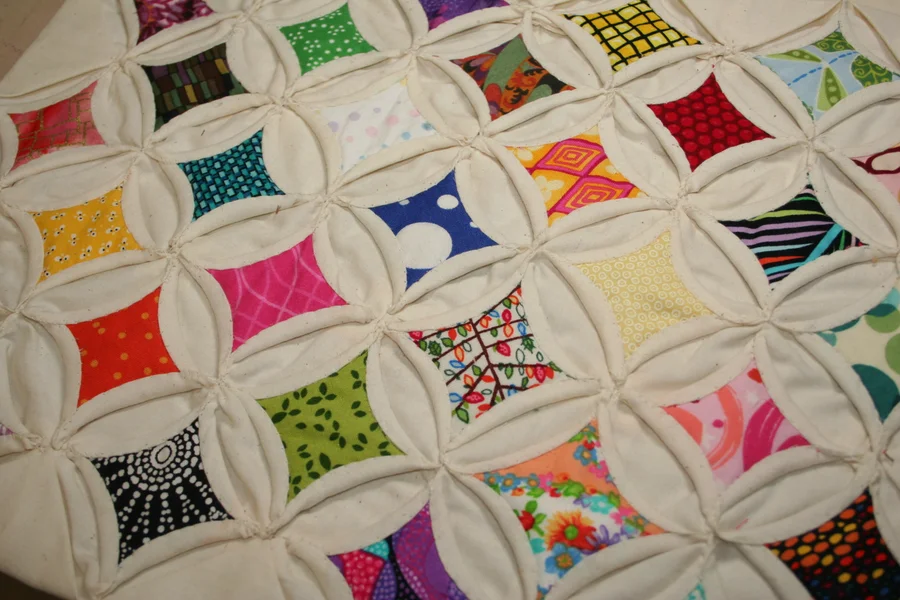
Full Pattern: Click Here
In the quiet moments of hand stitching each Cathedral Windows Quilt Square, we find more than just the creation of a beautiful pattern; we discover a story unfolding beneath our fingers. Each piece of fabric, carefully selected and stitched, is a reflection of our journey, imbued with memories and dreams. This process, slow and deliberate, becomes a meditative practice, connecting us to the rich heritage of quilting and to the stories embedded in every thread.
As you continue on your quilting adventure, let each square remind you of the beauty that can be crafted from small beginnings. With every stitch, you’re not just making a quilt; you’re weaving a tapestry of life, full of color, creativity, and personal expression. So, embrace the journey with each piece of fabric, and remember, in the world of quilting, every scrap tells a story, and every stitch is a testament to your creativity.

