Oh hey there, quilting friends!
SEE A NEW PATTERN HERE
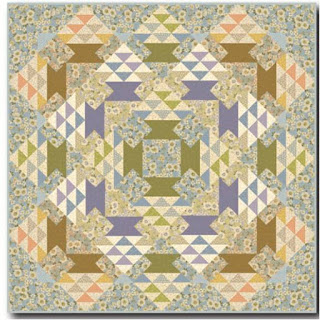
I can’t tell you how excited I am to share with you my latest passion project—the Blossom Lane Quilt.
This isn’t just another quilt; it’s a delightful adventure of colors, patterns, and of course, pure joy!
So grab a cup of tea, kick back on your comfy chair, and let me take you on this colorful journey.
Last winter, I found myself curled up in my favorite quilt shop when I stumbled upon the Blossom Lane Collection by Renée Nanneman.
The soft floral prints were calling my name!
I envisioned a lovely finishing touch to my living room, and that’s when the idea of the Blossom Lane Quilt was born.
I mean, who could resist the charm of those colors?!
**Inspiring Cheery Patterns in the Blossom Lane Quilt**
What I love most about the Blossom Lane Quilt is its impeccable design, featuring 24 pieced blocks that are 10” x 10”.
There’s something truly special about quilts designed with a medallion setting, enhancing the overall aesthetics.
Using floral fabrics that harmoniously coordinate, this quilt can effortlessly elevate any space—whether thrown over a couch or as a beautiful wall hanging.
The quilt’s versatility is its charm!
Not only can it be used as a decorative piece, but it’s also a perfect topper for a queen-size bed when positioned diagonally on a simple bedspread.
You might just find yourself daydreaming amidst the beauties of the Blossom Lane Quilt!
**Subtle Techniques that Make a Big Difference**
Creating the Blossom Lane Quilt is not just about piecing fabric; it’s about stitching memories and dreams, too.
One key step that I can’t stress enough is to ensure you’re working with a scant 1/4” seam allowance.
Trust me!
This tiny adjustment makes a colossal difference in how well the block patches fit together, leading to impeccable results in your quilt.
Additionally, don’t forget to choose fabrics wisely!
The incorporation of geometrics, soft florals, and tone-on-tone prints can breathe life into the Blossom Lane Quilt.
Choosing the right combinations and placements creates a stunning visual feast!
**Materials You’ll Need for Your Blossom Lane Quilt**
- Fat eighths of various floral patterns (including 4212-B, 4212-G, 4212-T, 4213-T, 4213-V, 4213-Y, 4216-B, 4216-O, and 4216-P)
- Fat quarters for the basket bottoms (like 4215-LN, 4215-P, and 4215-V)
- Background fabrics (including 4211-G, 4211-L, and 4211-V)
- 2 yards each of block backgrounds (4210-G and 4210-T)
- 14 yards of large-scale blue floral for edge setting triangles (4210-B)
- d yard of turquoise zigzag for binding (4214-T)
- 3w yards of cream zigzag for the backing (4214-L)
- Batting and quilter’s thread
- Sewing machine and cutting tools
**Prepare to Create Your Blossom Lane Quilt**
Before diving headfirst into this quilting adventure, I have a few preparation tips for you!
Start by organizing your fabrics into designated piles by color and type.
This simple step will make your quilting process smoother and more enjoyable.
No one likes rummaging through a disorganized fabric stash mid-project, right?
Also, cut all your pieces ahead of time!
I learned this trick the hard way.
Having your pieces pre-cut means you can simply focus on assembling the quilt without getting lost in the cutting frenzy mid-way through your creative session.
**Your Step-By-Step Pathway to the Blossom Lane Quilt**
Now that you’re all set up, let’s talk about how to assemble this beauty!
Below are the step-by-step instructions to guide your creative flow as you piece together your Blossom Lane Quilt.
You can access the full pattern through the link below.
I’m confident you’re going to love creating this quilt as much as I do!
Full Pattern: Click Here
**Additional Tips for a Successful Blossom Lane Quilt**
To ensure that everything runs smoothly, keep referring to the quilt diagrams while you work on the assembly.
This will help you stay organized and maintain the block orientation.
Plus, I like to have an extra set of hands (wink, wink) around to help with sewing and trimming the pieces!
Don’t rush the quilting process either!
Layer your quilt with batting and backing, and quilt in the ditch around the block patches.
Adding free-motion quilting around the printed motifs in the floral patches can add a lovely touch.
Take your time and enjoy the creative moments!
**Refining Your Blossom Lane Quilt**
As you edge toward completing your masterpiece, consider adding your personal touch.
Embellishments can make your quilt truly special: whether it’s hand-stitched details, decorative quilting, or even a unique label on the back, letting your personality shine through is key!
Remember, it’s all about creating something you love and appreciate.
Each fabric square tells a story and contributes to the overall beauty of the Blossom Lane Quilt.
**Celebrate Your Blossom Lane Quilt Creation**
As we come to the end of this colorful journey, I encourage you to take a moment to celebrate your creativity!
Whether you’ve tackled the quilt top or finished the entire piece, each time you work on the Blossom Lane Quilt, you embrace creativity and inspiration.
Every stitch is a step into your unique world of fabric art.
If you’re hungry for more creative insights, don’t hesitate to snoop around my blog!
There’s a treasure trove of content waiting for you—so go on and explore!
I’ve even prepared a delightful piece you can discover by hopping on this link.
Happy quilting!
I hold the belief that any quilt brings warmth and love into your home, and the Blossom Lane Quilt is no exception!
Let this be the beginning of an exciting journey filled with creativity and warmth in every stitch.


