Hey there, fellow quilt enthusiasts!
I’m Julie, and I cannot express how excited I am to share my journey with the Block Letter quilt project.
The first time I encountered a quilt pattern that seemed to burst with color and personality, I knew I had to dive in.
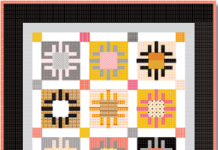
The Block Letter quilt, designed by the brilliant Susan Terpin, became that special project that filled my creative life with inspiration.
As I carefully selected my fabrics for this quilt, I was flooded with memories of vibrant colors and playful patterns.
I wanted to create something that not only looked great but also had some meaningful essence infused in it.
That’s the beauty of the Block Letter quilt—each square tells a story and can represent all the little things in life that make it colorful and bright!
Finding Your Creative Voice through Color
The first exciting aspect of the Block Letter quilt is the color palette!
It’s not merely a collection of shades but more of a symphony of hues.
The pattern allows you to play around with solids like Silver Lining, Candy Pink, or Brave Beet Red, making it a fantastic opportunity to express your vibrant persona.
When choosing your colors, think about what emotions they evoke—are you feeling nostalgic, joyful, or bold?
Utilizing a wide variety of colors adds a dynamic feel to your quilt.
Though I often encourage breaking the rules in your quilting journey, exploring a rainbow of colors through the Block Letter quilt is about mixing and matching until your heart sings.
Remember, the colors should resonate with you and make the crafting process all the more enjoyable!
Key Techniques for Success
Before diving into the nitty-gritty of the Block Letter quilt construction, let’s chat about those critical techniques.
You’re going to want to familiarize yourself with common quilting terminologies, like WS for the wrong side and RS for the right side of fabric.
Knowing your HSTs (half square triangles) from your QSTs (quarter square triangles) can save you a lot of heartache later on.
Preparation is everything!
I highly recommend taking time to read through the entire pattern instructions before you even think about cutting your fabric.
Skimming through only to realize you misaligned your strips can be quite frustrating.
When you respect the fabric and the pattern, the Block Letter quilt turns into a glorious tapestry of creativity.
Materials You’ll Need
- 3 yards of 3969 Solid Silver Lining
- 1/4 yard each of 3958 Solid Patriot Blue, 3944 Solid Red Violet, 3954 Solid Turquoise, 3924 Solid Indigo, 3959 Solid Candy Pink, 3918 Solid Cornflower, 3945 Solid Royal Purple, 3934 Solid Magenta, 3967 Solid French Blue, 3922 Solid Grape, 5695 Solid Crimson, 6718 Solid Beet Red, 3910 Solid Bluebird, 3917 Solid Cherry, 3949 Solid Sprout, 3926 Solid Ivy, 3961 Solid Orangina, 3971 Solid Peridot, 3927 Solid Jade, 3904 Solid Apricot, 3936 Solid Clover, 3951 Solid Taupe, 3932 Solid Lemon, and 3928 Solid Kelly
- Binding Material: At least 230″ of a continuous 2-1/4″ strip
Setting Up for Success
Before you get started on your playful Block Letter quilt, ensuring you have a tidy sewing area will make your project flow much smoother.
Give your fabrics a good press before cutting to ensure the most accurate measurements.
You wouldn’t want any pesky creases sneakily messing up your straight lines!
Additionally, I recommend organizing your pieces as you cut them.
Labeling them or group them based on color and size can save you time and reduce the chances of confusion.
Trust me, when you’re knee-deep in creating this marvelous Block Letter quilt, the last thing you’ll want is to play hide-and-seek with your pieces.
Step-by-Step Instructions:
Now, let’s get to the good stuff!
Below, I’ve laid out the step-by-step instructions for the Block Letter quilt.
As you follow along, you can also access the complete pattern via the link provided.
Full Pattern: Click Here
Additional Tips for a Flawless Finish
The beauty of the Block Letter quilt doesn’t just lie in its design but also in the finer details you incorporate.
Don’t be timid about adding a personal touch—embroidering your name, initials, or a meaningful date on the bottom strip can make this quilt uniquely yours.
Also, while quilting, take your time to align all the blocks perfectly as this is crucial for achieving a polished final product.
The effort you put into keeping those seams straight will be rewarded when you see the finished quilt come together.
Expanding Your Quilt Knowledge
As with any craft, there’s always an opportunity to grow and enhance your skills.
If you’re keen to explore advanced techniques, consider experimenting with different quilting styles or even adding embellishments to your Block Letter quilt.
These additional skills can take your project to new dimensions, allowing your creativity to shine even brighter.
Don’t forget, this adventurous quilting journey doesn’t stop with the Block Letter quilt.
I’ve got tons of fabulous content lined up just waiting for you to discover!
Curiosity always leads to creativity, and you can start exploring this amazing content treasure trove by tapping here.
Each piece you tackle gets you one step closer to nailing your craft!
Celebrate Your Creation!
There’s something indescribably fulfilling about finally laying your eyes on a finished Block Letter quilt!
Each stitch, every color choice, it all comes together beautifully, showcasing the hard work and creativity you’ve poured into it.
Revel in your accomplishment, and don’t hesitate to share how your finished project turned out!
As I wrap up this article, I want to encourage you to keep that innovative spirit alive.
Embrace the joy quilting brings and let it inspire you.
Every quilt has a story; make sure yours is one worth telling!


