Hi there, fellow crafting enthusiasts!
Today, I’m so excited to gather around with all of you and dive into the delightful world of quilting!
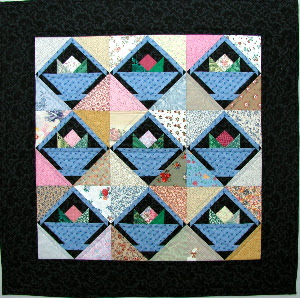
I’ve been on a real kick lately, experimenting with different patterns, and I can’t help but share my latest triumph: the Scrap Baskets!
You know, there’s something incredibly therapeutic about piecing together fabric scraps to create something so visually stunning and functional.
Each time I pull those colorful bits together, I feel a little rush of happiness wash over me.
This isn’t just any quilting project; it’s a joyful journey of fabric memories and creativity.
I transformed my swirl of fabric scraps into beautiful little baskets, bringing both organization and beauty to my home.
For anyone who might think, “Quilting’s not for me,” trust me, Scrap Baskets is the perfect starting point!
Let’s roll up our sleeves and jump right into this exciting adventure!
Crafting a Sweetly Simple Memory of Fun
The Scrap Baskets pattern isn’t just about creating an attractive wall quilt; it’s about digging into your sewing bag and embracing creativity.
This pattern allows you to use up those remnants from previous sewing projects, which feels like a win-win!
Plus, every fabric choice tells a story.
Maybe that blue fabric reminds you of a special dress, or that red scrap was once part of a cozy pillowcase.
Moreover, the effortless beauty of the Scrap Baskets allows for all sorts of fabric combinations.
You can go wild with colors or maintain a restrained palette.
It’s like your fabric speaks to you, urging you to turn scraps into something delightful!
By choosing the textiles that speak to you, you create a work of art that reflects your personality and memories.
Easy Techniques for a Fun Finish
Now, let’s talk a bit about the technique that makes this quilt a breeze to assemble.
The Scrap Baskets pattern uses the wonderful method of machine paper piecing.
This approach is not only super beginner-friendly but also ensures precision with every stitch!
What I love the most is that this method helps in creating sharp points without any fuss—perfect for those of us still mastering the art.
If you’ve been on the fence about diving into paper piecing, this pattern is your sign!
It can sound intimidating, but believe me, once you start piecing, your confidence will soar, and you’ll be hooked on making more.
The joy of piecing those blocks together can brighten any gloomy day!
Materials You’ll Need
- 6” Add-A-Quarter ruler
- Carol Doak’s Foundation Paper
- Rotary cutter, mat, and 12” gridded ruler
- Sewing machine (size 90/14 needle recommended)
- Fabric required:
- Black background of baskets and border – 1 yd.
- Blue fabric for baskets – 1/3 yd.
- Green scraps totaling -1/8 yd.
- Light-colored scraps totaling -1/2 yd.
- Red/Pink scraps totaling -1/8 yd.
- Backing fabric – 1 yd.
- Binding fabric – 1/4 yd.
Preparation is Key!
Before you dive headfirst into creating your Scrap Baskets, let’s take a minute to prepare!
First of all, gather your materials and ensure you have a clean workspace.
A clutter-free zone not only helps maintain your sanity but also boosts creativity!
Trust me; the last thing you want is to be hunting for that elusive rotary cutter in a fabric avalanche.
Next, consider printing the foundation pieces for the blocks.
It’s super important to set the PDF to print without scaling.
Double-check your printer settings to ensure accuracy.
The precise measurements are crucial for piecing; I can’t stress this enough!
This little detail can make a huge difference when you start sewing those beautiful blocks together.
Step-by-Step Instructions:
Now that you have your materials sorted and preparation completed, it’s time to dive into the fun part!
Below, I’ll outline the step-by-step instructions to make your own Scrap Baskets.
Remember, you can access the full pattern via the provided link afterward, so don’t stress about missing any details!
Full Pattern: Click Here
Additional Tips for Success
As you sew, remember to take your time and enjoy the process.
Machine paper piecing means you’ll be working with a thinner layer, so frequent pressing is key to ensuring those beautiful seams lay flat!
I like to have my iron nearby to press as I go—it keeps everything tidy and organized.
When joining the blocks, I recommend machine-basting the seams before sewing them together.
It gives you a little leeway to make adjustments if needed, especially for those who love having everything aligned perfectly.
Take your time with the final touches; ‘Scrap Baskets’ deserves it!
Design Considerations for an Innovative Touch
Let’s talk about a fun aspect of the Scrap Baskets pattern—design!
You can play with the configurations of your blocks to add your personalized flair.
Feel free to experiment with the arrangement of colors or mix in additional scraps to keep things lively!
Even a block’s rotation can create an entirely different visual appeal.
Also, consider adding embellishments or decorative stitching to personalize your quilt further.
It’s these little tweaks that can transform a lovely project into something truly unique.
Let your imaginative spirit roam, and you’ll surely create something fantastic!
Celebrate Your Creations!
As we wrap up this journey of crafting Scrap Baskets, I encourage each of you to take a moment and appreciate the beautiful quilt you’re going to create.
Celebrate every stitch, every flap of fabric, and the memories attached to them.
Remember, quilting is not just about the end product; it’s about the joy in the journey!
And hey, if you loved reading this guide, there’s a treasure trove of amazing content waiting for you on the blog!
Dive in and explore more delightful articles that will inspire your crafting journey.
I’ve prepared an incredible piece for you to check out by hopping over here.
Happy quilting, everyone!


