Hey there!
I’m Julie, and I recently got my hands on a stunning quilt pattern called the Fire on the Water Quilt.
The name alone brings waves of inspiration flowing into my little crafty world.
Like many of you, I love those moments when creativity strikes—like when you find the perfect fabric that instantly sparks an idea.
What can I say?
I’m crazy about bright colors and unique patterns that can transform a simple quilt into a masterpiece.
What makes the Fire on the Water Quilt special, you ask?
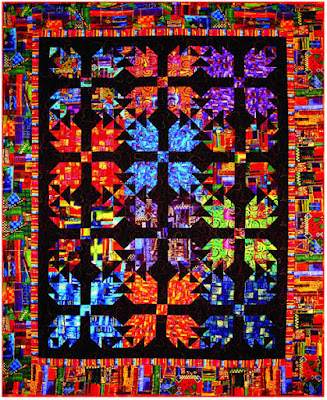
Well, it’s all about the vibrant colors, playful designs, and a fantastic mix of fabrics that create a beautiful quilt measuring 60” x 74”.
The excitement of piecing together each block got me hooked!
I spent hours rearranging and playing with fabric combinations, and I’m here to guide you through the process so you can create your own stunning quilt!
Planning Your Color Palette
Before we dive into the cutting and sewing, let’s talk about finding the perfect color palette for your Fire on the Water Quilt.
This quilt pattern uses 12 different fabrics from the Fire on the Water Collection, and it’s crucial to select fabrics that not only complement each other but also evoke that fiery sensation the name suggests.
Think about vibrant reds, deep oranges, and calming blues and greens.
The contrast makes for a dynamic combination that will set your quilt ablaze!
Remember, selecting your fabrics can make a world of difference in how your quilt turns out.
I recommend laying out your selected fabrics and experimenting with different arrangements before finalizing your choices.
This gives you a chance to see how colors interact, so it becomes a delightful design journey right from the start.
Plus, it’s a fantastic way to play around with the quilt’s energy.
Understanding the Techniques
The Fire on the Water Quilt involves techniques that not only help in creating a solid quilt but also sharpen your skills as a quilter.
The block construction involves drawing diagonal lines and making half-square triangles, which may seem challenging at first, but trust me, it’s incredibly satisfying!
Once you get the hang of it, you’ll be whipping up these techniques with ease.
The quilt assembly is another enjoyable aspect of this process.
Don’t forget to align your blocks carefully to achieve a polished finish.
This step is super important because it ensures that your quilt looks as stunning as the vision you had when you started your journey.
Each piece matters, so let’s get those blocks ready to come together!
Materials
- 12 different fabrics from the Fire on the Water Collection (3/8 yard of each, plus an additional 1 yard for the 3rd border)
- Striped fabric from the collection for the 2nd border (1/2 yard)
- Multi-dye cotton black for the background and 1st border (1 7/8 yards)
- Binding fabric of your choice (5/8 yard)
- Quilting thread (matching colors to your fabrics)
- Rotary cutter and mat
- Fabric scissors
- Cutting ruler
- Sewing machine with a quarter-inch foot
- Iron and ironing board
Prepare Before You Begin
Before jumping into the cutting and sewing, it’s wise to take a moment to prepare yourself and your workspace.
Make sure your sewing area is clean and organized, as this helps you maintain focus and enhances your creative energy.
Gather all your materials and tools, so you won’t be searching for them once you dive into the Fire on the Water Quilt.
It’s also a good idea to prewash your fabrics, especially if they are made from cotton.
Prewashing helps prevent any unwanted shrinkage once your masterpiece is complete.
Plus, it gives you a chance to iron out any pesky wrinkles that may have arrived during shipping, leaving you with crisp, beautiful fabric to work with.
Step-by-Step Instructions:
Following these instructions will guide you through creating your very own Fire on the Water Quilt.
For the complete pattern, don’t forget to check the link below!
Grab your fabric and let’s begin crafting!
Full Pattern: Click Here
Additional Tips
As you work through your Fire on the Water Quilt, here are a few practical tips to keep in mind.
First, take your time when cutting your pieces.
Accuracy is key in ensuring that everything fits together perfectly.
A little extra time spent here will save you frustrations later on!
Also, remember to enjoy the process!
Quilting is all about creativity and expression, so don’t be afraid to make it your own.
Want to add a personal touch?
Consider incorporating a few embellishments or unique colors that speak to you.
Your quilt should reflect your style and heart!
Advanced Techniques to Consider
If you’re feeling adventurous, think about experimenting with free-motion quilting once you’ve completed the Fire on the Water Quilt.
This technique will add texture and dimension to your quilt, creating a fantastic final product.
Dive into intricate designs that showcase your personality and bring your quilt to life in unexpected ways!
Additionally, consider playing with different border treatments as you work on your quilt.
You can incorporate contrasting fabrics or playful patterns to create a unique backdrop for your masterpiece.
It’s all about exploring your creativity to make it the quilt of your dreams!
Celebrate Your Creation!
Congratulations!
You’ve completed your own Fire on the Water Quilt.
Take a moment to admire your hard work and dedication.
There’s nothing quite like the warmth of a quilt that you’ve created with love and passion.
It’s not only a cozy blanket; it’s a reflection of your creative journey, filled with vibrant colors and personal stories.
If you’re hungry for more creative inspiration, make sure to explore the blog, which is packed with tons of amazing content to ignite your passion.
I’ve prepared an incredible piece you can check out that’ll keep those creative juices flowing, just by clicking here.
Until next time, happy quilting!


