I first dreamed up Crosstown Transfer while folding laundry on the other side of town, watching the machines hum like a steady metronome.
Somewhere between warm cycles and creased towels, I started sketching strip routes that bent at crisp right angles, as if the city itself were guiding my needle.
This quilt became a love letter to transit lines and the little moments of direction we find without thinking—turn here, go on, arrive.
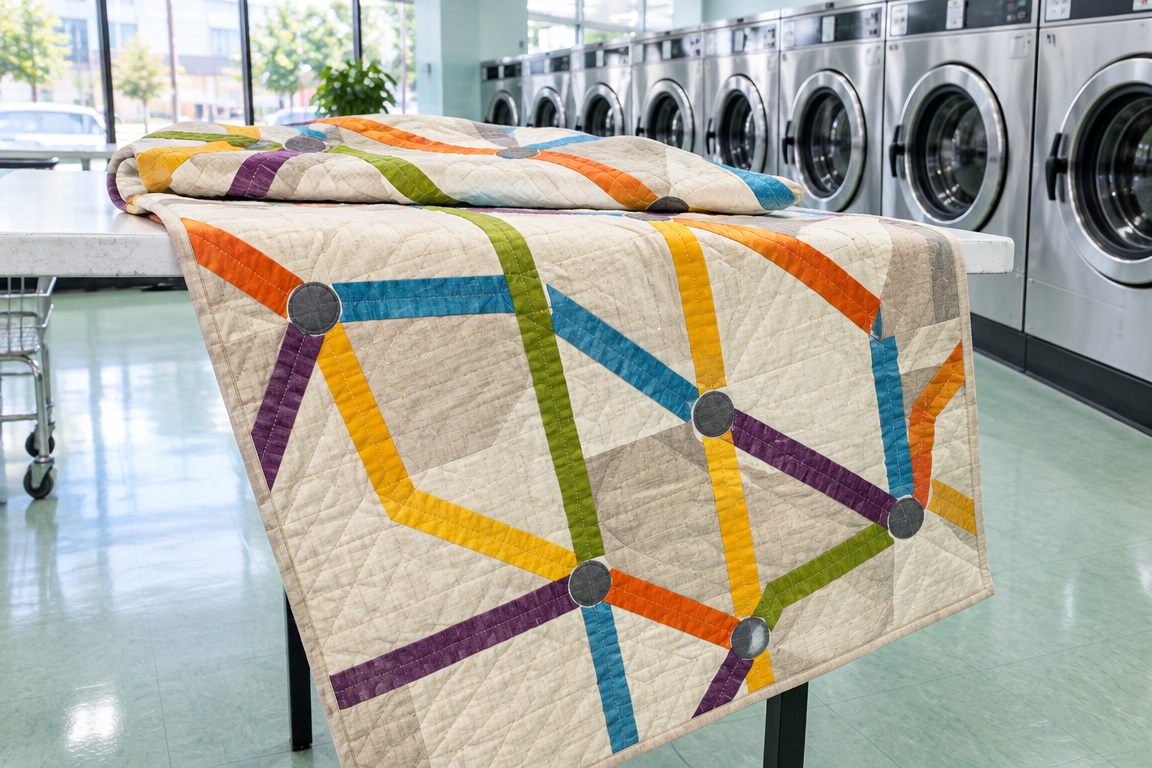
When I finally laid the cream-and-oat ground across a folding table, it felt like a map waiting to be traced.
And yes, I pinned it up mid-fold, because the most honest photos are the ones taken while the quilt is still in motion.
Here’s the design story, the pattern details, and the finishing tips I wish I’d had the first time I pieced a “route” quilt.
SEE A NEW PATTERN HEREWhy Crosstown Transfer Feels Like a Printed Map
The overall look is clean and graphic, with colored strips that travel across a calm cream-and-oat background like transit lines on paper.
I stitched the routes to bend at crisp 45-degree elbows, so the motion stays sharp instead of wiggly.
Small junction circles—appliquéd in slate-grey—add little decision points, the way intersections do when you’re rerouting your day.
One fat downtown ring near the center loops like a lively detour, giving the quilt a “destination” focal moment without crowding the surface.
Strip-Pieced Routes and the Color Play That Makes It Pop
I build each route from long strip sets, then trim them into straight and diagonal segments so the quilt reads like connected lines.
For the route colors, I used persimmon, lake blue, chartreuse, marigold, and plum so every line feels distinct but still blends into the overall map-like rhythm.
The oat sashing acts like cartography margins, keeping the colored routes floating instead of melting into one another.
When the elbows meet, that 45-degree precision makes the angles look intentional, not accidental, and it’s the part that makes me smile every time I rotate the quilt under the light.
Materials for Crosstown Transfer
- Fat quarters for route colors: persimmon, lake blue, chartreuse, marigold, and plum (8 total fat quarters, mix-and-match depending on your strip-set layout)
- Ground fabric: cream and oat (about 2 yards total combined, plus a little extra for backing alignment)
- Sashing fabric in oat: about 1 yard
- Junction circle applique fabric in slate-grey: about 1/2 yard
- Batting: twin/throw size quantity depends on your final quilt size (commonly 60×80 inches, about 2 yards wide by appropriate length)
- Backing: about 3 yards (or 3 1/2 yards for extra wash-and-align ease)
- Binding: about 3/4 yard (or enough for your preferred method and quilt perimeter)
I like to buy a little extra in the route colors because the trimming stage is where layouts become honest and you’ll want wiggle room.
If you’re quilting on a laundromat-table-sized ambition, having extra backing helps you keep everything smooth and square before the sandwich goes together.
Prep Your Workspace Before You Sew the Routes
I clear a wide surface, label my strip bundles by color, and make sure my rotary cutter and ruler feel perfectly aligned before the first cut.
For this quilt, I strongly recommend chain piecing strip sets, pressing consistently in one direction, and then pressing again after assembly so the seams behave during trimming.
Before cutting into diagonals, I double-check that my 45-degree ruler mark is true, because that’s what makes the elbows look crisp instead of slightly rounded.
Once you start segmenting, keep a simple “stack order” so the straight pieces and diagonal pieces land in the right neighborhoods of the layout.
Get the Downloadable Pattern (Full Instructions Below)
The complete sewable layout, route-building steps, applique placement, and quilting guidance are included in the downloadable pattern below the photo.
You’ll piece the strip sets, trim the route segments, add the oat sashing, and finish with the circle junctions, all with the same map clarity this version shows.
Tips for a Cleaner Finish You Can Actually Feel
To keep the route lines crisp, press your seam allowances carefully before assembling each segment set, and avoid stretching the fabric while guiding it through the machine.
When attaching sashing, I line up edges slowly, then stitch with steady hands so the routes keep their clean separation like they’re printed.
For the junction circles, baste first and keep the applique edges smooth, then stitch them down with a tight, consistent seam so they read as little intersection nodes.
Before quilting, I do a quick “fold test” on the top—if the angles want to drift, fix it now while the sandwich is still flexible.
A Slightly More Advanced Twist: Add a Street-Grid Echo
If you want to level up, try diagonal straight-line quilting that follows a faint grid across the whole quilt, so it feels like street directions without overpowering the route design.
You can also echo the downtown ring by quilting a gentle loop in the center panel, keeping the thread path subtle so the appliquéd circle stays the star.
For scrap mixing, consider using tonal pops within each route color family, like a darker chartreuse strip next to a lighter one, as long as the overall route still reads clearly.
Celebrate Your Finish and Map Your Next Project
When Crosstown Transfer is bound and ready, it feels like stepping into a neighborhood where every turn has a purpose and every line connects.
If you loved piecing with direction and rhythm, I hope you’ll browse another quilt adventure on the blog next, because this theme has plenty of room for your own routes to appear.