Spring brings with it the promise of fresh blooms and bright colors, and the Spring Baskets Table Topper captures that spirit perfectly.
Inspired by Lori DeJarnatt’s classic design, this project features charming basket appliqués in vibrant plaids, making it a delightful addition to your spring décor.
Whether you’re a seasoned quilter or looking for a beginner-friendly project, the Spring Baskets Table Topper offers an opportunity to play with color and appliqué techniques while creating something beautiful for your table.
Quilting is all about combining traditional motifs with your unique flair, and the Spring Baskets Table Topper achieves just that.
The mix of plaids and clean, solid white fabric sets a crisp backdrop, allowing the basket appliqués to take center stage. Let’s dive into this cheerful project and bring a touch of spring into your home.
Embrace Springtime with the Spring Baskets Table Topper
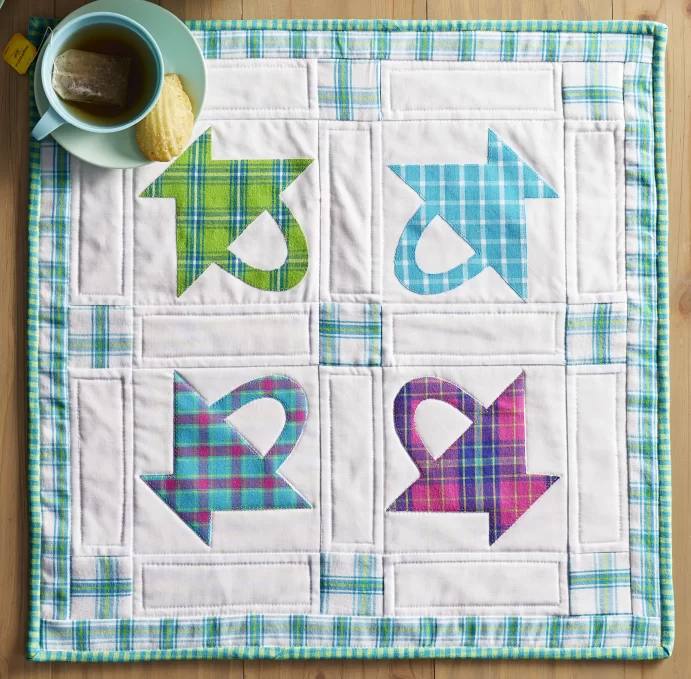
The Spring Baskets Table Topper features four appliquéd basket blocks arranged with neat sashing and borders. This project is inspired by the traditional basket motif, which has long been a favorite in quilting for its charming and versatile design.
With fabrics from the Piccadilly collection, the table topper feels both nostalgic and fresh, perfect for a seasonal update to your dining space.
Materials Needed for the Spring Baskets Table Topper
Finished Size: 21½” square
Finished Block Size: 6″ square
Fabric Requirements:
- Assorted plaids in green, blue, and pink (4 squares, each 7″ for appliqués)
- Solid white fabric: ⅜ yard (for blocks and sashing rectangles)
- Teal plaid fabric: ¼ yard (for sashing squares and border)
- Teal stripe fabric: ⅓ yard (for binding)
- Backing fabric: ⅞ yard
- Batting: 30″ square
- Lightweight fusible web for appliqué
Additional Supplies: Basic sewing tools and supplies
Preparation for the Spring Baskets Table Topper
Before you start cutting, review the pattern and instructions to familiarize yourself with the layout. The Spring Baskets Table Topper relies on accurate cutting and careful appliqué work.
Be sure to trace and cut the basket patterns with precision, allowing for a smooth and enjoyable assembly process. Prepare your fusible web and fabrics in advance to ensure each basket is neatly fused onto the blocks.
Full Pattern: Click Here
Step-by-Step Instructions
Cutting the Fabric
- Trace the Basket Pattern: Lay the fusible web, paper side up, over the basket pattern. Use a pencil to trace the pattern four times, leaving ½” between tracings. Cut out each fusible-web shape roughly ¼” outside the traced lines.
- Fuse the Appliqué Shapes: Following the manufacturer’s instructions, press each fusible-web shape onto the wrong side of your designated fabric squares (assorted plaids). Allow the shapes to cool, then cut out each fabric shape along the drawn lines and peel off the paper backing.
- Cut the Blocks and Sashing:
- From the solid white fabric, cut four 6½” squares for the blocks, and twelve 2½” x 6½” rectangles for the sashing.
- From the teal plaid fabric, cut nine 2½” sashing squares, two 2″ x 21½” border strips, and two 2″ x 18½” border strips.
- From the teal stripe fabric, cut three 2½” x 42″ binding strips.
Appliqué the Blocks
- Fuse the Basket Appliqués: Arrange one plaid basket appliqué on a solid white 6½” square, as shown in the Block Assembly Diagram. Carefully fuse the appliqué in place, ensuring the basket is centered and aligned.
- Stitch the Appliqué: Using thread that matches the basket fabric, machine-zigzag stitch around the edges of the appliqué to secure it. This stitch adds durability while giving the blocks a polished finish.
- Repeat for All Blocks: Follow these steps to create a total of four appliqué blocks.
Assemble the Table Topper Top
- Layout the Blocks and Sashing: Refer to the Table Topper Assembly Diagram and arrange the blocks with the solid white sashing rectangles and teal plaid sashing squares into five rows.
- Sew the Rows Together: Stitch the pieces together in each row, pressing the seams toward the sashing rectangles. Join the rows together, pressing the seams toward the sashing rows to complete the table topper center, which should measure 18½” square.
- Attach the Borders: Sew the teal plaid 2″ x 18½” border strips to the opposite edges of the table topper center. Then, sew the 2″ x 21½” border strips to the remaining edges to finish the top of your Spring Baskets Table Topper.
Finishing the Spring Baskets Table Topper
- Layer the Quilt: Place the table topper top, batting, and backing fabric together. Baste the layers with pins or spray adhesive to hold them in place.
- Quilt as Desired: For this project, Diane Tomlinson machine-quilted ¼” inside each sashing rectangle to add a subtle, neat quilting design. Feel free to choose a quilting design that complements your fabric choices and skill level.
- Attach the Binding: Join the binding strips at the short ends to create a continuous strip. Fold the binding in half lengthwise with wrong sides together and press. Sew the binding to the table topper edges, mitering the corners, then fold the binding to the back and stitch it in place for a polished finish.
Welcome Spring with the Spring Baskets Table Topper
The Spring Baskets Table Topper is a charming way to welcome the fresh energy of spring into your home. This project blends traditional basket motifs with cheerful plaid fabrics, resulting in a table topper that feels both classic and modern.
Whether you’re displaying it at a family gathering or using it to brighten up a cozy breakfast nook, the Spring Baskets Table Topper adds a touch of seasonal charm to any space.
As you create your Spring Baskets Table Topper, take joy in the process of blending colors and patterns. Let this project remind you of the simple pleasures of springtime and the timeless art of quilting. Happy quilting!

