Hey there fellow quilters!
I’m so excited to share this vibrant and festive adventure with you today!
As the holiday season approaches, I often reminisce about cozy get-togethers, the smell of cookies baking, and the joy of creating handmade treasures.
It’s in this spirit that I stumbled upon the Snow-Kissed Star quilt pattern.
When I first saw it, the frosty colors and joyful prints instantly made my heart sing!
I couldn’t wait to get my hands on those fabrics and start stitching.
Whipping up this quilt has been an extraordinary journey.
It’s not just about pulling out my sewing machine; it’s about creating a warmth that fills my home and hearts of my loved ones.
I remember the satisfaction of piecing together each block, seeing those triangles come to life, and imagining the delight on everyone’s faces when they receive such a heartfelt gift.
Today, I’m here to walk you through the process of making the Snow-Kissed Star quilt.
Let’s get started!
A Cozy Quilt for a Merry Kissmas
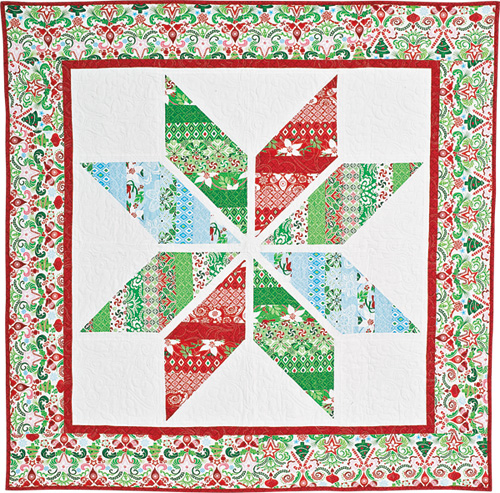
The Snow-Kissed Star quilt is an intermediate-level project with a finished size of 56 inches by 56 inches.
It features a combination of pieced triangle blocks and double triangles that dance together to form stunning star patterns.
Designed with fabrics from the delightful Flurry collection by Kate Spain for Moda, this quilt truly captures the essence of winter festivities!
The use of assorted prints grouped by color adds to its charm and visual interest, creating an enchanting star that’s sure to shine bright.
When making the Snow-Kissed Star quilt, you have the option of using a Jelly Roll, which is a convenient way to grab a range of fabric prints.
Or you can mix and match your colors if you’re feeling adventurous!
Either way, this quilt is perfect for brightening up your holiday season and adding a touch of handmade charm to your home.
You’ll find that every stitch helps to recreate those warm and joyful memories of Christmas.
Getting Your Patchwork Supplies Ready
- 10 assorted green, 4 assorted red, and 5 assorted aqua jelly roll strips.
- 1 yard of red texture fabric for blocks, inner border, and binding.
- 1.5 yards of white solid fabric for blocks, squares, and sashing.
- 1.75 yards of white/multicolor large print for the outer border.
- 3.5 yards of backing fabric.
- 64″ x 64″ batting.
- A square acrylic ruler (12″ x 12″ or larger).
These materials will set you on the path to creating your own Snow-Kissed Star quilt masterpiece.
It’s always a thrill to gather your supplies; it feels like you’re preparing for a delightful treasure hunt.
So, get ready to experience the joy and satisfaction that comes from picking out each beautiful fabric!
Before diving into the quilt-making process, I recommend taking a moment to cut and organize your pieces.
Good preparation is key to a smooth sewing experience.
Once you have all your fabric cuts ready according to the pattern, you’ll minimize any confusion when it’s time to start stitching!
Let’s Get Stitching!
Below, you’ll find step-by-step instructions for creating the Snow-Kissed Star quilt.
For the complete pattern and diagrams, be sure to check out the link below this image.
Remember, each stitch is a step towards creating something beautiful and meaningful!
Full Pattern: Click Here
Additional Stitching Tips
As you work on your Snow-Kissed Star quilt, remember to take your time.
Binding those colorful triangles together is what brings the whole quilt to life!
Don’t hesitate to call out any piecing issues or fabric fighting back; it’s all part of the quilting adventure!
And if you find a little mistake, that’s perfectly okay—we’re all in this together!
Keep your sewing space organized with your quilt blocks arranged based on their layout.
This helps you visualize the quilt as you assemble each section, and you’ll have a much more enjoyable experience as you see your quilt coming together with each sewn seam.
Exploring Advanced Quilt Techniques
As you delve into the making of the Snow-Kissed Star quilt, think about experimenting with advanced techniques to enhance the beauty of your quilt.
Consider adding a layer of quilting designs on top of your pieced blocks.
Utilizing stencils or free-motion quilting allows for personalization that adds another wonderful touch to your masterpiece.
Don’t shy away from basting your quilt layers for easier quilting.
Taking the time to layer your batting, backing, and quilt top properly can set the tone for a beautifully finished aesthetic.
Plus, it’s a great opportunity to show off your skills and creativity!
Celebrate Your Quilting Journey!
As we wrap up, I hope you’re feeling as excited about the Snow-Kissed Star quilt as I did when I first laid eyes on it.
This project isn’t just about the finished product; it’s about celebrating the joy of creativity and connection that quilting fosters.
With every stitch you make, you’re weaving love into something special that can be passed down or cherished during the holiday season.
If you’re eager to explore more amazing patterns and creative ideas, make sure to dive into the treasure trove of articles available on the blog!
I’ve got an incredible piece you can enjoy by clicking this link.
Thank you for joining me on this quilting journey, and let’s keep spreading warmth, one quilt at a time!


