There’s something undeniably magical about the winter season that makes me want to create cozy spaces filled with warmth and love.
Last year, I decided to whip up an Evergreen lap throw, and I can’t tell you enough how fabulous it feels to snuggle under a quilt you’ve made yourself.
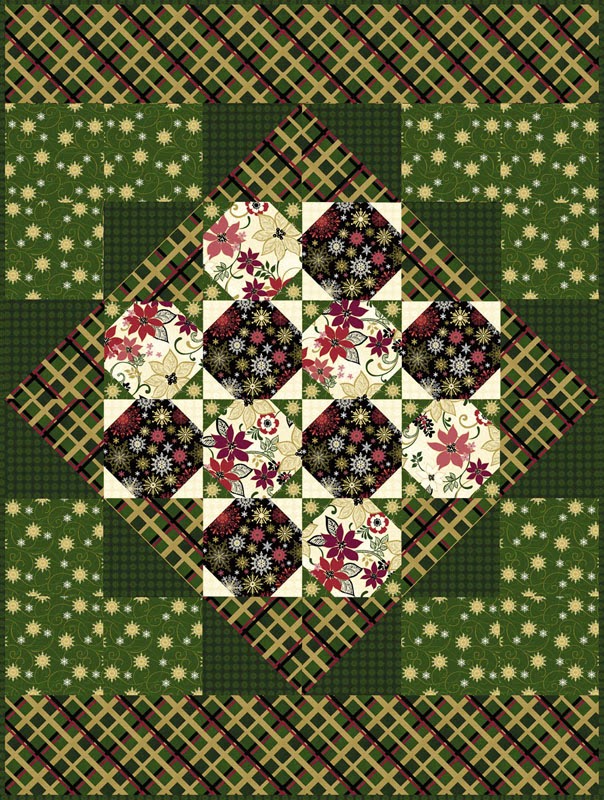
The combination of that gorgeous Christmas Spectacular fabric collection and those delightful metallic accents truly brings the holidays into your home.
Plus, let’s be honest—who doesn’t love the glitter and glam during this festive time?
As I crafted the Evergreen lap throw, I felt like I was painting my dreams onto fabric!
Every stitch represented my excitement for the holidays, from the snowflakes that danced across the fabric to the plush Minkee backing that keeps you warm and snug.
Seriously, this quilt is not just an object, but a whole experience!
If you’re ready to dive into the enchanting world of quilting with me, let’s get started on making your own Evergreen lap throw!
Finding Joy in Fabrics
When embarking on the journey of creating your Evergreen lap throw, starting with the right fabrics is essential.
The Christmas Spectacular collection by Kitty Yoshida truly captures the essence of holiday cheer, setting the foundation for your quilt.
Choosing fabrics that resonate with you not only makes the process enjoyable but also allows your quilt to reflect your personal style.
The stunning mix of colors will evoke feelings of celebration!
Don’t forget the metallic accents!
They add a touch of elegance to your Evergreen lap throw and catch the light beautifully.
When you spread your quilt out, these accents will twinkle in the holiday lights, creating that perfect ambiance for cozy nights at home.
It’s these little details that truly transform a quilt into a cherished item!
Understanding Quilt Components
Before you jump in and start sewing, let’s take a moment to discuss the construction of the Evergreen lap throw.
Key components include Half Square Triangles (HSTs), blocks, and the border assembly.
Understanding each part of the quilt helps ensure that your efforts will shine through in the finished piece!
Each block you create serves as a building block for your final design.
When assembling the blocks of your Evergreen lap throw, play around with the layout before you sew everything together.
This allows you to adjust and customize the design to your heart’s content.
It’s an excellent phase of the project where the creative juices really flow, and you can visualize how the colors and patterns will come together!
Materials You’ll Need
- Fabric from the Christmas Spectacular collection (e.g.C, D, A, B, E, F fabrics).
- Minkee fabric for the backing to keep it super snuggly.
- Batting (make sure it’s 3 inches larger than your final quilt size).
- Thread that matches or complements your fabric choices.
- A cutting mat, rotary cutter, and quilting ruler for precise cuts.
- Sewing machine (because let’s be honest, hand-sewing this whole thing would take ages!).
Prepping for the Evergreen Adventure
Before diving into creating your Evergreen lap throw, prepping your materials is a step you shouldn’t overlook.
Pre-wash your fabrics to get rid of any excess dye and to pre-shrink them!
This way, the beauty of your quilt lasts long after it’s finished, and you won’t experience any unexpected surprises after the first wash.
Plus, who wants a quilt that changes size after a wash, right?
Also, cut out all your squares and HSTs before you sew.
This little prep work not only streamlines the process but also allows you to visualize the whole project better.
You’ll be amazed at how much easier and enjoyable it is to jump right into sewing when everything is already prepped and at your fingertips!
Step-By-Step Instructions:
Now that you’re all prepped and ready, we’ll dive into the following instructions to create your Evergreen lap throw!
Remember, below is a general guideline, and you can find the full pattern at the link provided.
If you ever need to reference the complete details, don’t hesitate to check the link!
Full Pattern: Click Here
Additional Tips for Success
As you put your Evergreen lap throw together, remember to have patience with yourself!
Quilting can sometimes feel daunting; however, take it step by step.
If you’re running into trouble with measuring or piecing together blocks, just take a breath and step away for a moment.
It can do wonders!
Also, don’t be afraid to use fabric clips instead of pins for those bulky sections; they can be a game-changer!
Be meticulous when sewing those blocks together—keeping your seams even is key.
If possible, use a quarter-inch foot on your sewing machine to help maintain that consistent seam allowance.
This attention to detail can significantly impact the overall look of your Evergreen lap throw when it’s complete!
Advanced Techniques to Explore
For those of you who enjoy exploring advanced techniques, consider adding some embroidery or appliqué to your Evergreen lap throw!
Personalizing your quilt adds even more charm and gives it a unique touch that guests will adore.
Whether it’s adding festive phrases or decorative motifs, every stitch enhances the warmth and love that embodies holiday spirit.
Incorporating these advanced techniques can elevate your project.
It’s not about being perfect, but about allowing your creativity to flow and truly make this quilt your own.
Have fun with it, and celebrate the quilting journey!
Celebrate Your Creative Heart
As we wrap up this journey of crafting your Evergreen lap throw, remember to take a moment to appreciate your hard work.
Each stitch is a reminder of creativity, warmth, and the holiday spirit that will bring joy to your home for years to come.
Holding your completed quilt is a testament to your skills and dedication.
You’ve done an amazing job!
If you’re eager for more inspiration, be sure to explore the other articles on my blog—they’re filled with fantastic projects to ignite your creativity!
I’ve prepared an incredible piece that you can discover by clicking here.
Let’s continue this crafty journey together!


