Quilting is a journey that intertwines creativity, patience, and tradition.
It’s a journey that takes you through the realms of colors, patterns, and textures.
One of my earliest quilting memories is of my grandmother teaching me how to piece together a Half-Square Triangle Star Quilt.
This traditional quilt block, with its simple yet elegant design, was my first foray into the world of quilting.
Today, I want to take you on a detailed journey of creating your own Half-Square Triangle Star Quilt, a pattern that’s perfect for both beginners and seasoned quilters.
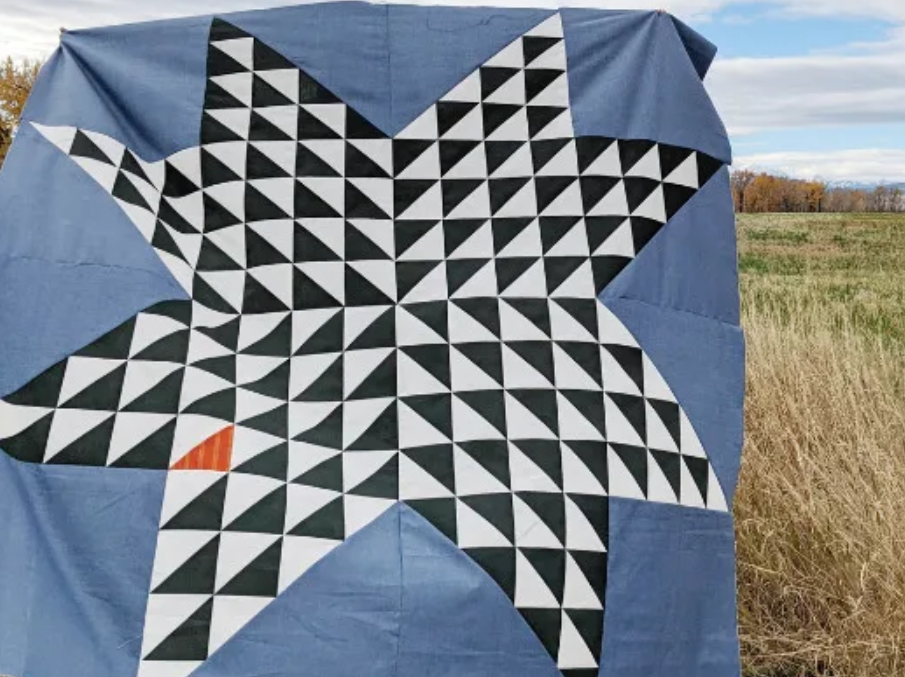
The Half-Square Triangle Star Quilt: A Closer Look
The Half-Square Triangle Star Quilt is a classic, traditional quilt block that’s been a staple in the quilting world for generations.
The beauty of this block lies in its simplicity – it’s a simple star within a square design that’s perfect for showcasing a variety of fabrics.
Despite its simplicity, the finished block creates a stunning visual effect, especially when multiple blocks are combined to create a larger quilt.
The finished block measures 18″ x 18″, making it an ideal size for a mini quilt or a larger quilt when multiple blocks are combined.
Materials Needed
Creating a Half-Square Triangle Star Quilt is a relatively straightforward process that doesn’t require a vast array of materials. To create a Half-Square Triangle Star Quilt, you will need:
- Binding fabric: The amount of fabric needed will depend on the size of your quilt. As a general rule, you will need enough fabric to cut strips that can go around the entire perimeter of your quilt. I typically cut my binding strips 2 ½” wide.
- Sewing machine: You will need a sewing machine to attach the binding to your quilt. I highly recommend using a machine with a walking foot, as it can help ensure that your binding is sewn on evenly.
- Thread: I recommend using 100% cotton thread, especially if your quilt is made of cotton fabric. Polyester thread may cut through the cotton layers over time.
- Cutting tools: You will need a rotary cutter and a quilting ruler to cut your binding strips. A cutting mat is also helpful to protect your work surface and ensure accurate cuts.
- Iron: An iron is essential for pressing your seams and your binding.
Step-by-Step Instructions
Step 1: Cutting the Fabric
Start by cutting your fabric. For a double binding, cut your binding strips 2 ½” wide. You can cut your strips across the width of the fabric yardage, or cut them on the bias, which means to cut them diagonally across the fabric. If you’re going to have any kind of curved or scalloped edge to your quilt, you will need a bias binding.
Step 2: Preparing the Binding
After cutting, trim the selvage edges off of all strips and sew them end to end with a ¼” seam allowance to create one long strip. Press connecting seams open (so you don’t have bulk) and then fold in half lengthwise and press.
Step 3: Trimming the Quilt
Use a ruler and rotary cutter and the quilt top as a guide, trimming the excess batting and quilt back layers for a clean, straight edge. Be careful to keep the quilt’s sides square.
Step 4: Pinning the Binding
Pin the raw edges (non-folded-edge) to the raw outside edges of your quilt front. This is personal preference, but I like to pin the entire binding to the entire quilt before I sew it down. This helps keep the binding taught and prevents potential wavy quilt edges later.
Step 5: Mitering the Corners
When you come to the corner put a pin in the corner at a 45-degree angle. Fold strip to the side at that same 45-degree angle. Now fold the strip back on it self with the fold at the first edge of the quilt and matching up the binding edges to the edge of the second side of the quilt. Place one more pin on the new side at a 45-degree angle. This will create a little triangle flap of fabric in the corner. Repeat at all four corners. When the strip gets back around to the beginning fold the ends down so that the strips meet-up. Press with your iron to make a crease at both folds. Trim both ends to ¼” away from the folds.
Full Pattern: Click Here
The Half-Square Triangle Star Quilt is a classic, traditional quilt block that’s been a staple in the quilting world for generations. The beauty of this block lies in its simplicity – it’s a simple star within a square design that’s perfect for showcasing a variety of fabrics. Despite its simplicity, the finished block creates a stunning visual effect, especially when multiple blocks are combined to create a larger quilt. The finished block measures 18″ x 18″, making it an ideal size for a mini quilt or a larger quilt when multiple blocks are combined. So why wait? Grab your fabrics and start your quilting journey with the Half-Square Triangle Star Quilt today!


